NEC PX-42M3A PlasmaSync 4200W - Page 24
Picture/Sound Settings Menu
 |
View all NEC PX-42M3A manuals
Add to My Manuals
Save this manual to your list of manuals |
Page 24 highlights
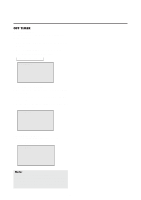
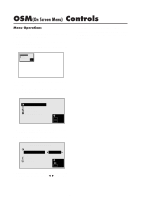
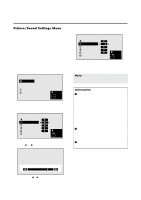
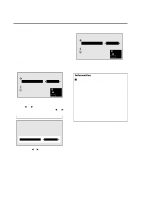
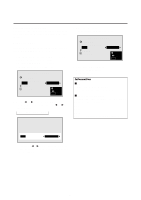
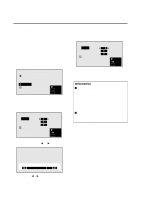
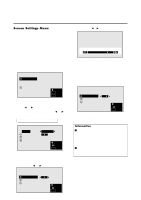
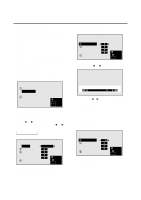
Picture/Sound Settings Menu Adjusting the picture The contrast, brightness, sharpness, color and tint can be adjusted as desired. Example: Adjusting the brightness Press the MENU button on the remote controller to display the MAIN MENU on the screen, then... 1. Use the v and w buttons to select "PICTURE/ SOUND", then press the "OK" button. The "PICTURE/SOUND" screen appears. 2. Use the v and w buttons to select "PICTURE", then press the "OK" button. PICTURE/SOUND PICTURE PICTURE MODE : N R : SOUND RETURN MEMORY NR-1 SEL. O K OK MENU EXIT The "PICTURE" screen appears. 3. To adjust the brightness ... Use the v and w buttons to select "BRIGHTNESS". PICTURE CONTRAST : BRIGHTNESS: SHARPNESS : COLOR : TINT : RETURN SEL. ADJ. MENU EXIT 4. Use the ᮤ and ᮣ buttons to adjust the picture. 5. Press the "OK" button. The brightness adjustment is completed. PICTURE CONTRAST : BRIGHTNESS: SHARPNESS : COLOR : TINT : RETURN SEL. ADJ. MENU EXIT 6 Once the adjustment is completed ... Press the "MENU" button. All menus disappear. Note: If "CAN NOT ADJUST" appears ... When trying to enter the PICTURE submenu, make sure PICTURE MODE is set to MEMORY. Information Ⅵ Picture adjustment screen CONTRAST ....... Changes the picture's contrast. BRIGHTNESS .... Changes the picture's brightness. SHARPNESS ..... Changes the picture's sharpness. Adjust for the desired sharpness. COLOR Changes the color density. TINT Changes the picture's tint. (NTSC only) Adjust for natural colored skin, background, etc. Ⅵ Adjusting the computer image Only the contrast and brightness can be adjusted when a computer signal is connected. Ⅵ Restoring the factory default settings Select "RESET" under the picture mode settings. BRIGHTNESS * If neither the ᮤ or ᮣ button is pressed within 5 seconds, the current setting is set and the previous screen reappears. 19
-
 1
1 -
2
-
3
-
4
-
5
-
6
-
7
-
8
-
9
-
10
-
11
-
12
-
13
-
14
-
15
-
16
-
17
-
18
-
 19
19 -
 20
20 -
 21
21 -
 22
22 -
 23
23 -
 24
24 -
 25
25 -
 26
26 -
 27
27 -
 28
28 -
 29
29 -
30
-
31
-
32
-
33
-
34
-
35
-
36
-
37
-
38
-
39
-
40
-
41
-
42
-
43
-
44
 |
 |
