Netgear GS716Tv2 GS716Tv2/GS724Tv3 Software Admin Manual - Page 21
Manually Assigning Network Parameters, Discover, Configuration Setting, Disable
 |
View all Netgear GS716Tv2 manuals
Add to My Manuals
Save this manual to your list of manuals |
Page 21 highlights
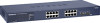
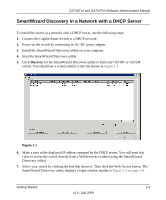
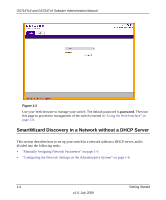
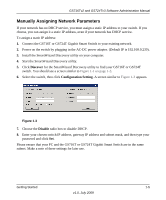
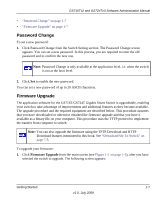
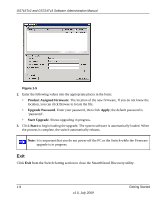
GS716Tv2 and GS724Tv3 Software Administration Manual Manually Assigning Network Parameters If your network has no DHCP service, you must assign a static IP address to your switch. If you choose, you can assign it a static IP address, even if your network has DHCP service. To assign a static IP address: 1. Connect the GS716T or GS724T Gigabit Smart Switch to your existing network. 2. Power on the switch by plugging in the AC-DC power adapter. (Default IP is 192.168.0.239), 3. Install the SmartWizard Discovery utility on your computer. 4. Start the SmartWizard Discovery utility. 5. Click Discover for the SmartWizard Discovery utility to find your GS716T or GS724T switch. You should see a screen similar to Figure 1-1 on page 1-3. 6. Select the switch, then click Configuration Setting. A screen similar to Figure 1-3 appears. Figure 1-3 7. Choose the Disable radio box to disable DHCP. 8. Enter your chosen switch IP address, gateway IP address and subnet mask, and then type your password and click Set. Please ensure that your PC and the GS716T or GS724T Gigabit Smart Switch are in the same subnet. Make a note of these settings for later use. Getting Started 1-5 v1.0, July 2009
-
 1
1 -
2
-
3
-
4
-
5
-
6
-
7
-
8
-
9
-
10
-
11
-
12
-
13
-
14
-
15
-
 16
16 -
 17
17 -
 18
18 -
 19
19 -
 20
20 -
 21
21 -
 22
22 -
 23
23 -
 24
24 -
 25
25 -
 26
26 -
27
-
28
-
29
-
30
-
31
-
32
-
33
-
34
-
35
-
36
-
37
-
38
-
39
-
40
-
41
-
42
-
43
-
44
-
45
-
46
-
47
-
48
-
49
-
50
-
51
-
52
-
53
-
54
-
55
-
56
-
57
-
58
-
59
-
60
-
61
-
62
-
63
-
64
-
65
-
66
-
67
-
68
-
69
-
70
-
71
-
72
-
73
-
74
-
75
-
76
-
77
-
78
-
79
-
80
-
81
-
82
-
83
-
84
-
85
-
86
-
87
-
88
-
89
-
90
-
91
-
92
-
93
-
94
-
95
-
96
-
97
-
98
-
99
-
100
-
101
-
102
-
103
-
104
-
105
-
106
-
107
-
108
-
109
-
110
-
111
-
112
-
113
-
114
-
115
-
116
-
117
-
118
-
119
-
120
-
121
-
122
-
123
-
124
-
125
-
126
-
127
-
128
-
129
-
130
-
131
-
132
-
133
-
134
-
135
-
136
-
137
-
138
-
139
-
140
-
141
-
142
-
143
-
144
-
145
-
146
-
147
-
148
-
149
-
150
-
151
-
152
-
153
-
154
-
155
-
156
-
157
-
158
-
159
-
160
-
161
-
162
-
163
-
164
-
165
-
166
-
167
-
168
-
169
-
170
-
171
-
172
-
173
-
174
-
175
-
176
-
177
-
178
-
179
-
180
-
181
-
182
-
183
-
184
-
185
-
186
-
187
-
188
-
189
-
190
-
191
-
192
-
193
-
194
-
195
-
196
-
197
-
198
-
199
-
200
-
201
-
202
-
203
-
204
-
205
-
206
-
207
-
208
-
209
-
210
-
211
-
212
-
213
-
214
-
215
-
216
-
217
-
218
-
219
-
220
-
221
-
222
-
223
-
224
-
225
-
226
-
227
-
228
-
229
-
230
-
231
-
232
-
233
-
234
-
235
-
236
-
237
-
238
-
239
-
240
-
241
-
242
-
243
-
244
-
245
-
246
 |
 |
