Netgear PR2000 User Manual (Non-Cellular Version) - Page 114
On the Wireless Card Access List screen, click the, Set Up Access List, Turn Access Control On, Apply
 |
View all Netgear PR2000 manuals
Add to My Manuals
Save this manual to your list of manuals |
Page 114 highlights
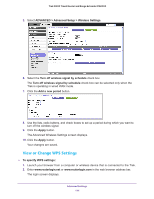
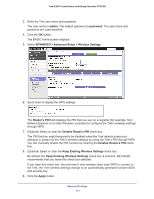
Trek N300 Travel Router and Range Extender PR2000 6. Scroll down and click the Set Up Access List button. 7. On the Wireless Card Access List screen, click the Add button. The Wireless Card Access Setup screen opens and displays a list of currently active wireless cards and their Ethernet MAC addresses. 8. If the computer or device you want is in the Available Wireless Cards list, select that radio button; otherwise, type a name and the MAC address. You can usually find the MAC address on the label of the wireless device. Tip: You can copy and paste the MAC addresses from the Attached Devices screen into the MAC Address field of this screen. To do this, use each wireless computer to join the wireless network. The computer then appears in the Attached Devices screen. For more information about the attached devices, see Attached Devices on page 44. 9. Click the Add button. The screen changes back to the list screen. 10. Add each computer or device that you want to allow to connect wirelessly. 11. Select the Turn Access Control On check box. 12. Click the Apply button. To edit a wireless device or delete it from the access list: 1. Launch your browser from a computer or wireless device that is connected to the Trek. 2. Enter www.routerlogin.net or www.routerlogin.com in the web browser address bar. The login screen displays. 3. Enter the Trek user name and password. The user name is admin. The default password is password. The user name and password are case-sensitive. Advanced Settings 114
-
 1
1 -
2
-
3
-
4
-
5
-
6
-
7
-
8
-
9
-
10
-
11
-
12
-
13
-
14
-
15
-
16
-
17
-
18
-
19
-
20
-
21
-
22
-
23
-
24
-
25
-
26
-
27
-
28
-
29
-
30
-
31
-
32
-
33
-
34
-
35
-
36
-
37
-
38
-
39
-
40
-
41
-
42
-
43
-
44
-
45
-
46
-
47
-
48
-
49
-
50
-
51
-
52
-
53
-
54
-
55
-
56
-
57
-
58
-
59
-
60
-
61
-
62
-
63
-
64
-
65
-
66
-
67
-
68
-
69
-
70
-
71
-
72
-
73
-
74
-
75
-
76
-
77
-
78
-
79
-
80
-
81
-
82
-
83
-
84
-
85
-
86
-
87
-
88
-
89
-
90
-
91
-
92
-
93
-
94
-
95
-
96
-
97
-
98
-
99
-
100
-
101
-
102
-
103
-
104
-
105
-
106
-
107
-
108
-
 109
109 -
 110
110 -
 111
111 -
 112
112 -
 113
113 -
 114
114 -
 115
115 -
 116
116 -
 117
117 -
 118
118 -
 119
119 -
120
-
121
-
122
-
123
-
124
-
125
-
126
-
127
-
128
-
129
-
130
-
131
-
132
-
133
-
134
-
135
-
136
-
137
-
138
-
139
-
140
-
141
-
142
-
143
-
144
-
145
 |
 |
