Netgear PR2000 User Manual (Non-Cellular Version) - Page 24
NETGEAR genie Setup, Wireless network key or password, To use NETGEAR genie to set up your Trek
 |
View all Netgear PR2000 manuals
Add to My Manuals
Save this manual to your list of manuals |
Page 24 highlights
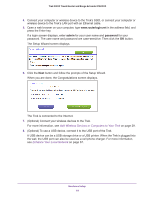
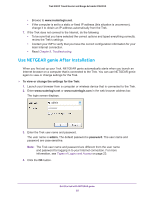
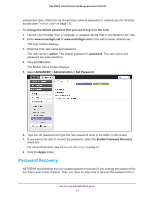
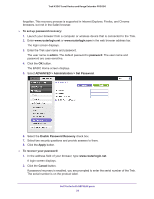
Trek N300 Travel Router and Range Extender PR2000 • Wireless network key or password. Your Trek is preset with a unique wireless network name (SSID) and password for wireless access. This information is on the product label. NETGEAR genie Setup NETGEAR genie runs on any computer or device with a web browser. It is the easiest way to set up the Trek because it automates many of the steps and verifies that those steps have been successfully completed. It takes about 15 minutes to complete. To use NETGEAR genie to set up your Trek: 1. Turn on the Trek by moving the Internet via switch to one of the following positions: • Wired. For an Internet connection with an Ethernet cable • Wireless. For a wireless Internet connection For information about the Internet via switch, see Internet Mode Switch on page 9. 2. Make sure that your Trek is cabled correctly. If you want to connect to the Internet with an Ethernet cable, make sure that you have connected an Ethernet cable between the Internet/LAN port of the Trek and the Ethernet port of your DSL or cable modem. For more information, see Internet Connection at Home Setup on page 18. 3. Make sure that your device is connected with an Ethernet cable to your Trek. You can also connect your device wirelessly to your Trek. For more information, see Add Wireless Devices or Computers to Your Trek on page 29. 4. Launch your Internet browser in one of the following ways. • The first time you set up the Internet connection for your Trek, the browser automatically goes to www.routerlogin.net, and the NETGEAR genie screen displays. • If you already used the NETGEAR genie, type www.routerlogin.net in the address field for your browser to display the NETGEAR genie screen. See Use NETGEAR genie After Installation on page 25. 5. Follow the instructions on the screen to complete the NETGEAR genie setup. NETGEAR genie guides you through connecting the Trek to the Internet. For more information about your Internet connection choices, see Different Ways You Can Connect to the Internet on page 14. 6. If the browser cannot display the web page, do the following. • Make sure that the computer is connected to the LAN Ethernet port or wirelessly to the Trek. • Make sure that the Trek is running. If it is, its WiFi LED is lit. • Close and reopen the browser to make sure that the browser does not cache the previous page. Get Started with NETGEAR genie 24
-
 1
1 -
2
-
3
-
4
-
5
-
6
-
7
-
8
-
9
-
10
-
11
-
12
-
13
-
14
-
15
-
16
-
17
-
18
-
 19
19 -
 20
20 -
 21
21 -
 22
22 -
 23
23 -
 24
24 -
 25
25 -
 26
26 -
 27
27 -
 28
28 -
 29
29 -
30
-
31
-
32
-
33
-
34
-
35
-
36
-
37
-
38
-
39
-
40
-
41
-
42
-
43
-
44
-
45
-
46
-
47
-
48
-
49
-
50
-
51
-
52
-
53
-
54
-
55
-
56
-
57
-
58
-
59
-
60
-
61
-
62
-
63
-
64
-
65
-
66
-
67
-
68
-
69
-
70
-
71
-
72
-
73
-
74
-
75
-
76
-
77
-
78
-
79
-
80
-
81
-
82
-
83
-
84
-
85
-
86
-
87
-
88
-
89
-
90
-
91
-
92
-
93
-
94
-
95
-
96
-
97
-
98
-
99
-
100
-
101
-
102
-
103
-
104
-
105
-
106
-
107
-
108
-
109
-
110
-
111
-
112
-
113
-
114
-
115
-
116
-
117
-
118
-
119
-
120
-
121
-
122
-
123
-
124
-
125
-
126
-
127
-
128
-
129
-
130
-
131
-
132
-
133
-
134
-
135
-
136
-
137
-
138
-
139
-
140
-
141
-
142
-
143
-
144
-
145
 |
 |
