Netgear PR2000 User Manual (Non-Cellular Version) - Page 81
Set Up a Network Printer, guest, To access the USB drive with ReadySHARE access from the Internet
 |
View all Netgear PR2000 manuals
Add to My Manuals
Save this manual to your list of manuals |
Page 81 highlights
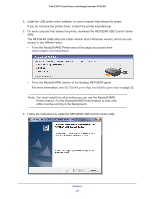
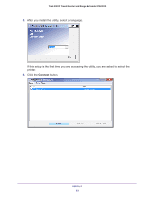
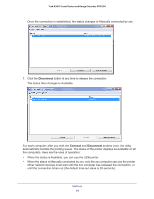
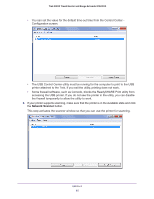
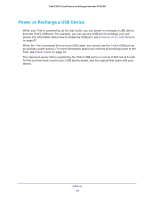
Trek N300 Travel Router and Range Extender PR2000 If you are using Dynamic DNS, you can type the DNS name rather than the IP address. 3. Type the account name and password for the account that has access rights to the USB drive. The user name (account name) for All - no password is guest. The directories of the USB drive that your account has access to display. For example, you could see share/partition1/directory1. You can now read and copy files from the USB directory. To access the USB drive with ReadySHARE access from the Internet: You can access your USB device in any of the following ways: • On Windows 7, Windows 8, Windows XP, Windows Vista, and Windows 2000 systems, select Start > Run, and enter \\readyshare in the dialog box. Click the OK button. • On Windows 7, Windows 8, Windows XP, Windows Vista, and Windows 2000 systems, open Internet Explorer or Safari, and enter \\readyshare in the address bar. • On Mac OS X (version 10.2 or later), enter smb://readyshare in the address bar. • In My Network Places, enter \\readyshare in the address bar. For more information about ReadySHARE access for USB storage devices, visit www.netgear.com/readyshare. Set Up a Network Printer The ReadySHARE Printer utility allows you to control from your computer a shared USB printer that is connected to the USB port on your Trek. You can share this USB printer among the Windows and Mac computers on your network. You must install this utility before you can use the ReadySHARE Printer feature. For this feature to work, the following conditions must be met: • This utility must be installed and running in the background on each computer from which you want to control this USB printer. • The driver software for the USB printer must be installed on each computer from which you want to control this USB printer. The ReadySHARE Printer utility has both a Mac version and a Windows version. The ReadySHARE Printer utility setup file and instructions are available at www.netgear.com/readyshare. After you install the ReadySHARE Printer utility, it displays on your computer as the NETGEAR USB Control Center. To set up ReadySHARE Printer: 1. Using a USB printer cable, connect a USB printer to the Trek's USB port. For information about how to locate the USB port, see Enhance Your Local Network on page 67. USB Port 81
-
 1
1 -
2
-
3
-
4
-
5
-
6
-
7
-
8
-
9
-
10
-
11
-
12
-
13
-
14
-
15
-
16
-
17
-
18
-
19
-
20
-
21
-
22
-
23
-
24
-
25
-
26
-
27
-
28
-
29
-
30
-
31
-
32
-
33
-
34
-
35
-
36
-
37
-
38
-
39
-
40
-
41
-
42
-
43
-
44
-
45
-
46
-
47
-
48
-
49
-
50
-
51
-
52
-
53
-
54
-
55
-
56
-
57
-
58
-
59
-
60
-
61
-
62
-
63
-
64
-
65
-
66
-
67
-
68
-
69
-
70
-
71
-
72
-
73
-
74
-
75
-
 76
76 -
 77
77 -
 78
78 -
 79
79 -
 80
80 -
 81
81 -
 82
82 -
 83
83 -
 84
84 -
 85
85 -
 86
86 -
87
-
88
-
89
-
90
-
91
-
92
-
93
-
94
-
95
-
96
-
97
-
98
-
99
-
100
-
101
-
102
-
103
-
104
-
105
-
106
-
107
-
108
-
109
-
110
-
111
-
112
-
113
-
114
-
115
-
116
-
117
-
118
-
119
-
120
-
121
-
122
-
123
-
124
-
125
-
126
-
127
-
128
-
129
-
130
-
131
-
132
-
133
-
134
-
135
-
136
-
137
-
138
-
139
-
140
-
141
-
142
-
143
-
144
-
145
 |
 |
