Netgear PR2000 User Manual (Non-Cellular Version) - Page 116
Static Routes, admin, password, ADVANCED > Advanced Setup > Dynamic DNS, Service Provider
 |
View all Netgear PR2000 manuals
Add to My Manuals
Save this manual to your list of manuals |
Page 116 highlights
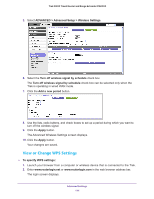
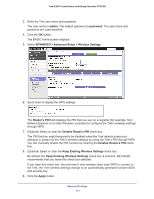
Trek N300 Travel Router and Range Extender PR2000 2. Enter www.routerlogin.net or www.routerlogin.com in the web browser address bar. The login screen displays. 3. Enter the Trek user name and password. The user name is admin. The default password is password. The user name and password are case-sensitive. 4. Click the OK button. The BASIC Home screen displays. 5. Select ADVANCED > Advanced Setup > Dynamic DNS. 6. Register for an account with one of the Dynamic DNS service providers whose URLs are in the Service Provider list. 7. Select the Use a Dynamic DNS Service check box. 8. Select the URL of your Dynamic DNS service provider. For example, for DynDNS.org, select www.DynDNS.org. 9. Type the host name (or domain name) that your Dynamic DNS service provider gave you. 10. Type the user name for your Dynamic DNS account. Enter the name that you use to log in to your account, not your host name. 11. Type the password (or key) for your Dynamic DNS account. 12. Click the Apply button. Your changes are saved. Static Routes Static routes provide more routing information to your Trek. Under usual circumstances, the Trek has adequate routing information after it has been configured for Internet access, and you do not need to configure more static routes. You must configure static routes only for unusual cases such as multiple Treks or multiple IP subnets on your network. As an example of when a static route is needed, consider a situation with the following elements: • Your primary Internet access is through a cable modem to an ISP. Advanced Settings 116
-
 1
1 -
2
-
3
-
4
-
5
-
6
-
7
-
8
-
9
-
10
-
11
-
12
-
13
-
14
-
15
-
16
-
17
-
18
-
19
-
20
-
21
-
22
-
23
-
24
-
25
-
26
-
27
-
28
-
29
-
30
-
31
-
32
-
33
-
34
-
35
-
36
-
37
-
38
-
39
-
40
-
41
-
42
-
43
-
44
-
45
-
46
-
47
-
48
-
49
-
50
-
51
-
52
-
53
-
54
-
55
-
56
-
57
-
58
-
59
-
60
-
61
-
62
-
63
-
64
-
65
-
66
-
67
-
68
-
69
-
70
-
71
-
72
-
73
-
74
-
75
-
76
-
77
-
78
-
79
-
80
-
81
-
82
-
83
-
84
-
85
-
86
-
87
-
88
-
89
-
90
-
91
-
92
-
93
-
94
-
95
-
96
-
97
-
98
-
99
-
100
-
101
-
102
-
103
-
104
-
105
-
106
-
107
-
108
-
109
-
110
-
 111
111 -
 112
112 -
 113
113 -
 114
114 -
 115
115 -
 116
116 -
 117
117 -
 118
118 -
 119
119 -
 120
120 -
 121
121 -
122
-
123
-
124
-
125
-
126
-
127
-
128
-
129
-
130
-
131
-
132
-
133
-
134
-
135
-
136
-
137
-
138
-
139
-
140
-
141
-
142
-
143
-
144
-
145
 |
 |
