Netgear R9000 User Manual - Page 67
Custom Static Routes
 |
View all Netgear R9000 manuals
Add to My Manuals
Save this manual to your list of manuals |
Page 67 highlights
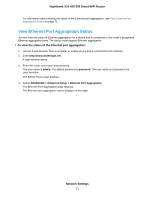
Nighthawk X10 AD7200 Smart WiFi Router 5. Select the Enable VLAN/Bridge Group check box. The page expands. 6. Select the By bridge group radio button. 7. Select a Wired Ports check box or a Wireless check box: • If your device is connected to an Ethernet port on the router, select the Wired Ports check box that corresponds to the Ethernet port on the router to which the device is connected. • If your device is connected to your router's WiFi network, select the Wireless check box that corresponds to the router's WiFi network to which the device is connected. Note You must select at least one Wired Ports or Wireless check box. You can select more than one check box. 8. Click the Apply button. Your settings are saved. Custom Static Routes Typically, you do not need to add static routes unless you use multiple routers or multiple IP subnets on your network. As an example of when a static route is needed, consider the following case: • Your main Internet access is through a cable modem to an ISP. • Your home network includes an ISDN router for connecting to the company where you are employed. This router's address on your LAN is 192.168.1.100. • Your company's network address is 134.177.0.0. When you set up your router, two implicit static routes were created. A default route was created with your ISP as the gateway, and a second static route was created to your local network for all 192.168.1.x addresses. With this configuration, if you try to access a device on the 134.177.0.0 network, your router forwards your request to the ISP. The ISP forwards your request to the company where you are employed, and the company firewall is likely to deny the request. In this case you must define a static route, telling your router to access 134.177.0.0 through the ISDN router at 192.168.1.100. Here is an example: Network Settings 67
-
 1
1 -
2
-
3
-
4
-
5
-
6
-
7
-
8
-
9
-
10
-
11
-
12
-
13
-
14
-
15
-
16
-
17
-
18
-
19
-
20
-
21
-
22
-
23
-
24
-
25
-
26
-
27
-
28
-
29
-
30
-
31
-
32
-
33
-
34
-
35
-
36
-
37
-
38
-
39
-
40
-
41
-
42
-
43
-
44
-
45
-
46
-
47
-
48
-
49
-
50
-
51
-
52
-
53
-
54
-
55
-
56
-
57
-
58
-
59
-
60
-
61
-
 62
62 -
 63
63 -
 64
64 -
 65
65 -
 66
66 -
 67
67 -
 68
68 -
 69
69 -
 70
70 -
 71
71 -
 72
72 -
73
-
74
-
75
-
76
-
77
-
78
-
79
-
80
-
81
-
82
-
83
-
84
-
85
-
86
-
87
-
88
-
89
-
90
-
91
-
92
-
93
-
94
-
95
-
96
-
97
-
98
-
99
-
100
-
101
-
102
-
103
-
104
-
105
-
106
-
107
-
108
-
109
-
110
-
111
-
112
-
113
-
114
-
115
-
116
-
117
-
118
-
119
-
120
-
121
-
122
-
123
-
124
-
125
-
126
-
127
-
128
-
129
-
130
-
131
-
132
-
133
-
134
-
135
-
136
-
137
-
138
-
139
-
140
-
141
-
142
-
143
-
144
-
145
-
146
-
147
-
148
-
149
-
150
-
151
-
152
-
153
-
154
-
155
-
156
-
157
 |
 |
