Nikon COOLPIX 4200 User Manual - Page 126
Date Imprint
 |
UPC - 018208255177
View all Nikon COOLPIX 4200 manuals
Add to My Manuals
Save this manual to your list of manuals |
Page 126 highlights
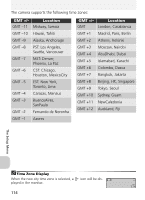
Date Imprint Rotate the mode dial to to select Date imprint ( 109), and then press . The date imprint option is used to imprint the date or the date and time of recording on pictures as they are recorded to the memory or memory card. It can not be used to imprint a date stamp on pictures after recording. Option Off (default setting) Description Time and date do not appear on pictures. Date Date is imprinted at bottom right corner of all pictures taken while this option is in effect. Date and time Date and time are imprinted at bottom right corner of all pictures taken while this option is in effect. The Setup Menu Restrictions on Date Imprint • Imprinted date can not be deleted. • Date imprint can not be selected if the camera clock has not been set ( 14). • Date and time will not be imprinted in the movie mode ( 51) and Panorama assist ( 40). • Date imprinted at an Image size ( 77) setting of 640 × 480 may be difficult to read. We recommend that Image size is 1024 × 768 or larger when using the Date imprint option. • The date is recorded in the order selected in Date ( 14) in the setup menu. • Imprinted data forms a permanent part of the image and will appear whenever the image is printed, regardless of whether the Date option is chosen in the Print set menu. Date Imprint Unless the setting is Off, Date imprint is shown by an icon in the monitor. 116
-
 1
1 -
2
-
3
-
4
-
5
-
6
-
7
-
8
-
9
-
10
-
11
-
12
-
13
-
14
-
15
-
16
-
17
-
18
-
19
-
20
-
21
-
22
-
23
-
24
-
25
-
26
-
27
-
28
-
29
-
30
-
31
-
32
-
33
-
34
-
35
-
36
-
37
-
38
-
39
-
40
-
41
-
42
-
43
-
44
-
45
-
46
-
47
-
48
-
49
-
50
-
51
-
52
-
53
-
54
-
55
-
56
-
57
-
58
-
59
-
60
-
61
-
62
-
63
-
64
-
65
-
66
-
67
-
68
-
69
-
70
-
71
-
72
-
73
-
74
-
75
-
76
-
77
-
78
-
79
-
80
-
81
-
82
-
83
-
84
-
85
-
86
-
87
-
88
-
89
-
90
-
91
-
92
-
93
-
94
-
95
-
96
-
97
-
98
-
99
-
100
-
101
-
102
-
103
-
104
-
105
-
106
-
107
-
108
-
109
-
110
-
111
-
112
-
113
-
114
-
115
-
116
-
117
-
118
-
119
-
120
-
 121
121 -
 122
122 -
 123
123 -
 124
124 -
 125
125 -
 126
126 -
 127
127 -
 128
128 -
 129
129 -
 130
130 -
 131
131 -
132
-
133
-
134
-
135
-
136
-
137
-
138
-
139
-
140
-
141
-
142
-
143
-
144
-
145
-
146
-
147
-
148
-
149
-
150
-
151
-
152
 |
 |
