Nikon COOLPIX 4200 User Manual - Page 72
Connecting the USB Cable
 |
UPC - 018208255177
View all Nikon COOLPIX 4200 manuals
Add to My Manuals
Save this manual to your list of manuals |
Page 72 highlights
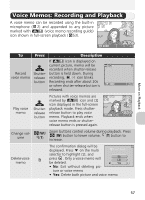
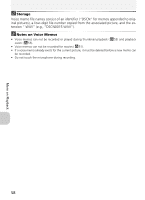
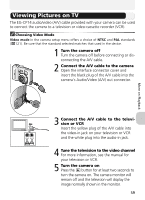
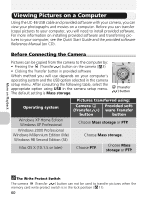
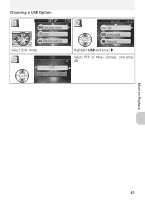
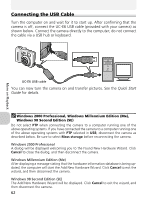
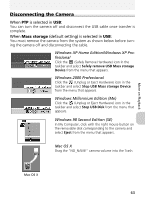
More on Playback Connecting the USB Cable Turn the computer on and wait for it to start up. After confirming that the camera is off, connect the UC-E6 USB cable (provided with your camera) as shown below. Connect the camera directly to the computer; do not connect the cable via a USB hub or keyboard. UC-E6 USB cable You can now turn the camera on and transfer pictures. See the Quick Start Guide for details. Windows 2000 Professional, Windows Millennium Edition (Me), Windows 98 Second Edition (SE) Do not select PTP when connecting the camera to a computer running one of the above operating systems. If you have connected the camera to a computer running one of the above operating systems with PTP selected in USB, disconnect the camera as described below. Be sure to select Mass storage before reconnecting the camera. Windows 2000 Professional A dialog will be displayed welcoming you to the Found New Hardware Wizard. Click Cancel to close the dialog, and then disconnect the camera. Windows Millennium Edition (Me) After displaying a message stating that the hardware information database is being updated, the computer will start the Add New Hardware Wizard. Click Cancel to exit the wizard, and then disconnect the camera. Windows 98 Second Edition (SE) The Add New Hardware Wizard will be displayed. Click Cancel to exit the wizard, and then disconnect the camera. 62
-
 1
1 -
2
-
3
-
4
-
5
-
6
-
7
-
8
-
9
-
10
-
11
-
12
-
13
-
14
-
15
-
16
-
17
-
18
-
19
-
20
-
21
-
22
-
23
-
24
-
25
-
26
-
27
-
28
-
29
-
30
-
31
-
32
-
33
-
34
-
35
-
36
-
37
-
38
-
39
-
40
-
41
-
42
-
43
-
44
-
45
-
46
-
47
-
48
-
49
-
50
-
51
-
52
-
53
-
54
-
55
-
56
-
57
-
58
-
59
-
60
-
61
-
62
-
63
-
64
-
65
-
66
-
 67
67 -
 68
68 -
 69
69 -
 70
70 -
 71
71 -
 72
72 -
 73
73 -
 74
74 -
 75
75 -
 76
76 -
 77
77 -
78
-
79
-
80
-
81
-
82
-
83
-
84
-
85
-
86
-
87
-
88
-
89
-
90
-
91
-
92
-
93
-
94
-
95
-
96
-
97
-
98
-
99
-
100
-
101
-
102
-
103
-
104
-
105
-
106
-
107
-
108
-
109
-
110
-
111
-
112
-
113
-
114
-
115
-
116
-
117
-
118
-
119
-
120
-
121
-
122
-
123
-
124
-
125
-
126
-
127
-
128
-
129
-
130
-
131
-
132
-
133
-
134
-
135
-
136
-
137
-
138
-
139
-
140
-
141
-
142
-
143
-
144
-
145
-
146
-
147
-
148
-
149
-
150
-
151
-
152
 |
 |
