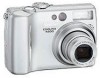
Nikon COOLPIX 4200 User Manual - Page 27
Step 1-Select
 |
UPC - 018208255177
View all Nikon COOLPIX 4200 manuals
Add to My Manuals
Save this manual to your list of manuals |
Page 27 highlights
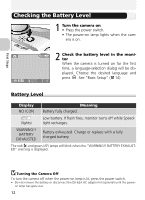
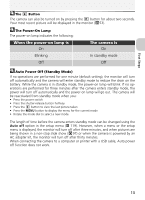
Basic Photography Step 1-Select Mode This section details the basic steps involved in taking pictures in (auto shooting mode). In this automatic, "point-and-shoot" mode, the majority of camera settings are controlled by the camera in response to shooting conditions, producing optimal results in most situations. 1 Rotate the mode dial to Basic Photography 2 Turn the camera on The power-on lamp will light and the monitor will display a welcome screen ( 110). The camera is ready to shoot when the monitor shows the view through the camera lens. Shooting mode indicates auto shooting mode. Image size Choose from five options depending on how you plan to use the picture ( 77). The default setting is 4M (2272 × 1704). Image quality Choose from three options depending on how you plan to use the picture ( 75). The default setting is NORMAL. Internal memory/memory card When the camera contains a memory card, is displayed, and when there is no memory card in the camera, is displayed. Number of exposures remaining The number of pictures that can be stored on the internal memory or a memory card depends on the capacity of the memory or memory card and the option chosen for Image mode (Image quality and Image size) ( 78). Flash mode Choose from five modes depending on lighting and your creative intent ( 42). 17
-
 1
1 -
2
-
3
-
4
-
5
-
6
-
7
-
8
-
9
-
10
-
11
-
12
-
13
-
14
-
15
-
16
-
17
-
18
-
19
-
20
-
21
-
 22
22 -
 23
23 -
 24
24 -
 25
25 -
 26
26 -
 27
27 -
 28
28 -
 29
29 -
 30
30 -
 31
31 -
 32
32 -
33
-
34
-
35
-
36
-
37
-
38
-
39
-
40
-
41
-
42
-
43
-
44
-
45
-
46
-
47
-
48
-
49
-
50
-
51
-
52
-
53
-
54
-
55
-
56
-
57
-
58
-
59
-
60
-
61
-
62
-
63
-
64
-
65
-
66
-
67
-
68
-
69
-
70
-
71
-
72
-
73
-
74
-
75
-
76
-
77
-
78
-
79
-
80
-
81
-
82
-
83
-
84
-
85
-
86
-
87
-
88
-
89
-
90
-
91
-
92
-
93
-
94
-
95
-
96
-
97
-
98
-
99
-
100
-
101
-
102
-
103
-
104
-
105
-
106
-
107
-
108
-
109
-
110
-
111
-
112
-
113
-
114
-
115
-
116
-
117
-
118
-
119
-
120
-
121
-
122
-
123
-
124
-
125
-
126
-
127
-
128
-
129
-
130
-
131
-
132
-
133
-
134
-
135
-
136
-
137
-
138
-
139
-
140
-
141
-
142
-
143
-
144
-
145
-
146
-
147
-
148
-
149
-
150
-
151
-
152
 |
 |
