Nikon COOLPIX P100  P100 User's Manual - Page 134
Skin Softening: Making Skin Appear Smoother, softening
 |
View all Nikon COOLPIX P100 manuals
Add to My Manuals
Save this manual to your list of manuals |
Page 134 highlights
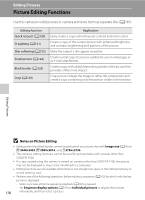
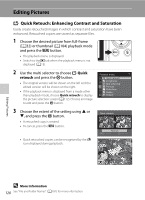
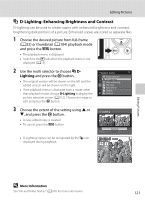
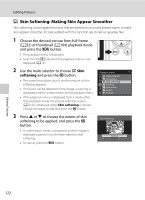
Editing Pictures e Skin Softening: Making Skin Appear Smoother Skin softening can be applied to faces that are detected in pictures already taken, to make skin appear smoother. Pictures edited with this function are stored as separate files. 1 Choose the desired picture from full-frame (A32) or thumbnail (A104) playback mode and press the d button. • The playback menu is displayed. • Switch to the c tab when the playback menu is not displayed (A13). 2 Use the multi selector to choose e Skin softening and press the k button. • The screen that allows you to set the amount of skin softening appears. • If no faces can be detected in the image, a warning is displayed and the screen returns to the playback menu. • If the playback menu is displayed from a mode other than playback mode, the picture selection screen (A112) is displayed when Skin softening is chosen. Choose an image to edit and press the k button. Playback menu Quick retouch D-Lighting Skin softening Print set Slide show Delete Protect 3 Press H or I to choose the extent of skin softening to be applied, and press the k button. • A confirmation screen is displayed, and the image is displayed zoomed in on the face edited by skin softening. • To cancel, press the d button. Skin softening Normal Cancel Amount Editing Pictures 122
-
 1
1 -
2
-
3
-
4
-
5
-
6
-
7
-
8
-
9
-
10
-
11
-
12
-
13
-
14
-
15
-
16
-
17
-
18
-
19
-
20
-
21
-
22
-
23
-
24
-
25
-
26
-
27
-
28
-
29
-
30
-
31
-
32
-
33
-
34
-
35
-
36
-
37
-
38
-
39
-
40
-
41
-
42
-
43
-
44
-
45
-
46
-
47
-
48
-
49
-
50
-
51
-
52
-
53
-
54
-
55
-
56
-
57
-
58
-
59
-
60
-
61
-
62
-
63
-
64
-
65
-
66
-
67
-
68
-
69
-
70
-
71
-
72
-
73
-
74
-
75
-
76
-
77
-
78
-
79
-
80
-
81
-
82
-
83
-
84
-
85
-
86
-
87
-
88
-
89
-
90
-
91
-
92
-
93
-
94
-
95
-
96
-
97
-
98
-
99
-
100
-
101
-
102
-
103
-
104
-
105
-
106
-
107
-
108
-
109
-
110
-
111
-
112
-
113
-
114
-
115
-
116
-
117
-
118
-
119
-
120
-
121
-
122
-
123
-
124
-
125
-
126
-
127
-
128
-
 129
129 -
 130
130 -
 131
131 -
 132
132 -
 133
133 -
 134
134 -
 135
135 -
 136
136 -
 137
137 -
 138
138 -
 139
139 -
140
-
141
-
142
-
143
-
144
-
145
-
146
-
147
-
148
-
149
-
150
-
151
-
152
-
153
-
154
-
155
-
156
-
157
-
158
-
159
-
160
-
161
-
162
-
163
-
164
-
165
-
166
-
167
-
168
-
169
-
170
-
171
-
172
-
173
-
174
-
175
-
176
-
177
-
178
-
179
-
180
-
181
-
182
-
183
-
184
-
185
-
186
-
187
-
188
-
189
-
190
-
191
-
192
-
193
-
194
-
195
-
196
-
197
-
198
-
199
-
200
-
201
-
202
-
203
-
204
-
205
-
206
-
207
-
208
-
209
-
210
-
211
-
212
-
213
-
214
-
215
-
216
 |
 |
