Nikon COOLPIX P100  P100 User's Manual - Page 49
Taking Pictures with the Self-Timer, Vibration reduction
 |
View all Nikon COOLPIX P100 manuals
Add to My Manuals
Save this manual to your list of manuals |
Page 49 highlights
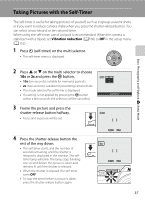
Taking Pictures with the Self-Timer The self-timer is useful for taking pictures of yourself, such as in group souvenir shots, or if you want to reduce camera shake when you press the shutter-release button. You can select a two-second or ten-second timer. When using the self-timer, use of a tripod is recommended. When the camera is stabilized with a tripod, set Vibration reduction (A160) to Off in the setup menu (A152). 1 Press n (self-timer) on the multi selector. • The self-timer menu is displayed. Basic Photography and Playback: A (Auto) Mode 2 Press H or I on the multi selector to choose 10s or 2s and press the k button. • 10s (ten seconds): suitable for memorial portraits. • 2s (two seconds): suitable for preventing camera shake. • The mode selected for self-timer is displayed. • If a setting is not applied by pressing the k button within a few seconds, the selection will be cancelled. 3 Frame the picture and press the shutter-release button halfway. • Focus and exposure will be set. 10s 2s Self-timer 10 4 Press the shutter-release button the rest of the way down. • The self-timer starts, and the number of seconds remaining until the shutter is released is displayed in the monitor. The selftimer lamp will blink. The lamp stops blinking one second before the picture is taken and remains lit until the shutter is released. • When the shutter is released, the self-timer turns OFF. • To stop the timer before a picture is taken, press the shutter-release button again. 1/250 F5.6 9 1/250 F5.6 37
-
 1
1 -
2
-
3
-
4
-
5
-
6
-
7
-
8
-
9
-
10
-
11
-
12
-
13
-
14
-
15
-
16
-
17
-
18
-
19
-
20
-
21
-
22
-
23
-
24
-
25
-
26
-
27
-
28
-
29
-
30
-
31
-
32
-
33
-
34
-
35
-
36
-
37
-
38
-
39
-
40
-
41
-
42
-
43
-
 44
44 -
 45
45 -
 46
46 -
 47
47 -
 48
48 -
 49
49 -
 50
50 -
 51
51 -
 52
52 -
 53
53 -
 54
54 -
55
-
56
-
57
-
58
-
59
-
60
-
61
-
62
-
63
-
64
-
65
-
66
-
67
-
68
-
69
-
70
-
71
-
72
-
73
-
74
-
75
-
76
-
77
-
78
-
79
-
80
-
81
-
82
-
83
-
84
-
85
-
86
-
87
-
88
-
89
-
90
-
91
-
92
-
93
-
94
-
95
-
96
-
97
-
98
-
99
-
100
-
101
-
102
-
103
-
104
-
105
-
106
-
107
-
108
-
109
-
110
-
111
-
112
-
113
-
114
-
115
-
116
-
117
-
118
-
119
-
120
-
121
-
122
-
123
-
124
-
125
-
126
-
127
-
128
-
129
-
130
-
131
-
132
-
133
-
134
-
135
-
136
-
137
-
138
-
139
-
140
-
141
-
142
-
143
-
144
-
145
-
146
-
147
-
148
-
149
-
150
-
151
-
152
-
153
-
154
-
155
-
156
-
157
-
158
-
159
-
160
-
161
-
162
-
163
-
164
-
165
-
166
-
167
-
168
-
169
-
170
-
171
-
172
-
173
-
174
-
175
-
176
-
177
-
178
-
179
-
180
-
181
-
182
-
183
-
184
-
185
-
186
-
187
-
188
-
189
-
190
-
191
-
192
-
193
-
194
-
195
-
196
-
197
-
198
-
199
-
200
-
201
-
202
-
203
-
204
-
205
-
206
-
207
-
208
-
209
-
210
-
211
-
212
-
213
-
214
-
215
-
216
 |
 |
