Nokia 6260 User Guide - Page 91
Receiving smart messages
 |
View all Nokia 6260 manuals
Add to My Manuals
Save this manual to your list of manuals |
Page 91 highlights
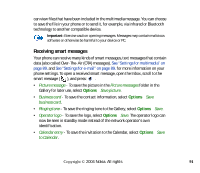
can view files that have been included in the multimedia message. You can choose to save the file in your phone or to send it, for example, via infrared or Bluetooth technology to another compatible device. Important: Exercise caution opening messages. Messages may contain malicious software or otherwise be harmful to your device or PC. Receiving smart messages Your phone can receive many kinds of smart messages, text messages that contain data (also called Over-The-Air (OTA) messages). See "Settings for multimedia" on page 89. and See "Settings for e-mail" on page 89. for more information on your phone settings. To open a received smart message, open the Inbox, scroll to the smart message ( ), and press . • Picture message - To save the picture in the Picture messages folder in the Gallery for later use, select Options→Save picture. • Business card - To save the contact information, select Options→Save business card. • Ringing tone - To save the ringing tone to the Gallery, select Options→Save. • Operator logo - To save the logo, select Options→Save. The operator logo can now be seen in standby mode instead of the network operator's own identification. • Calendar entry - To save the invitation to the Calendar, select Options→Save to Calendar. Copyright © 2004 Nokia. All rights 91
-
 1
1 -
2
-
3
-
4
-
5
-
6
-
7
-
8
-
9
-
10
-
11
-
12
-
13
-
14
-
15
-
16
-
17
-
18
-
19
-
20
-
21
-
22
-
23
-
24
-
25
-
26
-
27
-
28
-
29
-
30
-
31
-
32
-
33
-
34
-
35
-
36
-
37
-
38
-
39
-
40
-
41
-
42
-
43
-
44
-
45
-
46
-
47
-
48
-
49
-
50
-
51
-
52
-
53
-
54
-
55
-
56
-
57
-
58
-
59
-
60
-
61
-
62
-
63
-
64
-
65
-
66
-
67
-
68
-
69
-
70
-
71
-
72
-
73
-
74
-
75
-
76
-
77
-
78
-
79
-
80
-
81
-
82
-
83
-
84
-
85
-
 86
86 -
 87
87 -
 88
88 -
 89
89 -
 90
90 -
 91
91 -
 92
92 -
 93
93 -
 94
94 -
 95
95 -
 96
96 -
97
-
98
-
99
-
100
-
101
-
102
-
103
-
104
-
105
-
106
-
107
-
108
-
109
-
110
-
111
-
112
-
113
-
114
-
115
-
116
-
117
-
118
-
119
-
120
-
121
-
122
-
123
-
124
-
125
-
126
-
127
-
128
-
129
-
130
-
131
-
132
-
133
-
134
-
135
-
136
-
137
-
138
-
139
-
140
-
141
-
142
-
143
-
144
-
145
-
146
-
147
-
148
-
149
-
150
-
151
-
152
-
153
-
154
-
155
-
156
-
157
-
158
-
159
-
160
-
161
-
162
-
163
-
164
-
165
-
166
-
167
-
168
-
169
-
170
-
171
-
172
-
173
-
174
-
175
-
176
-
177
-
178
-
179
-
180
-
181
-
182
-
183
-
184
-
185
-
186
-
187
-
188
-
189
-
190
-
191
-
192
-
193
-
194
-
195
-
196
-
197
 |
 |
