Oki MICROLINE 320 TURBO Users Guide - Page 41
Product Registration
 |
View all Oki MICROLINE 320 TURBO manuals
Add to My Manuals
Save this manual to your list of manuals |
Page 41 highlights
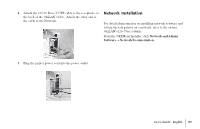
Product Registration my.okidata.com Your Personal Solutions Center Register your printer and create your own personalized support center with my.okidata.com. My.okidata.com is a powerful new area of our web site designed to help you get the most from your OKI printer. It represents our commitment to providing you with solutions, finding out the latest updates about your OKI products, and getting the details on OKI programs and services that can help your bottom line. You can also • Choose to receive product updates via e-mail. • Have private access to our solutions section. • Check out the What's New section to see what's changed since your last visit. • Get your own Solutions Specialist that you can contact directly via e-mail when you need assistance. my.okidata.com offers you support, solutions and more, all personalized for you and your specific OKI printer. Start using my.okidata.com today! Registering Your Printer You can register your printer by: • visiting our website at http://www.okidata.com. Click on Product Registration. • using the OKI Menu Installer (PC Users). 1 Insert the OKI CD in your CD-ROM Drive. 2 Browse to your CD-ROM drive and double-click INSTALL.EXE in the root directory. Click OK. 3 Select the language and your printer model. Click Continue. 4 When the OKI Menu Installer screen appears, click the On-Line Registration button. • filling out the enclosed registration form and mailing it in or faxing it in. Service and Support If you need further assistance or have questions, please refer to "Service and Support." | User's Guide: English 41
-
 1
1 -
2
-
3
-
4
-
5
-
6
-
7
-
8
-
9
-
10
-
11
-
12
-
13
-
14
-
15
-
16
-
17
-
18
-
19
-
20
-
21
-
22
-
23
-
24
-
25
-
26
-
27
-
28
-
29
-
30
-
31
-
32
-
33
-
34
-
35
-
 36
36 -
 37
37 -
 38
38 -
 39
39 -
 40
40 -
 41
41 -
 42
42 -
 43
43 -
 44
44 -
 45
45 -
 46
46 -
47
-
48
-
49
-
50
-
51
-
52
-
53
-
54
-
55
-
56
-
57
-
58
-
59
-
60
-
61
-
62
-
63
-
64
-
65
-
66
-
67
-
68
-
69
-
70
-
71
-
72
-
73
-
74
-
75
-
76
-
77
-
78
-
79
-
80
-
81
-
82
-
83
-
84
-
85
-
86
-
87
-
88
-
89
-
90
-
91
-
92
-
93
-
94
-
95
-
96
-
97
-
98
-
99
-
100
-
101
-
102
-
103
-
104
-
105
-
106
-
107
-
108
-
109
-
110
-
111
-
112
-
113
-
114
-
115
-
116
-
117
-
118
-
119
-
120
-
121
-
122
-
123
-
124
-
125
-
126
-
127
-
128
-
129
-
130
-
131
 |
 |
