Olympus MAUSB-10 Reference Manual - Page 18
Windows 2000/XP - driver windows xp
 |
View all Olympus MAUSB-10 manuals
Add to My Manuals
Save this manual to your list of manuals |
Page 18 highlights
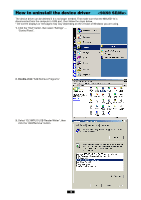
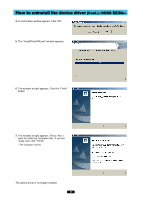
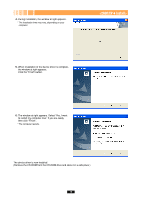
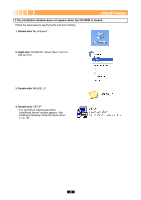
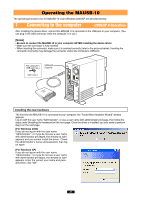
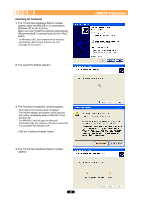
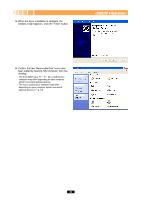
Windows 2000/XP How to install Also refer to your computer's user manual and the manuals for any optional devices you are using. 1 Turn on the computer Turn on your computer's power (and connected devices) to start Windows 2000/XP. To install the device driver, log on with the user name "Administrator", or use a user name with administrator privileges. 2 Install the device driver When using the MAUSB-10 for the first time, you must first install the device driver included on the provided CD-ROM. [Note] Do not connect to the computer before installation. • Do NOT connect the MAUSB-10 to the computer until installation of the device driver is completed. Before installation, make sure that the computer is turned on, then follow the steps below to install the driver on your computer. (* Note that the windows shown below may look different on your computer, depending on how your operating system is configured.) 1. Turn on the computer, then place the provided CD-ROM into the computer's CD-ROM drive. 2. When the CD-ROM is recognized, the InstallShield setup window is displayed for a few seconds. Then, the "InstallShield Wizard" window appears. 3. Click the "Next" button. * If the window at right does not appear, refer to "If the installation window does not appear when the CD-ROM is loaded" (੬ p. 20). * If you want to cancel the installation, click "Cancel". When the "Found New Hardware Wizard" window appears If you connect the MAUSB-10 to the computer before installing the device driver, the "Found New Hardware Wizard" window appears. In this case, follow the steps below. 1. Disconnect the MAUSB-10 from the computer (੬ p. 29). 2. Click the "Cancel" button. 3. Place the CD-ROM into the CD-ROM drive. Follow the instructions from "Install the device driver" (this page). 18
-
 1
1 -
2
-
3
-
4
-
5
-
6
-
7
-
8
-
9
-
10
-
11
-
12
-
 13
13 -
 14
14 -
 15
15 -
 16
16 -
 17
17 -
 18
18 -
 19
19 -
 20
20 -
 21
21 -
 22
22 -
 23
23 -
24
-
25
-
26
-
27
-
28
-
29
-
30
-
31
-
32
-
33
-
34
-
35
-
36
-
37
-
38
-
39
-
40
-
41
-
42
-
43
-
44
-
45
-
46
-
47
-
48
-
49
-
50
-
51
-
52
 |
 |
