Panasonic DMREZ47V Dvd Recorder - English/spanish - Page 73
Disc and Card Care, Video Cassette Information, Inserting/Removing the SD Card, Holding a disc or card
 |
View all Panasonic DMREZ47V manuals
Add to My Manuals
Save this manual to your list of manuals |
Page 73 highlights
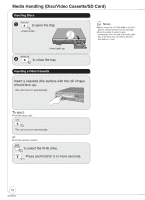
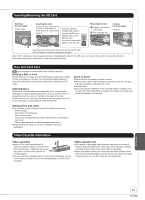
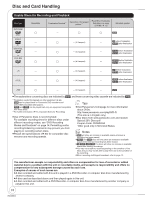
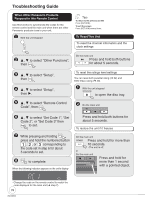
Inserting/Removing the SD Card Opening the front panel Press down. VHS DVD RESET COPYING Inserting the card Press on the center of the card place. until it clickDs VinDto REC VHS DVD RESET COPYING If you are using a miniSD card, insert it into the miniSD card adaptor that comes with the card. ADAPTER Insert and remove this adaptor from the unit. Removing the card Press on the center of the card. Closing the front panel Push up. Pull it straight out. REC VHS D VHS DVD RESET COPYING RESET COPYING Insert the card label up with the cut-off corner on the right. (Do not forget to close the front panel. ¼ right) When "SD" is flashing or when copying a picture or displaying the Album in the SD card, do not turn off the unit or remove the SD card. Such action may result in malfunction or loss of the card's contents. Disc and Card Care [RAM] Use cartridges to protect them from scratches and dirt. Holding a disc or card Handle discs by the edges to avoid inadvertently scratching or getting oil from your fingers on the disc. Do not touch the signal surface of discs (the shiny side) or the terminal surface (the metal part) of SD cards. Cleaning discs Discs are not indestructible and occasionally dirt or condensation may appear. Clean by gently wiping with a soft, dry lint-free cloth in a straight line from the center of the disc to the edge of the disc. Return discs to their cases and SD cards to their cartridges when not in use; this helps to protect against scratches and dirt. Storing discs and cards Do not place or store discs and cards in the following locations: - Direct sunlight - Very dusty or humid areas - Near a heat source - Places that undergo extreme shifts in temperature (condensation can occur) - Where static electricity or electromagnetic waves occur Keep the Memory Card out of reach of children to prevent swallowing. Discs to avoid Discs that are not perfectly circular in shape Warped discs, which may not balance properly in your unit, causing improper operation or damage to the unit Cracked discs Discs with exposed adhesive (from removed stickers or labels, such as may occur with rental discs or improperly cared-for discs that were previously labeled or re-labeled) Video Cassette Information Video cassettes Break off the video cassette's tab to prevent accidental erasure. Cover the hole with a double layer of adhesive tape when you want to use the video cassette for Tab recording again. You can use video cassettes with the VHS and S-VHS marks, but the unit is unable to make full use of the characteristics of S-VHS video cassettes. Video cassette care Poor quality or damaged video cassettes can cause the heads to become dirty and malfunction. Store your video cassettes carefully and discard them when they become dirty or damaged. Never use video cassettes on which juice has been spilled or those that are extremely damaged since this will not only cause the heads to become dirty, but will also make the unit malfunction. Reference 73 RQT8853
-
 1
1 -
2
-
3
-
4
-
5
-
6
-
7
-
8
-
9
-
10
-
11
-
12
-
13
-
14
-
15
-
16
-
17
-
18
-
19
-
20
-
21
-
22
-
23
-
24
-
25
-
26
-
27
-
28
-
29
-
30
-
31
-
32
-
33
-
34
-
35
-
36
-
37
-
38
-
39
-
40
-
41
-
42
-
43
-
44
-
45
-
46
-
47
-
48
-
49
-
50
-
51
-
52
-
53
-
54
-
55
-
56
-
57
-
58
-
59
-
60
-
61
-
62
-
63
-
64
-
65
-
66
-
67
-
 68
68 -
 69
69 -
 70
70 -
 71
71 -
 72
72 -
 73
73 -
 74
74 -
 75
75 -
 76
76 -
 77
77 -
 78
78 -
79
-
80
-
81
-
82
-
83
-
84
-
85
-
86
-
87
-
88
-
89
-
90
-
91
-
92
-
93
-
94
-
95
-
96
-
97
-
98
-
99
-
100
 |
 |
