Panasonic DMREZ47V Dvd Recorder - English/spanish - Page 8
Recording Television Programs
 |
View all Panasonic DMREZ47V manuals
Add to My Manuals
Save this manual to your list of manuals |
Page 8 highlights
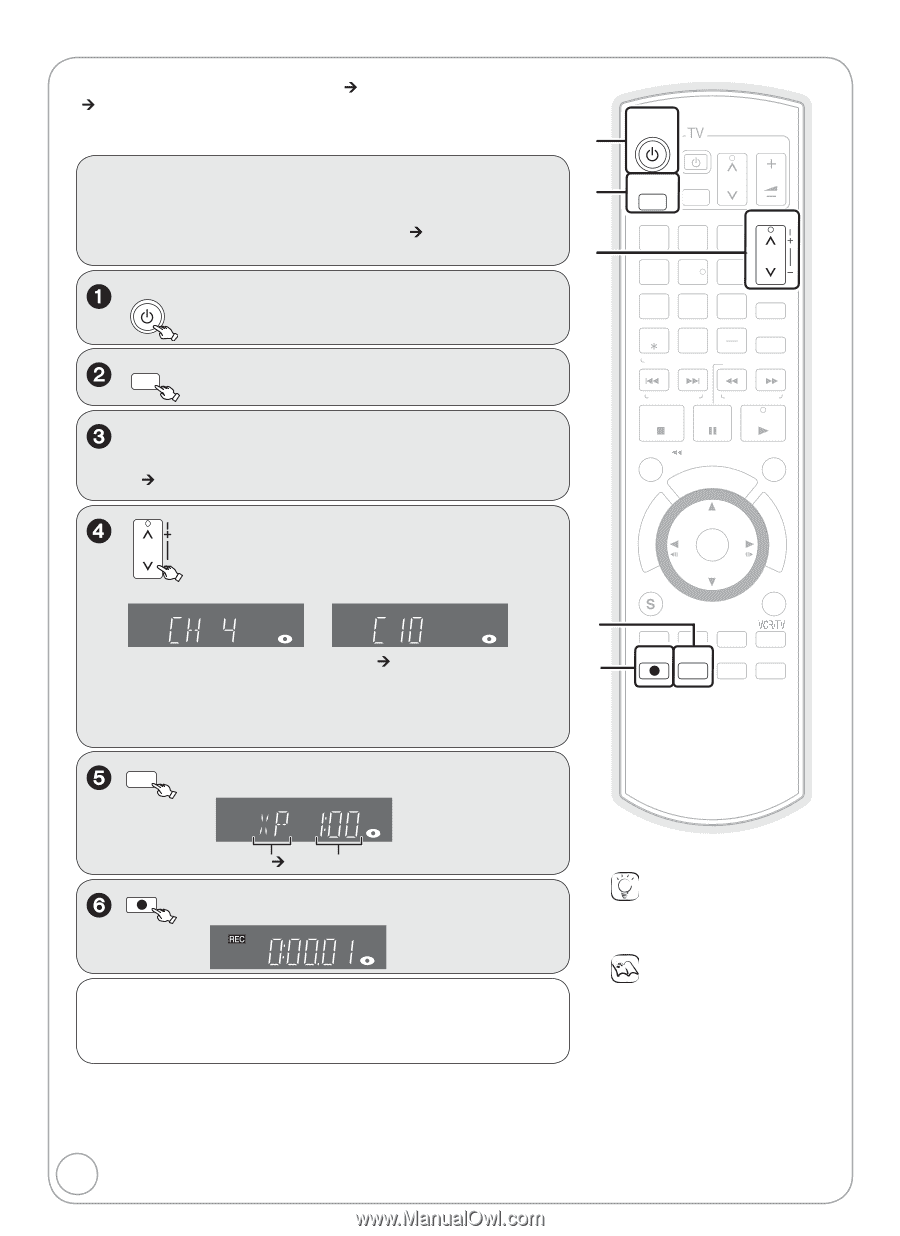
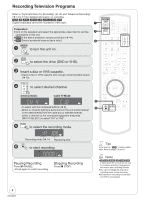
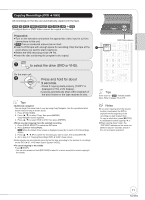
Recording Television Programs Refer to "Important Notes for Recording" (¼ 13) and "Advanced Recording" (¼ 14 to 17) for detailed information on recording. [RAM] [-R] [-R]DL] [-RW‹V›] [+R] [+R]DL] [+RW] [VHS] Digital broadcasts cannot be recorded to video tape. Preparation: Turn on the television and select the appropriate video input to suit the connections to this unit. [RAM] If the disc is protected, release protection (¼ 44). [VHS] Ensure accidental erasure tab is intact. DVD/VHS POWER to turn the unit on. DRIVE SELECT to select the drive (DVD or VHS). Insert a disc or VHS cassette. -Insert a disc or VHS cassette with enough remaining blank space (¼ 72). TRACKING/V-LOCK to select desired channel. CH Antenna Mode: Cable TV Mode: -To select with the numbered buttons (¼ 6). -When no channel setting is performed on the unit and broadcast is recorded directly from the cable box or satellite receiver, select a channel on the connected equipment and press [INPUT SELECT] to select "IN1" or "IN2". REC MODE to select the recording mode. DVD/VHS POWER POWER DRIVE SELECT TV/VIDEO CH VOL 12 45 78 0 CANCEL RESET TRACKING/V-LOCK 3 CH 6 9 INPUT SELECT DELETE SLOW/SEARCH SKIP/INDEX REW FF STOP PAUSE PLAY TIME SLIP/ JET REW SCHEDULE CM SKIP DIRECT NAVIGATOR FUNCTIONS ENTER SUB MENU RETURN CREATE AUDIO DISPLAY CHAPTER AB REC REC MODE F Rec STATUS Recording mode (¼ 14) Remaining time REC to start recording. Pausing Recording Press [ PAUSE]. -Press again to restart recording. Stopping Recording Press [ STOP]. Tips Icons such as " [RAM] " indicate usable discs. Refer to pages 74 and 75. Notes [-R] [-R]DL] [-RW‹V›] [+R] [+R]DL] [+RW] It takes about 30 seconds for the unit to complete recording management information after recording finishes. You cannot change the channel or recording mode during recording. Simultaneous recording to both DVD and VHS is not possible. 8 RQT8853
-
 1
1 -
2
-
 3
3 -
 4
4 -
 5
5 -
 6
6 -
 7
7 -
 8
8 -
 9
9 -
 10
10 -
 11
11 -
 12
12 -
 13
13 -
14
-
15
-
16
-
17
-
18
-
19
-
20
-
21
-
22
-
23
-
24
-
25
-
26
-
27
-
28
-
29
-
30
-
31
-
32
-
33
-
34
-
35
-
36
-
37
-
38
-
39
-
40
-
41
-
42
-
43
-
44
-
45
-
46
-
47
-
48
-
49
-
50
-
51
-
52
-
53
-
54
-
55
-
56
-
57
-
58
-
59
-
60
-
61
-
62
-
63
-
64
-
65
-
66
-
67
-
68
-
69
-
70
-
71
-
72
-
73
-
74
-
75
-
76
-
77
-
78
-
79
-
80
-
81
-
82
-
83
-
84
-
85
-
86
-
87
-
88
-
89
-
90
-
91
-
92
-
93
-
94
-
95
-
96
-
97
-
98
-
99
-
100
 |
 |