Panasonic KX-MB262CX Operating Instructions
Panasonic KX-MB262CX Manual
 |
View all Panasonic KX-MB262CX manuals
Add to My Manuals
Save this manual to your list of manuals |
Panasonic KX-MB262CX manual content summary:
- Panasonic KX-MB262CX | Operating Instructions - Page 1
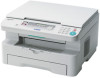
This pictured model is KX-MB262. Operating Instructions Multi-Function Printer Model No. KX-MB262CX KX-MB772CX Do NOT connect the USB cable until prompted by the Multi-Function Station (CD-ROM). 1 2 KX-MB262CX or KX-MB772CX may not be available in some areas. KX-MB772 only: L This unit is - Panasonic KX-MB262CX | Operating Instructions - Page 2
#114). Note: L The suffix in the model number will be omitted in these instructions. L Most figures shown in these operating instructions are based on a KX-MB262. Trademarks: L Microsoft, Windows, Windows Vista and PowerPoint are either registered trademarks or trademarks of Microsoft Corporation in - Panasonic KX-MB262CX | Operating Instructions - Page 3
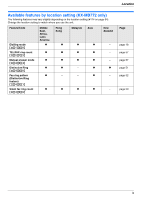
Dialling mode {#}{1}{2}{0} TEL/FAX ring count {#}{2}{1}{2} Manual answer mode {#}{4}{0}{4} Distinctive Ring {#}{4}{3}{0} Fax ring pattern (Distinctive Ring feature) {#}{4}{3}{1} Silent fax ring count {#}{4}{3}{6} Middle East, Africa, Latin America r r r r r r Hong Kong r r r r - r Malaysia Asia - Panasonic KX-MB262CX | Operating Instructions - Page 4
problems that may be caused by a non-Panasonic toner cartridge or drum unit: - Damage to the unit - Poor print quality - Improper operation Toner cartridge L Do not leave the toner cartridge out of the protection bag for a long time. It will decrease the toner life. Drum unit L Read the instructions - Panasonic KX-MB262CX | Operating Instructions - Page 5
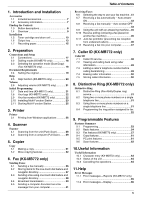
KX-MB772 only 21 2.8 Your logo (KX-MB772 only 22 2.9 Your fax number (KX-MB772 only 22 2.10 Installing Multi-Function Station 23 2.11 Starting Multi-Function Station 25 3. Printer Printer 3.1 Printing from Windows applications 26 4. Scanner Scanner KX-MB772 only) Caller ID 7.1 Caller ID service - Panasonic KX-MB262CX | Operating Instructions - Page 6
Table of Contents Troubleshooting 11.3 When a function does not work 68 12.Paper Jams Jams 12.1 12.2 Recording paper jam 73 Document jams (Auto document feeder) (KXMB772 only 78 13.Cleaning Cleaning - Panasonic KX-MB262CX | Operating Instructions - Page 7
damage to the unit or degradation of print quality which may occur from the use of a non-Panasonic toner cartridge and drum unit. 5 Quick reference guide 6 Quick installation guide 7 KX-MB772 only Telephone line cord (Use the appropriate telephone line cord for where you use the unit.) *1 Prints - Panasonic KX-MB262CX | Operating Instructions - Page 8
is for beeps (KX-MB262 only). * The pictured model is KX-MB772. A { KX-MB772 only) L To send a document to multiple parties (page 39). P {MANUAL BROAD} (KX-MB772 only) L To send a document to multiple parties manually (page 39). Q Station keys (KX (KX-MB772 only) L To access special telephone services - Panasonic KX-MB262CX | Operating Instructions - Page 9
KX-MB262 A 5 6 89 1 Top cover 2 ADF (Auto Document Feeder) cover 3 Document guides 4 Document cover 5 Output tray 6 Top cover release lever 7 Document entrance 8 Paper input tray 9 Recording paper exit j Document exit CD G A Recording paper guides B Speaker (KX-MB772 only) C Power inlet D Manual - Panasonic KX-MB262CX | Operating Instructions - Page 10
1 Note: L Shipping tape positions are subject to change without notice. Installation 1.5 Toner cartridge and drum unit The included toner cartridge is a starter toner cartridge. Caution: L Read the following instructions before you begin installation. After you have read them, open the drum unit - Panasonic KX-MB262CX | Operating Instructions - Page 11
unit (4) vertically. 3 6 Lift the top cover release lever (7) and open the top cover (8). 8 9 7 4 4 Turn the green levers (5) on each side of the toner cartridge while pressing down firmly. 5 Note: L Do not touch the transfer roller (9). L If the lower glass (j) is dirty, clean it with a soft and - Panasonic KX-MB262CX | Operating Instructions - Page 12
toner cartridge. TONER LOW l TONER EMPTY L To check the drum life and quality, please print the printer toner cartridge and drum unit. L To ensure that the unit operates properly, we recommend the use of Panasonic toner cartridge (Model No. KX-FAT92A/KX-FAT92E) and drum unit (Model No. KX-FAD93A/KX - Panasonic KX-MB262CX | Operating Instructions - Page 13
machine life, we recommend you to clean slots and openings (page 4) and the inside of the unit (page 79, 82) when replacing the toner cartridge and/or drum unit. Waste disposal method Waste material should be disposed of under conditions which meet all national and local environmental regulations - Panasonic KX-MB262CX | Operating Instructions - Page 14
1. Introduction and Installation If the top part of the extender is detached 1. With the top part of the extender in the open position, insert the tab (1) into the left hole (2) of the extender. If the extender is detached 1. Line up the extender (1) with the left side of the output tray. Make - Panasonic KX-MB262CX | Operating Instructions - Page 15
the paper input tray, if it is lifted. 2 1 2 Before loading a stack of paper, fan the paper to prevent paper jams. 3 4 Adjust the recording paper guides. Pinch the front side of the recording paper guide (4), then slide it to match the paper size mark. Pinch the right side of the recording paper - Panasonic KX-MB262CX | Operating Instructions - Page 16
the front part of the tray. Then push it completely into the unit. Note: L If the paper is not loaded correctly, re-adjust the paper guides, or the paper may jam. L If the paper input tray does not close, the plate in the paper input tray may be lifted. Push the - Panasonic KX-MB262CX | Operating Instructions - Page 17
provider instructs you to install a filter (5), please connect it as follows (KX-MB772 only). 5 * The pictured model is KX-MB772. Multi-Function Station (page 23). Note: L If any other device is connected to the same telephone line, this unit may disturb the network condition of the device (KX - Panasonic KX-MB262CX | Operating Instructions - Page 18
select the desired setting. {1} "PULSE": For rotary/pulse dial service. {2} "TONE" (default): For tone dial service. 3 {SET} 4 Press {MENU} to exit. * The pictured model is KX-MB772. - {SCAN}: Select this mode when using the unit as a scanner for the computer (page 28). - {COPY}: Select this mode - Panasonic KX-MB262CX | Operating Instructions - Page 19
there are no documents in the auto document feeder (KX-MB772 only). L Place the original onto the scanner glass gently and do not press down too firmly to width of the document guides (1) to fit the actual size of the document. Note: L Confirm that there are no documents on the scanner glass. L Check - Panasonic KX-MB262CX | Operating Instructions - Page 20
mm 216 mm 5 mm 4 mm Document weight L Single sheet: 60 g/m2 to 75 g/m2 L Multiple sheets: 60 g/m2 to 75 g/m2 Help 2.5 Help function (KX-MB772 only) The unit contains helpful information on the following topics which can be printed for reference purposes, as follows: - "BASIC SETTINGS" - "FEATURE - Panasonic KX-MB262CX | Operating Instructions - Page 21
is OFF, turn it ON by pressing {FAX}. Initial Programming 2.7 Date and time (KX-MB772 only) {MENU} {FAX} {SET} {V}{^} Ringer volume While the unit is idle number, and make the correction. If you have subscribed to a Caller ID service If feature #114 is set to "NEW ZEALAND", the date and time - Panasonic KX-MB262CX | Operating Instructions - Page 22
) You can program your logo (name, company name, etc.) so that it appears on the top of each page sent. {MENU} {STOP} 2.9 Your fax number (KX-MB772 only) You can program your fax number so that it appears on the top of each page sent. {MENU} {STOP} {SET} {} 1 {MENU} i {#}{1}{0}{2} i {SET} LOGO - Panasonic KX-MB262CX | Operating Instructions - Page 23
, Windows XP and Windows Vista users, you must be logged in as an administrator in order to install Multi-Function Station. 2 Insert the included CD-ROM into your CD-ROM drive. L If the [Select Language] dialogue box appears, select the desired language that you want to use with this software. Click - Panasonic KX-MB262CX | Operating Instructions - Page 24
]. Then follow the on-screen instructions. To uninstall the software For Windows 2000, Windows XP and Windows Vista users, you must be logged in as an administrator in order to uninstall Multi-Function Station. 1. [Start] i [All Programs] or [Programs] i [Panasonic] i the unit's name i [Uninstall or - Panasonic KX-MB262CX | Operating Instructions - Page 25
.*1 [Utilities] L To start Multi-Function Viewer (page 29). L To start Device Monitor (page 64). L To start OCR application (page 28). [Settings] (page 25) L To change the general settings. L To change the settings for scanning. [o] L For detailed instructions on Multi-Function Station. L To - Panasonic KX-MB262CX | Operating Instructions - Page 26
. For Windows XP/Windows Vista: Click [Preferences], then click the desired tab. Change the printer settings, then click [OK]. 4 Click [Print] or [OK]. L The unit will start printing. Note: L To stop printing from the unit, see page 64. L To load paper, see page 15, 27. L When using the manual input - Panasonic KX-MB262CX | Operating Instructions - Page 27
computer. 1 Adjust the width of the guides (1) to the size of the recording paper manual input tray, you must change the paper source in the [Basic] tab when setting the printer properties (page 26). You can also select the desired media type. To print on labels Use labels designed for laser - Panasonic KX-MB262CX | Operating Instructions - Page 28
page 64. L You can save the images in JPEG or PDF formats. 4.1.4 Scan to OCR With OCR software, you can convert an image into text data that can be edited with word processor software. Readiris OCR software can be installed when installing Multi-Function Station. 1 Set the original (page 19). 28 - Panasonic KX-MB262CX | Operating Instructions - Page 29
L See page 19 for document requirements. 4.2.2 Using Multi-Function Viewer 1 Set the original (page 19). 2 Start Multi-Function Station. 3 [Utilities] i [Viewer] L [Multi-Function Viewer] will appear. 4 Click the [Scan] icon in the [Multi-Function Viewer] window. L The unit's name dialogue box will - Panasonic KX-MB262CX | Operating Instructions - Page 30
displayed when the only one printer driver has been installed. L You can move, copy and delete a file or page. 4.2.3 Using other applications Multi-Function Station includes a TWAIN compliant scanner driver. You can also scan using other applications that support TWAIN scanning. For example, proceed - Panasonic KX-MB262CX | Operating Instructions - Page 31
machine near a supervised area to prevent illegal copies from being made. 5.1.1 Using the scanner glass 6 After you finish copying, press {STOP} to reset the settings you set the default operation mode (feature #464 on page 56) (KX-MB772 only). L If the {FAX AUTO ANSWER} light is ON, the unit - Panasonic KX-MB262CX | Operating Instructions - Page 32
Using the auto document feeder (KX- 5.2 More copying features MB772 enlargement / reduction) setting (feature #468 on page 61). L When using the scanner glass, the unit will only enlarge the right top corner of the document starting KX-MB772 only). L You cannot reduce the whole area of a legal size - Panasonic KX-MB262CX | Operating Instructions - Page 33
-MB772 only): Original document Enlarged copy Example: 70% reduced copy Using the scanner glass (1): Original document Reduced copy 1 Using the auto document feeder (KX-MB772 only): Original document Reduced copy 5. Copier 5.2.2 To copy 2-sided documents onto 1 page (Quick ID copy feature - Panasonic KX-MB262CX | Operating Instructions - Page 34
1 page. 2. Place the next document on the scanner glass and press {SET}. Repeat this until all the documents are scanned. L The unit will start copying. L You can press {START} anytime to start copying. When using the auto document feeder: {START} (KX-MB772 only). 7 After you finish copying, press - Panasonic KX-MB262CX | Operating Instructions - Page 35
unit will scan 1 page. 2. Place the next document on the scanner glass and press {SET}. Repeat this until all the documents are scanned, then press {START}. L The unit will start copying. When using the auto document feeder: {START} (KX-MB772 only). 6 After you finish copying, press {STOP} to reset - Panasonic KX-MB262CX | Operating Instructions - Page 36
6. Fax (KX-MB772 only) 6SeFnadxin(KgXF-aMxeBs772 only) 6.1 Sending a fax manually 6.1.1 Using the scanner glass By using the scanner glass, you can send a page from booklets or small size paper that cannot be sent with the auto document feeder. {FAX} {START} {CONTRAST} {REDIAL} {RESOLUTION} { - Panasonic KX-MB262CX | Operating Instructions - Page 37
6. Fax (KX-MB772 only) Printing a journal report A journal report provides you with a printed record of the 30 most recent faxes. To print it manually, see page 83. To print it automatically after every 30 new fax transmissions and receptions, make sure feature #402 is activated (page 57). For an - Panasonic KX-MB262CX | Operating Instructions - Page 38
6. Fax (KX-MB772 only) 3 Enter the telephone number, L Make sure that the {FAX} light is ON. 6.3.1 Using the scanner glass 1 Set the original (page 19). 2 If necessary, change to Using stations 1-3: Press the desired station key. Using stations 4-6: Press {LOWER}, then press the desired station key. - Panasonic KX-MB262CX | Operating Instructions - Page 39
Fax (KX-MB772 only broadcast function utilises stations 1-2. The one-touch dial function will MANUAL BROADCAST (using the dial keypad): 1. {MANUAL BROAD} 2. Press {V} or {^} repeatedly to select "MANUAL BROAD". 3 {SET} 4 Program items. Using stations 1-3: Press the desired station key. Using stations - Panasonic KX-MB262CX | Operating Instructions - Page 40
6. Fax (KX-MB772 only) 2 Press {V} or {^} repeatedly to display the desired broadcast memory ("" or ""). i {MENU} i {*} up to 20 items). 4 {STOP} Note: L When adding new items to the MANUAL BROADCAST memory, you can only select stored items. 2. If necessary, change to the - Panasonic KX-MB262CX | Operating Instructions - Page 41
a Windows application using Multi-Function Station. For example, to send a document created from WordPad, proceed as follows. 1 Open the document you want to send. 2 Select [Print...] from the [File] menu. L The [Print] dialogue box will appear. 3 Select the PCFAX unit's name as the active printer - Panasonic KX-MB262CX | Operating Instructions - Page 42
6. Fax (KX-MB772 only) Setup Set the fax machine to TEL mode (page 43) by #404 is set to "TEL" beforehand (page 57). How to receive phone calls and faxes You have to answer all calls manually. To receive a fax document, press {START}. 6.6.3 Use as a telephone and/or fax (TEL/FAX mode) Important: L - Panasonic KX-MB262CX | Operating Instructions - Page 43
6. Fax (KX-MB772 only) 6.7 Receiving a fax automatically - Auto answer ON 6.7.1 Activating FAX ONLY mode Press {FAX AUTO ANSWER} repeatedly to display "FAX ONLY MODE". L The {FAX AUTO ANSWER} light turns ON. 6.8 Receiving a fax manually - Auto answer OFF Important: L Use this mode with an - Panasonic KX-MB262CX | Operating Instructions - Page 44
6. Fax (KX-MB772 only) Note: L To stop receiving, see page 64. L To receive fax to talk to the calling party. B If you do not answer the call, the unit will activate the fax function. L Some fax machines do not generate fax calling tones when sending faxes, therefore the unit will try to receive - Panasonic KX-MB262CX | Operating Instructions - Page 45
(KX-MB772 more than 4 seconds during the message. Otherwise, both machines will not function correctly. 4 Activate the answering machine. 5 Set the unit to the may not be able to receive documents. See the operating instructions of the answering machine and erase unnecessary messages. 6.10 Receive - Panasonic KX-MB262CX | Operating Instructions - Page 46
service (page 48), this feature prevents fax reception from calls that do not show caller information. Additionally, the unit will not accept faxes originating from numbers that match the ones on a programmable junk fax prohibitor list. Important: L This feature does not work when manual reception - Panasonic KX-MB262CX | Operating Instructions - Page 47
auto answer setting ON (page 43). 2 Start Multi-Function Station. i [PC FAX] 3 When a fax call document 1. Select [PC FAX] from Multi-Function Station. 2. Select [Received Log] in [Communication your computer. 1. Select [PC FAX] from Multi-Function Station. 2. Select [Received Log] in [Communication - Panasonic KX-MB262CX | Operating Instructions - Page 48
telephone number and name. L This unit will not support future additional telephone services. L Depending on the service of the local telephone company, the date/time of the by printing the Caller ID list - To print manually, see page 83. - To print automatically after every 30 new calls, activate - Panasonic KX-MB262CX | Operating Instructions - Page 49
7. Caller ID (KX-MB772 only) 7.2 Viewing and calling back using caller information Important: L an area code prefix. For local calls, "0" and the area code prefix can be omitted (For New Zealand users only). 1 {CALLER ID} 2 Press {V} or {^} repeatedly to display the desired entry. 3 Press {CALLER - Panasonic KX-MB262CX | Operating Instructions - Page 50
7. Caller ID (KX-MB772 only) 7.4 Erasing caller information 7.5 Storing caller information 7.4.1 to select "DIAL MODE". i {SET} i {SET} For station 3: Press the station key. i {SET} For stations 4-6: Press {LOWER}, then press the desired station key. i {SET} For navigator directory: Press { - Panasonic KX-MB262CX | Operating Instructions - Page 51
Ring (KX-MB772 only) 8DiDstiisntcinticvteiveRiRnging (KX-MB772 only) 8.1 Distinctive Ring (Fax Ability/Duplex ring) service Important: L Not available when "MALAYSIA" is selected in feature #114 on page 54. This feature is only for use if you subscribe to a Distinctive Ring pattern service from - Panasonic KX-MB262CX | Operating Instructions - Page 52
8. Distinctive Ring (KX-MB772 only) 8.4 Programming the ring pattern assigned for fax Important: L Available when "MIDDLE EAST", "ASIA", "AFRICA" or "LAT.AMERICA" is selected in feature #114 on - Panasonic KX-MB262CX | Operating Instructions - Page 53
9FePartougrerasmSmumabmleaFryeatures 9.1 Programming {MENU} {SET} 1 {MENU} 2 Press {#} and the 3-digit code (page 54 to page 62). 3 Press the desired selection to display the desired setting. L This step may be slightly different depending on the feature. 4 {SET} 5 Press {MENU} to exit. 9. - Panasonic KX-MB262CX | Operating Instructions - Page 54
KX-MB772 only) Setting your logo {#}{1}{0}{2} (KX-MB772 only) Setting your fax number {#}{1}{0}{3} (KX-MB772 only) Setting the location where you use {#}{1}{1}{4} (KX-MB772 only) Setting the dialling mode {#}{1}{2}{0} (KX . {3} "MALAYSIA": To use in Malaysia. {4} " PBX, PBX functions (transferring - Panasonic KX-MB262CX | Operating Instructions - Page 55
this feature. {1} "ENABLED": The unit will hold the previous setting. Note: L The previous setting will be held individually for copying and sending faxes (KX-MB772 only). To select the default operation mode when the selected time of the mode timer (feature #464) passes. {1} "COPY" (default): Copy - Panasonic KX-MB262CX | Operating Instructions - Page 56
9. Programmable Features Feature/Code Setting the default operation mode timer {#}{4}{6}{4} (KX-MB772 only) Setting toner save feature {#}{4}{8}{2} Selection To set the timer before returning to the default operation mode (feature #463). {0} "OFF": Deactivates this feature. {1} "30s": 30 seconds - Panasonic KX-MB262CX | Operating Instructions - Page 57
Features 9.3 Fax features (KX-MB772 only) Feature/Code Changing the TEL/FAX delayed ring count {#}{2}{1}{2} Printing a sending report {#}{4}{0}{1} Setting the journal report to print automatically {#}{4}{0}{2} Changing the receiving mode in the manual answer setting {#}{4}{0}{4} Sending documents - Panasonic KX-MB262CX | Operating Instructions - Page 58
page 21), the time is set using 24hour time entry. 9. When using the scanner glass, press {SET}. i {START} When using the auto document feeder, press during fax transmission / reception, the unit will support the communication. If you often have trouble when sending faxes, this feature allows you to - Panasonic KX-MB262CX | Operating Instructions - Page 59
3). L See page 44 for details. To alert you with a beeping sound when a received fax document is stored into memory due to some existing problem. {0} "OFF": Deactivates this feature. {1} "ON" (default): You will hear a beeping sound. Note: L The slow beeps will continue until you solve the printing - Panasonic KX-MB262CX | Operating Instructions - Page 60
press {START} for fax reception. If you wish to receive a fax into the computer, activate this feature and run [PC FAX] from Multi-Function Station. {0} "OFF": Deactivates this feature. {1} "ALWAYS": If the unit recognizes the connection to the computer, it will transfer a received document to the - Panasonic KX-MB262CX | Operating Instructions - Page 61
9. Programmable Features 9.4 Copy features Feature/Code Changing the default copy resolution {#}{4}{6}{1} Holding the previous page layout setting {#}{4}{6}{7} Holding the previous zoom (enlargement / reduction) setting {#}{4}{6}{8} Holding the previous collate setting {#}{4}{6}{9} Selection To - Panasonic KX-MB262CX | Operating Instructions - Page 62
as a file. {3} "E-MAIL": The scanned image will be saved for e-mail attachment. {4} "OCR": The scanned image will be displayed in the OCR window. {0} "DISABLED" (default): Deactivates this feature. {1} "ENABLED": The unit will hold the previous scan settings for each mode of push scan; scan type - Panasonic KX-MB262CX | Operating Instructions - Page 63
10. Useful Information 1U0seUfusel IfnufloIrnmfoarmtioantion 10.1 Character entry (KX-MB772 only) The dial keypad is used to enter characters and numbers. - Press {} to move the cursor. - Press dial keys to enter characters and - Panasonic KX-MB262CX | Operating Instructions - Page 64
of the unit from your computer. 1 Start Multi-Function Station. 2 [Utilities] i [Device Monitor] L The [Device Monitor] window will appear. 3 Confirm the status of the unit. [Status]: Current status of the unit Note: L Additional information (toner and recording paper status, unit information, etc - Panasonic KX-MB262CX | Operating Instructions - Page 65
- Reports (KX-MB772 only) If a problem occurs during machine rings too many times. Send the fax manually (page 36). L The other party's machine is not a fax machine. with the other party. L The number you dialled is not in service. L {STOP} was pressed and fax communication was cancelled. L The - Panasonic KX-MB262CX | Operating Instructions - Page 66
a problem, one or more of the following messages will appear on the display. Display "CALL SERVICE" " has a document in memory. See the other displayed message instructions to print out the document. For fax memory capacity, of the unit. Send the entire document manually. L When making a copy, the - Panasonic KX-MB262CX | Operating Instructions - Page 67
the software and try again. L The unit is warming up. Wait for a while. L The other party's fax machine does not offer the polling function. Check The toner's service life is finished. Replace the toner cartridge immediately. L The toner's service life is near to an end. Replace the toner cartridge - Panasonic KX-MB262CX | Operating Instructions - Page 68
] i [Cleanup Tool] L The [MfsCleaner] window will appear. 3. Click [Clean], then click [Yes] to restart the computer. Note: L To install Multi-Function Station again, see page 23. L Install the operating instructions to your computer beforehand (page 24). L The printer driver has not been installed - Panasonic KX-MB262CX | Operating Instructions - Page 69
] in the print dialogue so that coloured text will be printed in greyscale. 11.3.3 Scanner Problem I cannot scan. The document is not fed into the unit when using the unit as a scanner (KX-MB772 only). Even after clicking [Cancel], scanning continues. Cause & Solution L When scanning at a high - Panasonic KX-MB262CX | Operating Instructions - Page 70
document, using "TEXT" resolution (page 31). 11.3.5 Fax (KX-MB772 only) Problem I cannot send documents. I cannot send a fax overseas. The of the telephone number or dial manually. L If your line has special telephone services such as call waiting, the service may have been activated during fax - Panasonic KX-MB262CX | Operating Instructions - Page 71
do not subscribe to the Distinctive Ring service offered by your local telephone company, this feature should be OFF (KX-MB772 only). L The incoming call is . L If documents can not be copied properly, refer to "11.3.2 Printing problems", page 69. L The memory is full of received documents due to a - Panasonic KX-MB262CX | Operating Instructions - Page 72
service provider to have an ADSL Splitter installed. We do not recommend the use of generic ADSL filters. 11.3.6 Using an answering machine (KX-MB772 only) Problem operating instructions of function. L If any documents are stored in the memory (i.e. during copy, PC printing), they will be lost. KX - Panasonic KX-MB262CX | Operating Instructions - Page 73
the unit The display will show the following. PAPER JAMMED b OPEN TOP COVER 12. Paper Jams Case 1: When the recording paper has jammed near the manual input tray: 1. Pull open the paper input tray (1). CHECK REAR COVER Caution: L Do not pull out the jammed paper forcibly before opening the top - Panasonic KX-MB262CX | Operating Instructions - Page 74
12. Paper Jams 3. Close the paper input tray. 4 Case 2: When the recording paper has jammed near the drum and toner unit: 1. Pull open the paper input tray (1). L Open and close the top cover (4) to clear the error message. 1 2. Lift the top cover release lever (2) and - Panasonic KX-MB262CX | Operating Instructions - Page 75
3. Remove the jammed paper (6) carefully by pulling it upwards. 4. Close the paper input tray. 6 12. Paper Jams Remove the jammed paper (7) carefully by pulling it toward you. 5. Close the top cover until locked. 7 75 - Panasonic KX-MB262CX | Operating Instructions - Page 76
12. Paper Jams Case 3: When the recording paper has jammed near the fuser unit: 1. Lift the top cover release lever (1) and open the top cover (2). 2 4 3. Remove the jammed paper (6) carefully by pulling it upwards. 1 3 6 Caution: The fuser unit (3) gets hot. Do not touch it. Note: L Do not - Panasonic KX-MB262CX | Operating Instructions - Page 77
the front part of the tray. Remove the recording paper and straighten. 2 Re-load the recording paper. 12.1.3 When the recording paper in the manual input tray is not fed into the unit properly The display will show the following. CHECK PICK UP INPUT TRAY #2 1 Remove the recording paper. 2 Re - Panasonic KX-MB262CX | Operating Instructions - Page 78
12. Paper Jams 12.2 Document jams (Auto document feeder) (KX-MB772 only) Caution: L Do not pull out the jammed document forcibly before lifting the ADF cover. When the document has jammed near the document entrance: 3 1 - Panasonic KX-MB262CX | Operating Instructions - Page 79
the other party (KX- MB772 only). Caution: L Be careful when handling the drum and toner unit. See the caution for the drum unit on page 10 for details. L Do not use paper products, such as paper towels or tissues, to clean the inside of the unit. 13.1.1 White plates and scanner - Panasonic KX-MB262CX | Operating Instructions - Page 80
the top cover release lever (1) and open the top cover (2). 2 4 4 Clean the lower glass (6) with a soft and dry cloth. 6 1 3 5 Reinstall the drum and toner unit (7) by holding the tabs. Caution: The fuser unit (3) gets hot. Do not touch it. Note: L Do not touch the transfer roller (4). 3 Remove - Panasonic KX-MB262CX | Operating Instructions - Page 81
L Make sure that the triangles (8) match, to install the drum and toner unit correctly. 13. Cleaning Caution: L To prevent injuries, be careful not to put your hands under the top cover. 8 6 Close the top cover until locked. 7 Re-connect the power cord. 81 - Panasonic KX-MB262CX | Operating Instructions - Page 82
13. Cleaning 13.2 Cleaning the document feeder rollers (KX-MB772 only) Clean the rollers when the document frequently misfeeds. 1 Disconnect the power cord. 2 Open the ADF cover (1) while holding the document cover (2). 1 2 4 Close the - Panasonic KX-MB262CX | Operating Instructions - Page 83
is still poor, replace the toner cartridge and drum unit. - "CALLER ID LIST"*1 *1 KX-MB772 only {MENU} {SET} ■ Document size: KX-MB262: Max. 216 mm in width, Max. 297 mm in length KX-MB772: Max. 216 64-level ■ Scanner type: Colour Contact Image Sensor ■ Printer type: Laser Printer ■ Data compression - Panasonic KX-MB262CX | Operating Instructions - Page 84
Laser output: Max. 5 mW Wave length: 760 nm - 810 nm Emission duration: Continuous ■ Print speed: Approx. 18 ppm (pages per minute) ■ Printing resolution: 600 × 600 dpi *1 KX - sided printing with other copiers or printers. This may cause paper jams. in these instructions may vary slightly - Panasonic KX-MB262CX | Operating Instructions - Page 85
Multi-Function Station 4.3 Starting Multi-Function Station Printing 4.4 Using the unit as a printer Scanning 4.5 Using the unit as a scannerRemote Control 4.6 Operating the unit from your computer. 4.7 Fax sending/receiving using Multi-Function Station Thank you for purchasing a Panasonic - Panasonic KX-MB262CX | Operating Instructions - Page 86
journal report: 37, 57 #403 Power save: 55 #404 Manual answer mode: 57 #411 Overseas mode: 57 #412 Delayed 61 #468 Zoom hold: 61 #469 Collate hold: 61 #482 Toner save: 13, 56 #493 Scan mode: 62 #494 Scan #145): 54 Error messages: 66 Distinctive Ring Service (Feature #430): 58 Document size: 19 - Panasonic KX-MB262CX | Operating Instructions - Page 87
Manual input tray: 27 Memory reception alert (Feature #437): 59 Mode timer (Feature #464): 56 Multi-Function Station software Activating: 25 Installing: 23 Uninstalling: 24 N Navigator directory Sending faxes: 38 Storing: 37 O OCR software : 37, 83 Power down: 72 Printer test: 83 Sending: 36, 57 - Panasonic KX-MB262CX | Operating Instructions - Page 88
PFQX2741ZA CM0807DN0 (CD)
-
 1
1 -
 2
2 -
 3
3 -
 4
4 -
 5
5 -
 6
6 -
 7
7 -
8
-
9
-
10
-
11
-
12
-
13
-
14
-
15
-
16
-
17
-
18
-
19
-
20
-
21
-
22
-
23
-
24
-
25
-
26
-
27
-
28
-
29
-
30
-
31
-
32
-
33
-
34
-
35
-
36
-
37
-
38
-
39
-
40
-
41
-
42
-
43
-
44
-
45
-
46
-
47
-
48
-
49
-
50
-
51
-
52
-
53
-
54
-
55
-
56
-
57
-
58
-
59
-
60
-
61
-
62
-
63
-
64
-
65
-
66
-
67
-
68
-
69
-
70
-
71
-
72
-
73
-
74
-
75
-
76
-
77
-
78
-
79
-
80
-
81
-
82
-
83
-
84
-
85
-
86
-
87
-
88
 |
 |

KX-MB262CX or KX-MB772CX may not be available in some areas.
KX-MB772 only:
L
This unit is compatible with Caller ID. To use this feature, you must subscribe to the
appropriate service of your service provider.
L
Be sure to use the telephone line cord included in this unit.
L
This model is designed to be used in Middle East, Hong Kong, Malaysia, Asia, New Zealand,
Africa and Latin America according to the location setting feature. The default setting is
Middle East. To change the location setting, see page 54 (feature #114).
Operating Instructions
KX-MB772CX
Multi-Function Printer
Model No.
KX-MB262CX
Do NOT connect the USB cable until prompted by the Multi-Function Station (CD-ROM).
1
2
This pictured model is KX-MB262.