Panasonic KX-MB262CX Operating Instructions - Page 14
If the top part of the extender is detached, If the extender is detached
 |
View all Panasonic KX-MB262CX manuals
Add to My Manuals
Save this manual to your list of manuals |
Page 14 highlights
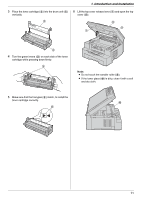
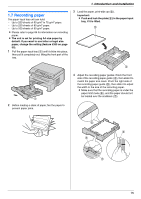
1. Introduction and Installation If the top part of the extender is detached 1. With the top part of the extender in the open position, insert the tab (1) into the left hole (2) of the extender. If the extender is detached 1. Line up the extender (1) with the left side of the output tray. Make sure that the triangles (2) match, to attach the extender correctly. 1 2 2 1 2. Slide the other tab (3) into the right hole (4) of the extender from below until it clicks into place. 2. Snap the extender (3) into the unit by pushing down the right side of the extender. 3 4 3 14
-
 1
1 -
2
-
3
-
4
-
5
-
6
-
7
-
8
-
 9
9 -
 10
10 -
 11
11 -
 12
12 -
 13
13 -
 14
14 -
 15
15 -
 16
16 -
 17
17 -
 18
18 -
 19
19 -
20
-
21
-
22
-
23
-
24
-
25
-
26
-
27
-
28
-
29
-
30
-
31
-
32
-
33
-
34
-
35
-
36
-
37
-
38
-
39
-
40
-
41
-
42
-
43
-
44
-
45
-
46
-
47
-
48
-
49
-
50
-
51
-
52
-
53
-
54
-
55
-
56
-
57
-
58
-
59
-
60
-
61
-
62
-
63
-
64
-
65
-
66
-
67
-
68
-
69
-
70
-
71
-
72
-
73
-
74
-
75
-
76
-
77
-
78
-
79
-
80
-
81
-
82
-
83
-
84
-
85
-
86
-
87
-
88
 |
 |

1. Introduction and Installation
14
If the top part of the extender is detached
1.
With the top part of the extender in the open position,
insert the tab (
1
) into the left hole (
2
) of the
extender.
2.
Slide the other tab (
3
) into the right hole (
4
) of the
extender from below until it clicks into place.
If the extender is detached
1.
Line up the extender (
1
) with the left side of the
output tray. Make sure that the triangles (
2
) match,
to attach the extender correctly.
2.
Snap the extender (
3
) into the unit by pushing down
the right side of the extender.
2
1
4
3
1
2
3