Panasonic KX-MB262CX Operating Instructions - Page 27
Using the manual input tray, Printer - laser printer
 |
View all Panasonic KX-MB262CX manuals
Add to My Manuals
Save this manual to your list of manuals |
Page 27 highlights
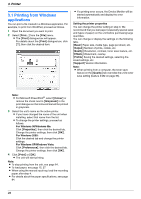
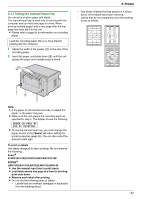
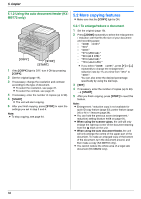
3.1.1 Using the manual input tray You can print on plain paper and labels. The manual input tray is used only for printing with the computer and can hold one page at a time. When printing multiple pages, add a next page after the first page has been fed into the unit. L Please refer to page 84 for information on recording paper. Load the recording paper after you have started printing with the computer. 1 Adjust the width of the guides (1) to the size of the recording paper. 2 Insert the paper, print-side down (2) until the unit grasps the paper and a single beep is heard. 2 3. Printer - Any sheet of labels that has spaces in it where some of the labels have been removed. - Labels that do not completely cover the backing sheet as follows. 1 Note: L If the paper is not inserted correctly, re-adjust the paper, or the paper may jam. L Make sure the unit grasps the recording paper as specified in step 2. The display shows the following. PAPER IN TRAY #2 FOR PC PRINTING L To use the manual input tray, you must change the paper source in the [Basic] tab when setting the printer properties (page 26). You can also select the desired media type. To print on labels Use labels designed for laser printing. We recommend the following: Avery® 5160/5161/5162/5163/5164/5165/5167/5168 XEROX® LWH100/LWH110/LWH120/LWH130/LWH140 L Use the manual input tray to print labels. L Load label sheets one page at a time for printing, print-side down. L Remove each label after printing. L Do not use the following types of labels: - Labels that are wrinkled, damaged or separated from the backing sheet. 27
-
 1
1 -
2
-
3
-
4
-
5
-
6
-
7
-
8
-
9
-
10
-
11
-
12
-
13
-
14
-
15
-
16
-
17
-
18
-
19
-
20
-
21
-
 22
22 -
 23
23 -
 24
24 -
 25
25 -
 26
26 -
 27
27 -
 28
28 -
 29
29 -
 30
30 -
 31
31 -
 32
32 -
33
-
34
-
35
-
36
-
37
-
38
-
39
-
40
-
41
-
42
-
43
-
44
-
45
-
46
-
47
-
48
-
49
-
50
-
51
-
52
-
53
-
54
-
55
-
56
-
57
-
58
-
59
-
60
-
61
-
62
-
63
-
64
-
65
-
66
-
67
-
68
-
69
-
70
-
71
-
72
-
73
-
74
-
75
-
76
-
77
-
78
-
79
-
80
-
81
-
82
-
83
-
84
-
85
-
86
-
87
-
88
 |
 |
