Panasonic KX-WP1050 Wifi Telephone - Page 164
Setting, Description, Status/Packet, Filtering], Action], Direction], Source IP, Address]
 |
UPC - 037988840205
View all Panasonic KX-WP1050 manuals
Add to My Manuals
Save this manual to your list of manuals |
Page 164 highlights
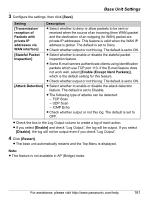
Base Unit Settings 4 Configure the settings under the Packet Filtering Setting heading, then click [Add] to add the new entry. Setting [No.] [Status/Packet Filtering] [Action] [Direction] [Source IP Address] [Source Port] [Destination IP Address] Description L Select the desired entry number for the packet filtering setting. Entry number represents the priority. Entry number 1 has the highest priority. L Select whether to enable or disable the packet filtering feature. L Select whether to allow or deny IP packets that are being received. L Select [LiW] (filtering when sending to WAN) or [WiL] (filtering when receiving from WAN). L Enter the packet source IP address/netmask to be filtered. L If you want to set one IP address, enter that IP address in IP address field and "32" in netmask field. (e.g. If you want to control the packet from 192.168.102.10, enter "192.168.102.10" in IP address field and "32" in netmask field.) L If you want to set a range of IP addresses, enter that network address in IP address field and it's netmask in netmask field. (e.g. If you want to control the packet from 192.168.102.0 192.168.102.255, enter "192.168.102.0" in IP address field and "24" in netmask field.) L If you want to set the base unit's address, enter "local" in IP address field. Leave the netmask field blank.*1 L If you want to set all IP address, select "*" in IP address field. Leave the netmask field blank. L Enter the packet source port to be filtered when you select the protocol from TCP/UDP/TCP&UDP. L If you want to set one port, enter its port number only. L If you want to set a range of ports, enter the port numbers in the following way: "2000 - 3000" L If you want to set all ports, select "*". L Enter the packet destination IP address to be filtered. L The entry is the same as the Source IP Address. 164 For assistance, please visit http://www.panasonic.com/help
-
 1
1 -
2
-
3
-
4
-
5
-
6
-
7
-
8
-
9
-
10
-
11
-
12
-
13
-
14
-
15
-
16
-
17
-
18
-
19
-
20
-
21
-
22
-
23
-
24
-
25
-
26
-
27
-
28
-
29
-
30
-
31
-
32
-
33
-
34
-
35
-
36
-
37
-
38
-
39
-
40
-
41
-
42
-
43
-
44
-
45
-
46
-
47
-
48
-
49
-
50
-
51
-
52
-
53
-
54
-
55
-
56
-
57
-
58
-
59
-
60
-
61
-
62
-
63
-
64
-
65
-
66
-
67
-
68
-
69
-
70
-
71
-
72
-
73
-
74
-
75
-
76
-
77
-
78
-
79
-
80
-
81
-
82
-
83
-
84
-
85
-
86
-
87
-
88
-
89
-
90
-
91
-
92
-
93
-
94
-
95
-
96
-
97
-
98
-
99
-
100
-
101
-
102
-
103
-
104
-
105
-
106
-
107
-
108
-
109
-
110
-
111
-
112
-
113
-
114
-
115
-
116
-
117
-
118
-
119
-
120
-
121
-
122
-
123
-
124
-
125
-
126
-
127
-
128
-
129
-
130
-
131
-
132
-
133
-
134
-
135
-
136
-
137
-
138
-
139
-
140
-
141
-
142
-
143
-
144
-
145
-
146
-
147
-
148
-
149
-
150
-
151
-
152
-
153
-
154
-
155
-
156
-
157
-
158
-
 159
159 -
 160
160 -
 161
161 -
 162
162 -
 163
163 -
 164
164 -
 165
165 -
 166
166 -
 167
167 -
 168
168 -
 169
169 -
170
-
171
-
172
-
173
-
174
-
175
-
176
-
177
-
178
-
179
-
180
-
181
-
182
-
183
-
184
-
185
-
186
-
187
-
188
-
189
-
190
-
191
-
192
-
193
-
194
-
195
-
196
-
197
-
198
-
199
-
200
-
201
-
202
-
203
-
204
-
205
-
206
-
207
-
208
-
209
-
210
-
211
-
212
-
213
-
214
-
215
-
216
-
217
-
218
-
219
-
220
-
221
-
222
-
223
-
224
-
225
-
226
-
227
-
228
-
229
-
230
-
231
-
232
-
233
-
234
-
235
-
236
 |
 |
