Panasonic KXFPC161 Operating Instructions - Page 52
COPY, COPYING, Making a copy
 |
View all Panasonic KXFPC161 manuals
Add to My Manuals
Save this manual to your list of manuals |
Page 52 highlights
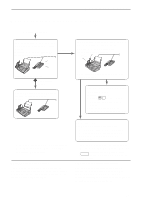
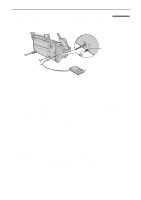
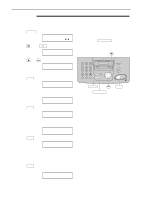
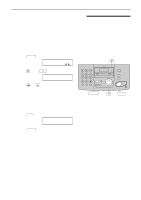
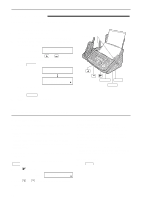
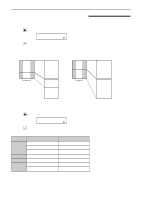
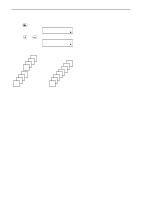
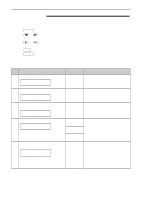
Copying Making a copy! The unit can make single or multiple copies (up to 50). 1 Adjust the width of the document guides to the size of the document. 2 Insert the document (up to 10 pages) FACE DOWN until a single beep is heard and the unit grabs the document. Display: !!!STANDARD PRESS NAVI.[+ -] q If necessary, press or repeatedly to select the desired resolution (see below). 3 Press COPY . NUMBER=1 COPY:PRESS START Document guides FACE DOWN NUMBER=1 OR PRESS NAVI. H q If necessary, enter the number of copies (up to 50). 4 Press START . q The unit will start copying. START STOP COPY Note: q Any transmittable document can be copied (p. 36). To select the resolution Select the desired resolution according to the type of document. - FINE: For printed or typewritten originals with small printing. - SUPER FINE: For originals with very small printing. - PHOTO: For originals containing photographs, shaded drawings, etc. q If you select "STANDARD", copying will be done using "FINE" mode. You can also select the resolution after pressing COPY in step 3. 1. Press 3 times. Display: STANDARD [+ -] H 2. Press or resolution. repeatedly to select the desired Quick scan feature With this feature, the unit can scan the document into memory before copying. This feature is helpful when you want to remove the document for other uses. To use this feature, activate feature #34 on page 59 and make a copy. After storing, the unit will print the document. q If the document exceeds the memory capacity (p. 80), copying will be canceled and this feature will be turned off automatically. To stop copying Press STOP . 52
-
 1
1 -
2
-
3
-
4
-
5
-
6
-
7
-
8
-
9
-
10
-
11
-
12
-
13
-
14
-
15
-
16
-
17
-
18
-
19
-
20
-
21
-
22
-
23
-
24
-
25
-
26
-
27
-
28
-
29
-
30
-
31
-
32
-
33
-
34
-
35
-
36
-
37
-
38
-
39
-
40
-
41
-
42
-
43
-
44
-
45
-
46
-
 47
47 -
 48
48 -
 49
49 -
 50
50 -
 51
51 -
 52
52 -
 53
53 -
 54
54 -
 55
55 -
 56
56 -
 57
57 -
58
-
59
-
60
-
61
-
62
-
63
-
64
-
65
-
66
-
67
-
68
-
69
-
70
-
71
-
72
-
73
-
74
-
75
-
76
-
77
-
78
-
79
-
80
-
81
-
82
-
83
-
84
 |
 |
