Panasonic WVCW974 WVCW974 User Guide - Page 15
Camera installation, Mounting the Camera
 |
UPC - 791871505373
View all Panasonic WVCW974 manuals
Add to My Manuals
Save this manual to your list of manuals |
Page 15 highlights
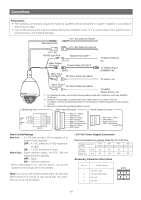
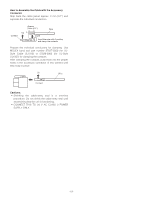
Camera installation ■ Mounting the Camera Ceiling mount The figure shows an example of the camera mounted on a ceiling with a locally procured bracket. Refer to the instructions included with the bracket for filling gaps and holes with waterproof material. 2. Disassembling the Camera (1) Remove the upper base from the camera by loosening 3 screws. The screws that are removed need to be used during reassembly. Be careful to not lose them. Turn the upper base and separate it. * Special screw (mounting screw): Use a hexagon wrench for the hexagon screw (M6). x3 ● Construction 40 1-1/2B deep 30 MAX PT11 crest (taper pipe thread) (Ø 58) 40 1-1/2A deep 30 MAX PT11 crest (parallel pipe thread) (60) 25 85 ● Assemble procedure 1. Preparations (1) Procure a ceiling mount bracket. (2) To prevent the camera from falling, use a mounting a bracket to which a safety wire can be attached. (3) Installation Surface Caution: Consult an expert on the load bearing capacity of the installation surface and structure. If the surface is not strong enough, the camera may fall down. Refer to the product specifications for weights. Prepare appropriate hardware (e.g. wall nuts, anchor bolts, etc.) for fixing on the installation surface. (2) Remove the attachment pipe from the upper base by loosening 4 screws. * Special screw (mounting screw): Use a hexagon wrench for the hexagon screw (M6). x4 -15-
-
 1
1 -
2
-
3
-
4
-
5
-
6
-
7
-
8
-
9
-
 10
10 -
 11
11 -
 12
12 -
 13
13 -
 14
14 -
 15
15 -
 16
16 -
 17
17 -
 18
18 -
 19
19 -
 20
20 -
21
-
22
-
23
-
24
-
25
-
26
-
27
-
28
-
29
-
30
-
31
-
32
-
33
-
34
-
35
-
36
-
37
-
38
-
39
-
40
-
41
-
42
-
43
-
44
-
45
-
46
-
47
-
48
-
49
-
50
-
51
-
52
-
53
-
54
-
55
-
56
-
57
-
58
-
59
-
60
-
61
-
62
-
63
-
64
-
65
-
66
-
67
-
68
-
69
-
70
-
71
-
72
-
73
-
74
-
75
-
76
-
77
-
78
-
79
-
80
-
81
-
82
-
83
-
84
-
85
-
86
-
87
-
88
-
89
-
90
-
91
-
92
-
93
-
94
-
95
-
96
-
97
-
98
-
99
-
100
-
101
-
102
-
103
-
104
-
105
-
106
-
107
-
108
-
109
-
110
-
111
-
112
-
113
-
114
-
115
-
116
-
117
-
118
-
119
-
120
-
121
-
122
 |
 |
