Panasonic WVCW974 WVCW974 User Guide - Page 16
Mounting the camera, Caution, Warning
 |
UPC - 791871505373
View all Panasonic WVCW974 manuals
Add to My Manuals
Save this manual to your list of manuals |
Page 16 highlights
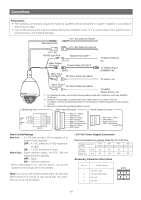
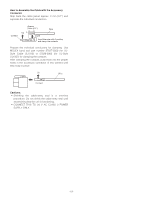
3. Mounting the Bracket (1) Fix the bracket to the installation surface using appropriate bolts, nuts or the like (not supplied). Make sure that everything is tightened securely. 4. Mounting the camera (1) Aim the "START" arrow at the bent portion of the leaf spring. Bending Leaf Spring S TA R T Attachment Pipe (2) Fix the attachment pipe to the bracket. (3) Thread cables through the bracket. Connect cables, referring to CONNECTIONS. Warning: Seal the cables with plastic or rubber tape to prevent it from being exposed. (2) Be sure to hook the fall prevention wire into the bracket. Fall Prevention Wire Cables Upper Base (4) Fix the upper base to the attachment pipe. • Fasten 4 screws (the screws that were removed in step (2) of "2. Disassembling the Camera") making sure that "REAR" engraved on the upper base faces the wall. Recommended torque: Approximately 5.0 N/m {51 kgf cm} • Fill the gap between the bracket and attachment pipe with waterproof material such as silicon clay. See instructions of the bracket for details. Warning: Carefully apply the sealing so that water or moisture cannot get inside. If water gets inside the camera it could cause a shock or fire. Also, if moisture gets inside the camera it could cause the dome to become foggy. Waterproof Material x4 Screws (3) Fix the camera to the upper base. • Move the camera up so that its guide pins fit into the guide holes of the upper base. • Turn the camera counter-clockwise to the end, viewed from the bottom. • Fasten 3 screws (the screws that were removed in step (1) of "2. Disassembling the Camera"). Caution: Tighten the three (3) mounting screws for the upper base. Recommended torque: Approximately 5.0 N/m {51 kgf cm} Poorly tightened screws may result in water leaking into the camera or possible fire. x3 Screws Upper Base Enclosure Upper Base -16-
-
 1
1 -
2
-
3
-
4
-
5
-
6
-
7
-
8
-
9
-
10
-
 11
11 -
 12
12 -
 13
13 -
 14
14 -
 15
15 -
 16
16 -
 17
17 -
 18
18 -
 19
19 -
 20
20 -
 21
21 -
22
-
23
-
24
-
25
-
26
-
27
-
28
-
29
-
30
-
31
-
32
-
33
-
34
-
35
-
36
-
37
-
38
-
39
-
40
-
41
-
42
-
43
-
44
-
45
-
46
-
47
-
48
-
49
-
50
-
51
-
52
-
53
-
54
-
55
-
56
-
57
-
58
-
59
-
60
-
61
-
62
-
63
-
64
-
65
-
66
-
67
-
68
-
69
-
70
-
71
-
72
-
73
-
74
-
75
-
76
-
77
-
78
-
79
-
80
-
81
-
82
-
83
-
84
-
85
-
86
-
87
-
88
-
89
-
90
-
91
-
92
-
93
-
94
-
95
-
96
-
97
-
98
-
99
-
100
-
101
-
102
-
103
-
104
-
105
-
106
-
107
-
108
-
109
-
110
-
111
-
112
-
113
-
114
-
115
-
116
-
117
-
118
-
119
-
120
-
121
-
122
 |
 |
