Panasonic WVCW974 WVCW974 User Guide - Page 17
Installing the brackets, Attach the brackets to the camera
 |
UPC - 791871505373
View all Panasonic WVCW974 manuals
Add to My Manuals
Save this manual to your list of manuals |
Page 17 highlights
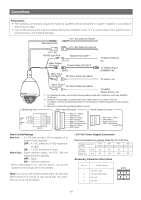
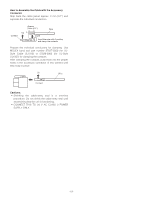
■ Installing the brackets Refer to the installation guides provided with the brackets. ■ Attach the brackets to the camera 1. Put the waterproof caps (provided) onto the tops of the screws. 3. Before clamping the sun shield, close the front and rear sun shields (first latch the hook on the wire side, and then do the other side). * Take care that the camera safety wire does not go on the inside. Camera Safety wire Sun shield ■ Attach the front and rear sun shields (provided) to the camera 1. Hold the front and rear sun shields by the indentations on the rims and release the hooks from both sides to separate them. A wire is attached to one side to prevent them from being lost. 4. Align the arrow (˜) on the rear sun shield with the "START" arrow (˚) on the sun shield and then turn them to the "LOCK" arrow (˚) until they click. Indented parts Align with this arrow Wire Unhook 5. Use the screws on the front/rear sun shields to attach them to the camera. Recommended tightening torque: 5.0 N/m {51 kgf cm} 2. Hold the front and rear sun shields near the Upper Base in position to be mounted. Note: To remove the front/rear sunshields from the camera, do the above procedure in reverse. Caution: The camera safety wire is designed to allow the camera to hang from it. Do not apply force greater than the weight of the camera to the wire. -17-
-
 1
1 -
2
-
3
-
4
-
5
-
6
-
7
-
8
-
9
-
10
-
11
-
 12
12 -
 13
13 -
 14
14 -
 15
15 -
 16
16 -
 17
17 -
 18
18 -
 19
19 -
 20
20 -
 21
21 -
 22
22 -
23
-
24
-
25
-
26
-
27
-
28
-
29
-
30
-
31
-
32
-
33
-
34
-
35
-
36
-
37
-
38
-
39
-
40
-
41
-
42
-
43
-
44
-
45
-
46
-
47
-
48
-
49
-
50
-
51
-
52
-
53
-
54
-
55
-
56
-
57
-
58
-
59
-
60
-
61
-
62
-
63
-
64
-
65
-
66
-
67
-
68
-
69
-
70
-
71
-
72
-
73
-
74
-
75
-
76
-
77
-
78
-
79
-
80
-
81
-
82
-
83
-
84
-
85
-
86
-
87
-
88
-
89
-
90
-
91
-
92
-
93
-
94
-
95
-
96
-
97
-
98
-
99
-
100
-
101
-
102
-
103
-
104
-
105
-
106
-
107
-
108
-
109
-
110
-
111
-
112
-
113
-
114
-
115
-
116
-
117
-
118
-
119
-
120
-
121
-
122
 |
 |
