Philips DV910VHS User manual - Page 12
Connect the power cords of the TV and the DVD/VCR to a power outlet.Turn on the TV and set
 |
View all Philips DV910VHS manuals
Add to My Manuals
Save this manual to your list of manuals |
Page 12 highlights
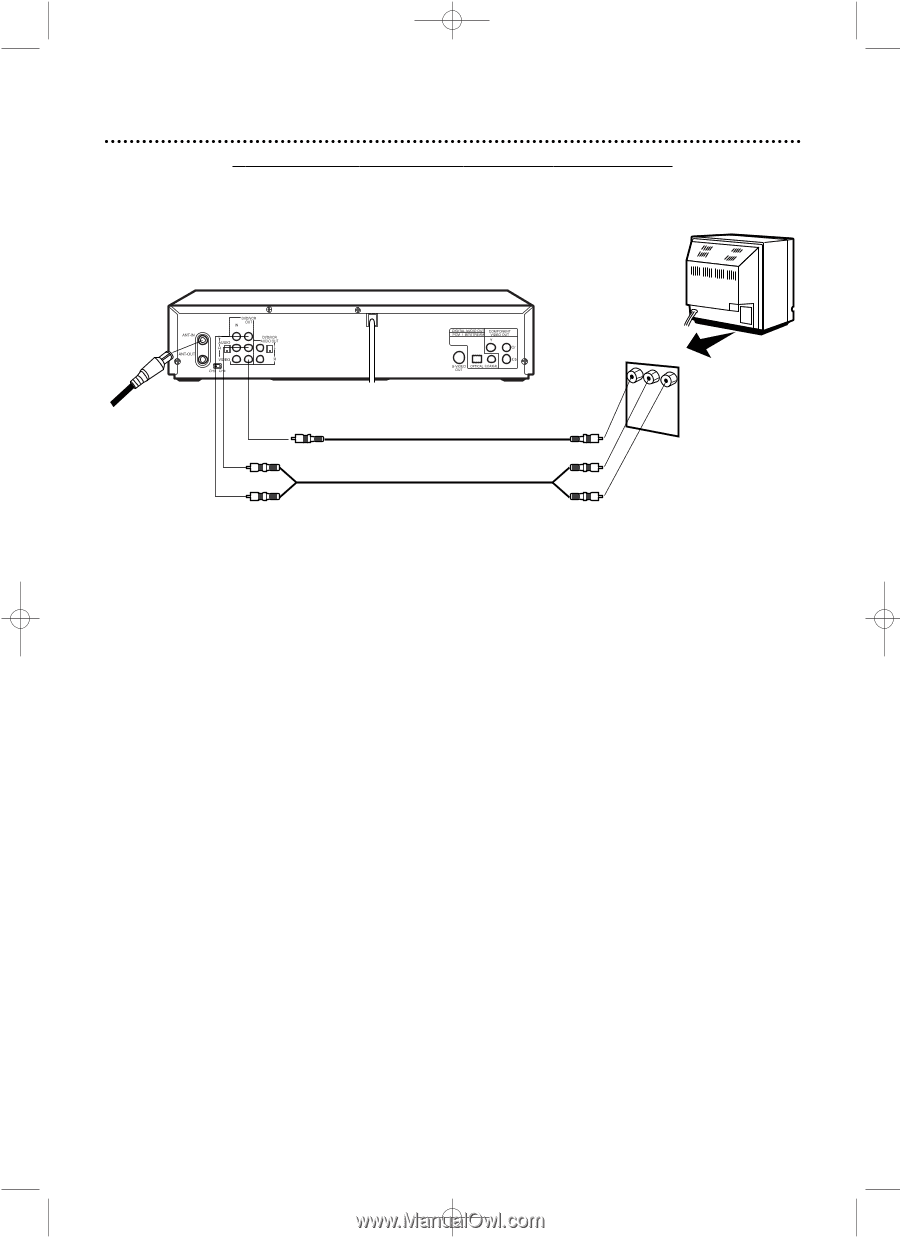
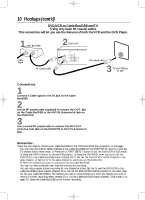
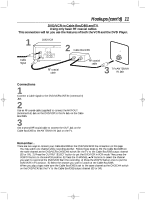
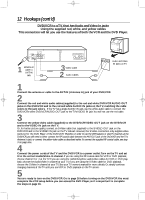
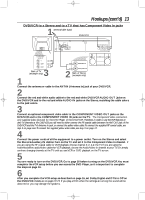
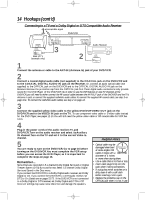
DV910(H9100).QX33 01.8.9 10:26 AM Page 12 12 Hookups (cont'd) DVD/VCR to a TV that has Audio and Video In jacks Using the supplied red, white, and yellow cables This connection will let you use the features of both the VCR and the DVD Player. 1 antenna or cable to ANT-IN Jack 3 Video Cable 2 Audio Cables Audio and Video IN Jacks on TV 1 Connect the antenna or cable to the ANT-IN (Antenna In) jack of your DVD/VCR. 2 Connect the red and white audio cables (supplied) to the red and white DVD/VCR AUDIO OUT jacks on the DVD/VCR and to the red and white AUDIO IN jacks on the TV, matching the cable colors to the jack colors. If the TV has a single AUDIO IN jack, use the white audio cable to connect the DVD/VCR's white DVD/VCR AUDIO OUT jack to the TV's AUDIO IN jack.You will not use the red cable. 3 Connect the yellow video cable (supplied) to the DVD/VCR VIDEO OUT jack on the DVD/VCR and to the VIDEO IN jack on the TV. Or, for better picture quality, connect an S-Video cable (not supplied) to the S-VIDEO OUT jack on the DVD/VCR and to the S-VIDEO IN jack on the TV instead. However, the S-Video connection only supplies video (picture) for the DVD Player of the DVD/VCR. Therefore, in order to use the VCR features or view TV channels at the DVD/VCR, you still need to either connect the RF coaxial cable between the ANT-OUT jack of the DVD/VCR and the TV's Antenna In jack, or connect the yellow video cable as described earlier.To connect the supplied RF coaxial cable, see step 3 on page nine. 4 Connect the power cords of the TV and the DVD/VCR to a power outlet.Turn on the TV and set it to the correct Audio/Video In channel. If you are using the RF coaxial cable for VCR or DVD playback, choose channel 3 or 4 at the TV. If you are using the red/white/yellow audio/video cables for VCR or DVD playback, choose the Audio/Video In channel at your TV. If you are using the S-Video cable for DVD playback, choose the S-Video In channel at your TV. See your TV owner's manual for more details. Or, simply continue changing channels at the TV until you see VCR or DVD playback on the TV screen. 5 You are ready to turn on the DVD/VCR. Go to page 16 before turning on the DVD/VCR.You must complete the VCR setup before you can access the DVD Player, so it is important to complete the steps on page 16.
-
 1
1 -
2
-
3
-
4
-
5
-
6
-
 7
7 -
 8
8 -
 9
9 -
 10
10 -
 11
11 -
 12
12 -
 13
13 -
 14
14 -
 15
15 -
 16
16 -
 17
17 -
18
-
19
-
20
-
21
-
22
-
23
-
24
-
25
-
26
-
27
-
28
-
29
-
30
-
31
-
32
-
33
-
34
-
35
-
36
-
37
-
38
-
39
-
40
-
41
-
42
-
43
-
44
-
45
-
46
-
47
-
48
-
49
-
50
-
51
-
52
-
53
-
54
-
55
-
56
-
57
-
58
-
59
-
60
-
61
-
62
-
63
-
64
-
65
-
66
-
67
-
68
-
69
-
70
-
71
-
72
-
73
-
74
-
75
-
76
-
77
-
78
-
79
-
80
-
81
-
82
-
83
-
84
-
85
-
86
-
87
-
88
 |
 |