Philips DV910VHS User manual - Page 50
Playing a Disc - problems
 |
View all Philips DV910VHS manuals
Add to My Manuals
Save this manual to your list of manuals |
Page 50 highlights
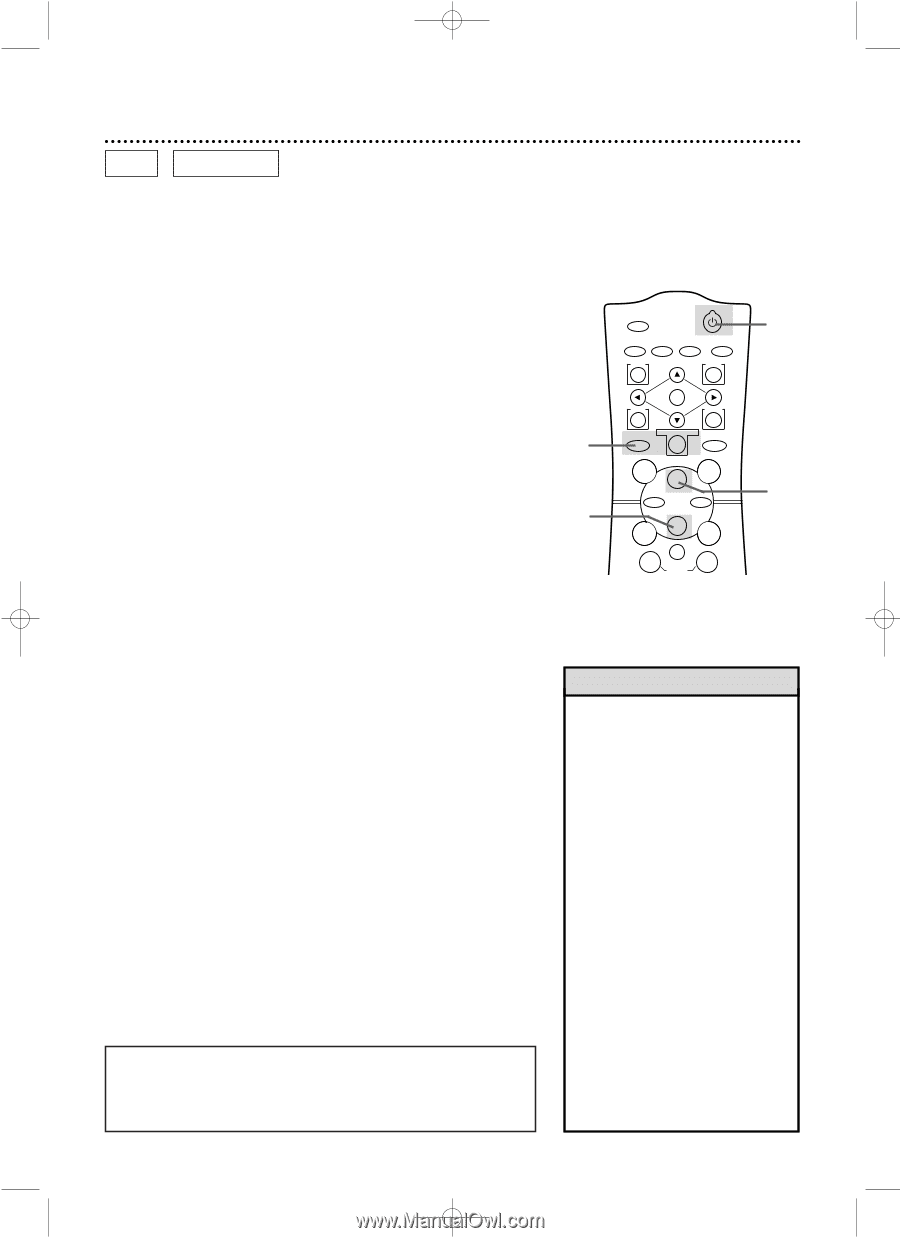
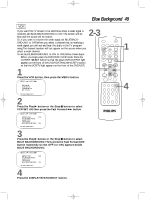
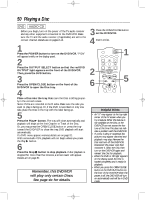
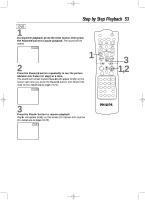
DV910(H9100).QX33 01.8.9 10:27 AM Page 50 50 Playing a Disc DVD AUDIO CD q Before you begin, turn on the power of the TV, audio receiver and any other equipment connected to the DVD/VCR. Make sure the TV and the audio receiver (if applicable) are set to the correct channel. Details are on pages 8-14. 1 Press the POWER button to turn on the DVD/VCR. "P-ON" will appear briefly on the display panel. 2 Press the OUTPUT SELECT button so that the red DVD OUTPUT light appears on the front of the DVD/VCR. Then, press the DVD button. 3 Press the OPEN/CLOSE button on the front of the DVD/VCR to open the Disc tray. 4 Place a Disc into the tray. Make sure the Disc is sitting properly in the correct recess. Some DVDs are recorded on both sides. Make sure the side you want to play is facing up. Or, if the DVD is recorded on only one side, place the Disc in the tray with the label facing up. 5 Press the Play B button. The tray will close automatically, and playback will begin at the first Chapter or Track of the Disc. Or, you may press the OPEN/CLOSE button or press the tray toward the DVD/VCR to close the tray; DVD playback will start automatically. If a DVD menu appears instead, details are on page 51. With some Audio CDs, playback will not begin unless you press the Play B button. 6 Press the Stop C button to stop playback. If disc playback is stopped for more than five minutes, a screen saver will appear. Details are on page 81. Remember, this DVD/VCR will play only certain Discs. See page six for details. 3 Press the OPEN/CLOSE button on the DVD/VCR. 4 Insert a Disc. 2 6 MARKER POWER SETUP AUDIO SUBTITLE ANGLE MENU TITLE MODE OK RETURN DVD OUTPUT SELECT VCR SKIP/CHANNEL H/L CHANNEL/SKIP K/G B E D C REC /OTR F A-B CLEAR REPEAT 1 5 Helpful Hints • An "X" may appear at the top right corner of the TV screen when you try a feature. Either the feature is not available on the Disc, or the DVD/VCR can not access the feature at this time.This does not indicate a problem with the DVD/VCR. • If a Disc is dirty or scratched, the pictures may appear distorted and playback may stop. Remove the Disc and turn off the DVD/VCR. Disconnect the power cord, then reconnect it. Clean the Disc, then turn on the DVD/VCR again and reinsert the Disc for playback. • When the DVD or CD light appears on the display panel, the Disc is loaded completely and is ready for playback. • When you press the OPEN/CLOSE button or the DVD PLAY button on the front of the DVD/VCR when the power is off, the DVD/VCR will turn on automatically and will be in DVD mode.
-
 1
1 -
2
-
3
-
4
-
5
-
6
-
7
-
8
-
9
-
10
-
11
-
12
-
13
-
14
-
15
-
16
-
17
-
18
-
19
-
20
-
21
-
22
-
23
-
24
-
25
-
26
-
27
-
28
-
29
-
30
-
31
-
32
-
33
-
34
-
35
-
36
-
37
-
38
-
39
-
40
-
41
-
42
-
43
-
44
-
 45
45 -
 46
46 -
 47
47 -
 48
48 -
 49
49 -
 50
50 -
 51
51 -
 52
52 -
 53
53 -
 54
54 -
 55
55 -
56
-
57
-
58
-
59
-
60
-
61
-
62
-
63
-
64
-
65
-
66
-
67
-
68
-
69
-
70
-
71
-
72
-
73
-
74
-
75
-
76
-
77
-
78
-
79
-
80
-
81
-
82
-
83
-
84
-
85
-
86
-
87
-
88
 |
 |