Philips DVDR77 User manual - Page 102
Picture settings
 |
View all Philips DVDR77 manuals
Add to My Manuals
Save this manual to your list of manuals |
Page 102 highlights
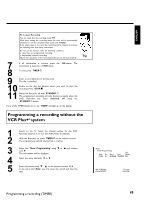
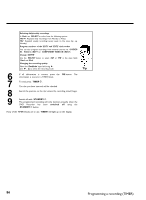
Picture settings You can select the following functions in this menu: 'TV shape' The picture signal can be adjusted to fit your TV: '4:3 letterbox': for a 'wide-screen' display with black bars on the top and bottom '4:3 panscan': for a full-height picture with the sides trimmed '16:9' : for wide-screen TV (frame ratio 16:9) 'Black level shift' Adapts the color dynamic for NTSC playback when set to 'On'. 'Vertical video shift' This allows you to move the picture left or right using the D , C buttons in order to adjust the picture to your TV screen. 'EXT1 video attenuation' With the buttons D , C you can attenuate or boost the component video signal on the input socket COMPONENT VIDEO IN These setting concerns only the input signal. The component video output signal leaves unchanged. 'Video output' This allows you to switch the Component Video signal between 'Interlaced' and 'Progressive Scan.' Warning If your TV has separate connections for 'Interlaced' and 'Progressive Scan' or it does not switch automatically between the two, it is possible that no picture will appear on the TV after it is switched from one to the other. 1 2 Select the setting you need with SELECT . Choose Progressive Scan only if your TV has Progressive Scan. Confirm with OK . TV shape Black level shift Vertical video shift EXT1 video attenuation Video output Picture 16:9 Off ï ï Interlaced 90 User preferences
-
 1
1 -
2
-
3
-
4
-
5
-
6
-
7
-
8
-
9
-
10
-
11
-
12
-
13
-
14
-
15
-
16
-
17
-
18
-
19
-
20
-
21
-
22
-
23
-
24
-
25
-
26
-
27
-
28
-
29
-
30
-
31
-
32
-
33
-
34
-
35
-
36
-
37
-
38
-
39
-
40
-
41
-
42
-
43
-
44
-
45
-
46
-
47
-
48
-
49
-
50
-
51
-
52
-
53
-
54
-
55
-
56
-
57
-
58
-
59
-
60
-
61
-
62
-
63
-
64
-
65
-
66
-
67
-
68
-
69
-
70
-
71
-
72
-
73
-
74
-
75
-
76
-
77
-
78
-
79
-
80
-
81
-
82
-
83
-
84
-
85
-
86
-
87
-
88
-
89
-
90
-
91
-
92
-
93
-
94
-
95
-
96
-
 97
97 -
 98
98 -
 99
99 -
 100
100 -
 101
101 -
 102
102 -
 103
103 -
 104
104 -
 105
105 -
 106
106 -
 107
107 -
108
-
109
-
110
-
111
-
112
-
113
-
114
-
115
-
116
-
117
-
118
-
119
-
120
-
121
-
122
 |
 |
