Philips TSU7500 User manual - Page 28
Labeling a Button
 |
UPC - 037849966563
View all Philips TSU7500 manuals
Add to My Manuals
Save this manual to your list of manuals |
Page 28 highlights
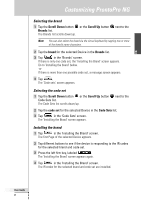
Customizing ProntoPro NG User Guide 26 Labeling a Button 1 Tap and hold the ProntoPro NG icon in the upper left corner of the touch screen for 3 seconds. The Tools Menu appears. 2 Tap in the Tools Menu. The 'Label Tool' screen appears. 3 Tap . The page you last visited appears. 4 Navigate to the Device and the Page that contains the button you want to label. 5 Tap the button you want to label. The 'Labeling' screen appears. 6 Tap the keyboard. The keyboard zooms in. 7 Tap the character you want to add to the label. The character is added to the label. The keyboard automatically zooms out again. 1 To zoom out without adding a character to the label, press . The character is not added to the label. The keyboard is zoomed out. 2 To use other characters and symbols, press . The character set on the keyboard switches. You can choose from four different character sets. 3 To remove characters, press the firm key labeled . The character in front of the cursor is removed. 8 You can add other characters to the label. 9 Tap . The label of the selected button is changed. The last visited page appears again. -or- Tap . The last visited page appears again, without changing the label of the selected button. 10 You can select other buttons on ProntoPro NG to label. 11 Press the left firm key labeled the Label Tool. below the touch screen to exit
-
 1
1 -
2
-
3
-
4
-
5
-
6
-
7
-
8
-
9
-
10
-
11
-
12
-
13
-
14
-
15
-
16
-
17
-
18
-
19
-
20
-
21
-
22
-
 23
23 -
 24
24 -
 25
25 -
 26
26 -
 27
27 -
 28
28 -
 29
29 -
 30
30 -
 31
31 -
 32
32 -
 33
33 -
34
-
35
-
36
-
37
-
38
-
39
-
40
-
41
-
42
-
43
-
44
-
45
-
46
-
47
-
48
-
49
-
50
-
51
-
52
-
53
-
54
-
55
-
56
-
57
-
58
-
59
-
60
-
61
-
62
-
63
-
64
-
65
-
66
-
67
-
68
-
69
-
70
-
71
-
72
 |
 |
