Pioneer AVIC-X9115BT Operation Manual - Page 39
Scrolling the map to the, position you want to see, Changing the tilt and rotation, angle of the map
 |
View all Pioneer AVIC-X9115BT manuals
Add to My Manuals
Save this manual to your list of manuals |
Page 39 highlights
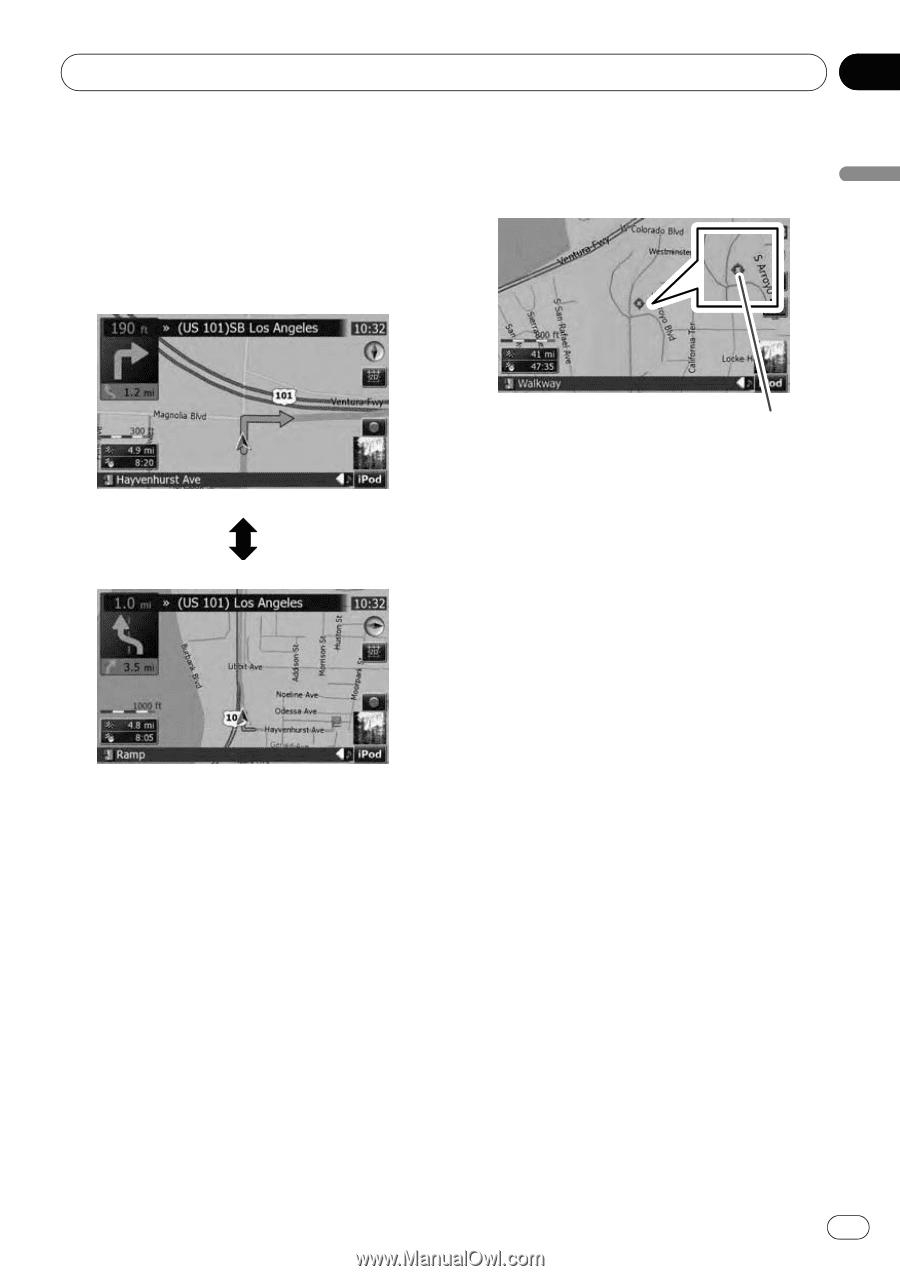
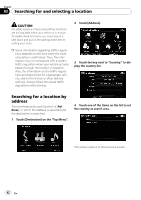
Basic operation Chapter 02 2 Move MULTI-CONTROL down or up to zoom in or out. Moving MULTI-CONTROL upward or downward once allows you to change the map scale one step at a time. Holding MULTI-CONTROL while moving it up or down allows you to change the scale sequentially. 3 Touch the map briefly. Briefly touching the position on the map that you want to see positions the cursor there. Basic operation Cursor Positioning the cursor to the desired location results in a brief informational overview about the location being displayed at the bottom of screen, with street name and other information for this location being shown. (The information shown varies depending on the position.) 4 Touch and drag the map in the desired direction to scroll. Dragging the map scrolls it. The scrolling increment depends on your dragging length. p Pressing the MAP button returns the map to the current position. p Zooming out will reduce the size of the icon and further zooming out will hide it. However, the pin-shaped icon is not resized and keeps displayed. p Further zooming out hides the lines of traffic information. Scrolling the map to the position you want to see 1 Press the MAP button to display the navigation map screen. 2 Switch to the 2D map screen. = For details, refer to Switching the map mode on the previous page. Changing the tilt and rotation angle of the map On the 3D map screen, briefly touching the map shows the tilt controls and rotation angle. 1 Press the MAP button to display the navigation map screen. 2 Switch to the 3D map screen. = For details, refer to Switching the map mode on the previous page. En 39
-
 1
1 -
2
-
3
-
4
-
5
-
6
-
7
-
8
-
9
-
10
-
11
-
12
-
13
-
14
-
15
-
16
-
17
-
18
-
19
-
20
-
21
-
22
-
23
-
24
-
25
-
26
-
27
-
28
-
29
-
30
-
31
-
32
-
33
-
 34
34 -
 35
35 -
 36
36 -
 37
37 -
 38
38 -
 39
39 -
 40
40 -
 41
41 -
 42
42 -
 43
43 -
 44
44 -
45
-
46
-
47
-
48
-
49
-
50
-
51
-
52
-
53
-
54
-
55
-
56
-
57
-
58
-
59
-
60
-
61
-
62
-
63
-
64
-
65
-
66
-
67
-
68
-
69
-
70
-
71
-
72
-
73
-
74
-
75
-
76
-
77
-
78
-
79
-
80
-
81
-
82
-
83
-
84
-
85
-
86
-
87
-
88
-
89
-
90
-
91
-
92
-
93
-
94
-
95
-
96
-
97
-
98
-
99
-
100
-
101
-
102
-
103
-
104
-
105
-
106
-
107
-
108
-
109
-
110
-
111
-
112
-
113
-
114
-
115
-
116
-
117
-
118
-
119
-
120
-
121
-
122
-
123
-
124
-
125
-
126
-
127
-
128
-
129
-
130
-
131
-
132
-
133
-
134
-
135
-
136
-
137
-
138
-
139
-
140
-
141
-
142
-
143
-
144
-
145
-
146
-
147
-
148
-
149
-
150
-
151
-
152
-
153
-
154
-
155
-
156
-
157
-
158
-
159
-
160
-
161
-
162
-
163
-
164
-
165
-
166
-
167
-
168
-
169
-
170
-
171
-
172
-
173
-
174
-
175
-
176
-
177
-
178
-
179
-
180
-
181
-
182
-
183
-
184
-
185
-
186
-
187
-
188
-
189
-
190
-
191
-
192
-
193
-
194
-
195
-
196
-
197
-
198
-
199
-
200
-
201
-
202
-
203
-
204
-
205
-
206
-
207
-
208
-
209
-
210
-
211
-
212
-
213
-
214
-
215
 |
 |