Pioneer AVIC-X920BT Owner's Manual - Page 23
What you can do on each, Shortcut Menu, How to use the navigation menu screens - bluetooth
 |
UPC - 884938104241
View all Pioneer AVIC-X920BT manuals
Add to My Manuals
Save this manual to your list of manuals |
Page 23 highlights
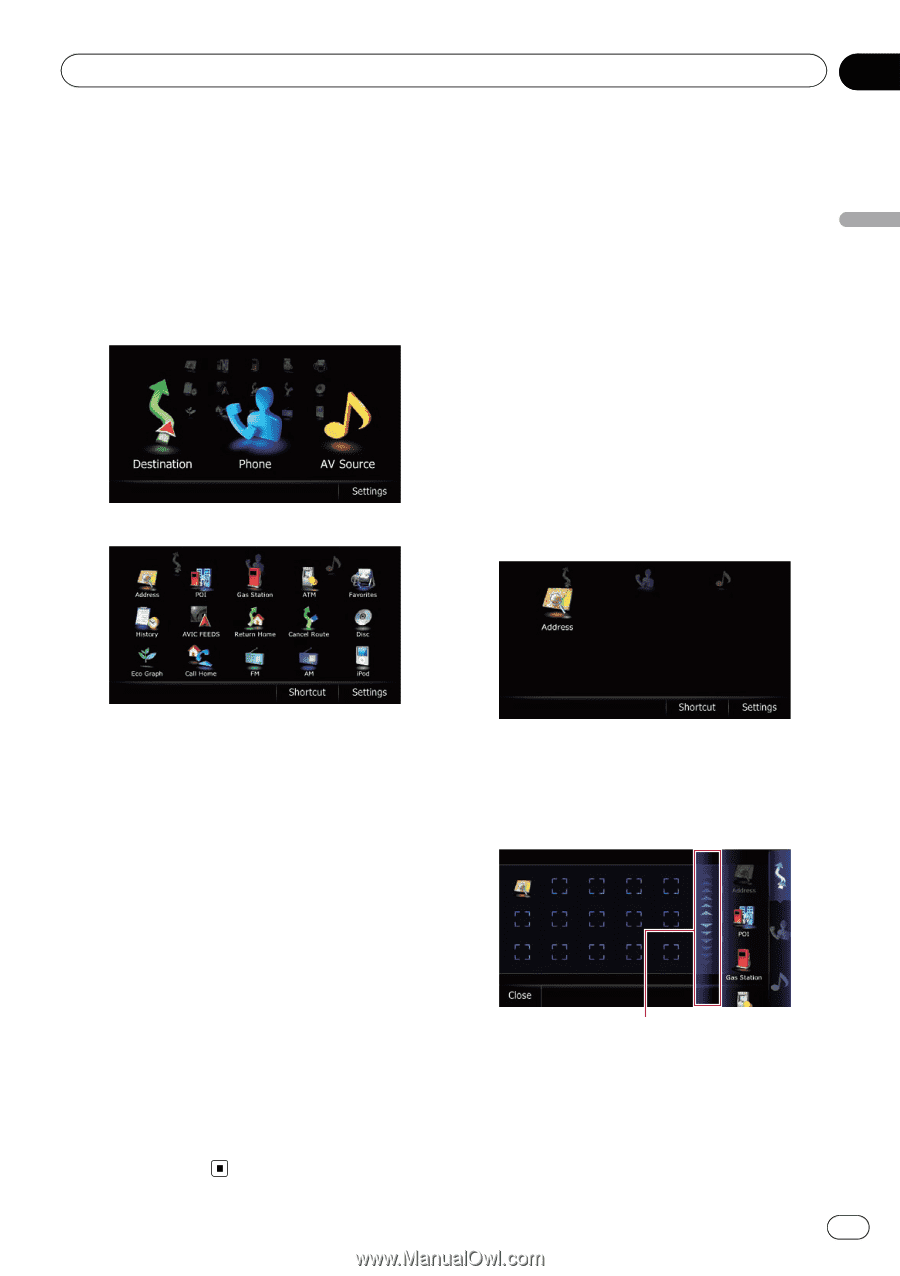
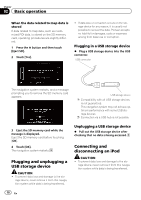
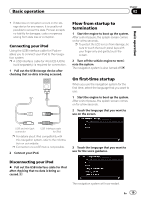
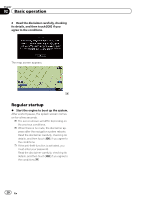
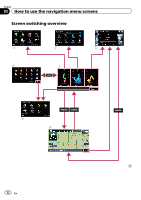
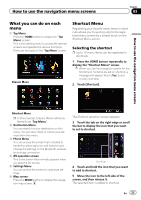
How to use the navigation menu screens How to use the navigation menu screens Chapter 03 What you can do on each menu 1 Top Menu Press the HOME button to display the "Top Menu" screen. This is the starting menu to access the desired screens and operate the various functions. There are two types of the "Top Menu" screen. Classic Menu Shortcut Menu Registering your favorite menu items in shortcuts allows you to quickly jump to the registered menu screen by a simple touch on the Shortcut Menu screen. Selecting the shortcut p Up to 15 menu items can be registered in shortcuts. 1 Press the HOME button repeatedly to display the "Shortcut Menu" screen. p When you use the navigation system for the first time or no items are set on shortcut, a message will appear. Touch [Yes] to proceed to next step. 2 Touch [Shortcut]. Shortcut Menu p In this manual, Classic Menu will be referred to as "Top Menu". 2 Destination Menu You can search for your destination on this menu. You can also check or cancel your set route from this menu. 3 Phone Menu You can access the screen that is related to hands-free phoning to see call histories and change the settings on the Bluetooth wireless technology connection. 4 AV operation screen This is the screen that normally appears when you play the AV source. 5 Settings Menu You can access the screen to customize settings. 6 Map screen Press the MODE button to display the navigation map screen. The Shortcut selection screen appears. 3 Touch the tab on the right edge or scroll the bar to display the icon that you want to set to shortcut. Scroll bar 4 Touch and hold the icon that you want to add to shortcut. 5 Move the icon to the left side of the screen, and then release it. The selected item is added to shortcut. En 23
-
 1
1 -
2
-
3
-
4
-
5
-
6
-
7
-
8
-
9
-
10
-
11
-
12
-
13
-
14
-
15
-
16
-
17
-
 18
18 -
 19
19 -
 20
20 -
 21
21 -
 22
22 -
 23
23 -
 24
24 -
 25
25 -
 26
26 -
 27
27 -
 28
28 -
29
-
30
-
31
-
32
-
33
-
34
-
35
-
36
-
37
-
38
-
39
-
40
-
41
-
42
-
43
-
44
-
45
-
46
-
47
-
48
-
49
-
50
-
51
-
52
-
53
-
54
-
55
-
56
-
57
-
58
-
59
-
60
-
61
-
62
-
63
-
64
-
65
-
66
-
67
-
68
-
69
-
70
-
71
-
72
-
73
-
74
-
75
-
76
-
77
-
78
-
79
-
80
-
81
-
82
-
83
-
84
-
85
-
86
-
87
-
88
-
89
-
90
-
91
-
92
-
93
-
94
-
95
-
96
-
97
-
98
-
99
-
100
-
101
-
102
-
103
-
104
-
105
-
106
-
107
-
108
-
109
-
110
-
111
-
112
-
113
-
114
-
115
-
116
-
117
-
118
-
119
-
120
-
121
-
122
-
123
-
124
-
125
-
126
-
127
-
128
-
129
-
130
-
131
-
132
-
133
-
134
-
135
-
136
-
137
-
138
-
139
-
140
-
141
-
142
-
143
-
144
-
145
-
146
-
147
-
148
-
149
-
150
-
151
-
152
-
153
-
154
-
155
-
156
-
157
-
158
-
159
-
160
-
161
-
162
-
163
-
164
-
165
-
166
-
167
-
168
-
169
-
170
-
171
-
172
-
173
-
174
-
175
-
176
-
177
-
178
-
179
-
180
-
181
-
182
-
183
-
184
-
185
-
186
-
187
-
188
-
189
-
190
-
191
-
192
-
193
-
194
-
195
-
196
-
197
-
198
-
199
-
200
-
201
-
202
-
203
-
204
-
205
-
206
-
207
-
208
-
209
-
210
-
211
-
212
-
213
-
214
-
215
-
216
-
217
-
218
-
219
-
220
-
221
-
222
-
223
-
224
-
225
-
226
-
227
-
228
 |
 |