Pioneer AVIC-X920BT Owner's Manual - Page 49
Deleting the entry from the, Registering and editing locations
 |
UPC - 884938104241
View all Pioneer AVIC-X920BT manuals
Add to My Manuals
Save this manual to your list of manuals |
Page 49 highlights
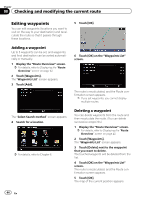
Registering and editing locations Chapter 09 Registering and editing locations 5 Touch [OK]. The "Favorites" screen appears. Importing the "Favorites" items You can import the locations that you have edited on the utility program AVIC FEEDS which is available separately to "Favorites". p When a location that is already registered in "Favorites" is imported, the location is overwritten. 1 Store the item into the SD memory card by using the AVIC FEEDS. 2 Insert an SD memory card into the SD card slot. = For details of the operation, refer to Inserting and ejecting an SD memory card on page 15. 3 Display the "Destination Menu" screen. = For details of the operations, refer to Screen switching overview on page 22. 4 Touch [Favorites]. The "Favorites" screen appears. 5 Touch . The message confirming whether to replace the stored items appears. Deleting the entry from the "History" list Items in "History" can be deleted. All entries in "History" can be deleted at once. 1 Display the "Destination Menu" screen. = For details of the operations, refer to Screen switching overview on page 22. 2 Touch [History]. The "Destination History List" screen appears. 3 Touch [Delete]. The "Delete from History" screen appears. 4 Select the location you want to delete. A check mark appears next to the selected location. # Touch [All] or [None]. Selects or deselects all entries. 5 Touch [Delete]. 6 Touch [Yes]. Data import starts. After importing the data is finished, the "Favorites" screen appears. A message will appear asking you to confirm the deletion. 6 Touch [Yes]. The data you selected is deleted. # Touch [No]. Cancels the deletion. En 49
-
 1
1 -
2
-
3
-
4
-
5
-
6
-
7
-
8
-
9
-
10
-
11
-
12
-
13
-
14
-
15
-
16
-
17
-
18
-
19
-
20
-
21
-
22
-
23
-
24
-
25
-
26
-
27
-
28
-
29
-
30
-
31
-
32
-
33
-
34
-
35
-
36
-
37
-
38
-
39
-
40
-
41
-
42
-
43
-
 44
44 -
 45
45 -
 46
46 -
 47
47 -
 48
48 -
 49
49 -
 50
50 -
 51
51 -
 52
52 -
 53
53 -
 54
54 -
55
-
56
-
57
-
58
-
59
-
60
-
61
-
62
-
63
-
64
-
65
-
66
-
67
-
68
-
69
-
70
-
71
-
72
-
73
-
74
-
75
-
76
-
77
-
78
-
79
-
80
-
81
-
82
-
83
-
84
-
85
-
86
-
87
-
88
-
89
-
90
-
91
-
92
-
93
-
94
-
95
-
96
-
97
-
98
-
99
-
100
-
101
-
102
-
103
-
104
-
105
-
106
-
107
-
108
-
109
-
110
-
111
-
112
-
113
-
114
-
115
-
116
-
117
-
118
-
119
-
120
-
121
-
122
-
123
-
124
-
125
-
126
-
127
-
128
-
129
-
130
-
131
-
132
-
133
-
134
-
135
-
136
-
137
-
138
-
139
-
140
-
141
-
142
-
143
-
144
-
145
-
146
-
147
-
148
-
149
-
150
-
151
-
152
-
153
-
154
-
155
-
156
-
157
-
158
-
159
-
160
-
161
-
162
-
163
-
164
-
165
-
166
-
167
-
168
-
169
-
170
-
171
-
172
-
173
-
174
-
175
-
176
-
177
-
178
-
179
-
180
-
181
-
182
-
183
-
184
-
185
-
186
-
187
-
188
-
189
-
190
-
191
-
192
-
193
-
194
-
195
-
196
-
197
-
198
-
199
-
200
-
201
-
202
-
203
-
204
-
205
-
206
-
207
-
208
-
209
-
210
-
211
-
212
-
213
-
214
-
215
-
216
-
217
-
218
-
219
-
220
-
221
-
222
-
223
-
224
-
225
-
226
-
227
-
228
 |
 |
