Pioneer DV-F727 Owner's Manual - Page 32
Inputting characters using the, remote control
 |
UPC - 012562507996
View all Pioneer DV-F727 manuals
Add to My Manuals
Save this manual to your list of manuals |
Page 32 highlights
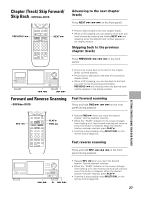
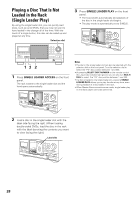
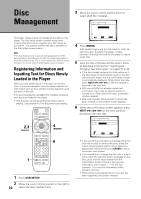
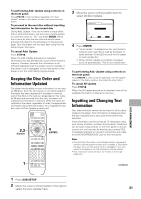
When a disc already contain text information When text is already present on the disc in the form of CD TEXT or DVD text, the title and artist information appears automatically in the appropriate spaces. However, it is possible to change the information that appears for these discs. When you change the title or artist information, input a space " " at the beginning of the entry. The newly input information will be displayed for the disc in place of the information programmed on the disc. To have the original information programmed on the disc displayed, delete the space " " at the beginning of the entry. Inputting characters using the remote control 4 Move the cursor control joystick right to highlight the title field. 5 Press ENTER. The text input screen appears. 6 Move the cursor control around the character field to select a character. Text Custom Auto Update Disc Type Title 4 CD R Artist ABCDEFGHIJKLMNOPQRSTUVWXYZ +-789 abcd efgh i j klmnopqr stuvwxyz /456 DEL 0123OK 4 ¢ Cursor CLEAR Delete Return Chara ENTER Select SUB SETUP Exit 2,3,4, 6,8,10 (Cursor) PREVIOUS 4 7 3 8 4¢ e 1¡ E 5,7,9,11 (ENTER) NEXT ¢ CLEAR 1,13 7 Press ENTER to select a character. 8 When you are finished with the title, move the cursor control to select "OK". 9 Press ENTER. The cursor returns to the Text menu screen. 10 Move the cursor control joystick right to highlight the artist's field. 11 Press ENTER. The text input screen appears. 12 Repeat steps 6 to 8 to complete the artist's name. 13 Press SUB SETUP. The Sub Setup screen closes. 1 Press SUB SETUP. 2 Move the cursor control joystick to select the Text menu. 3 Move the cursor control joystick down to select a disc number. Text Custom Auto Update Disc Type Title 1 DVD Silver Skies 2 DVD Someone2Hold 3 VCD Dance Coll. 4 DVD 5 CD Live at Roxy! Artist Matt Jones S. Benak Various Exhibition 4 ¢ Page PLAY Play Item ENTER Input SUB SETUP Exit If the disc number you want is not currently displayed on the screen, use PREVIOUS 4 or NEXT ¢ to move in five disc increments until the disc you want appears. 32 To clear text that has been entered 1 Set the character input mode as described in steps 1 through 5 above. 2 Use PREVIOUS 4 or NEXT ¢ to move the cursor to the character you want to clear. 3 Press CLEAR. 4 Move the cursor control joystick to select "OK" and press ENTER. To add or insert text 1 Set the character input mode as described in steps 1 through 5 above. 2 Use PREVIOUS 4 or NEXT ¢ to move the cursor to the character where you want to add or insert new text. New text will be inserted at the cursor location. 3 Move the cursor control joystick to select the new text and press ENTER. 4 Move the cursor control joystick to select "OK" and press ENTER.
-
 1
1 -
2
-
3
-
4
-
5
-
6
-
7
-
8
-
9
-
10
-
11
-
12
-
13
-
14
-
15
-
16
-
17
-
18
-
19
-
20
-
21
-
22
-
23
-
24
-
25
-
26
-
 27
27 -
 28
28 -
 29
29 -
 30
30 -
 31
31 -
 32
32 -
 33
33 -
 34
34 -
 35
35 -
 36
36 -
 37
37 -
38
-
39
-
40
-
41
-
42
-
43
-
44
-
45
-
46
-
47
-
48
-
49
-
50
-
51
-
52
-
53
-
54
-
55
-
56
-
57
-
58
-
59
-
60
-
61
-
62
-
63
-
64
-
65
-
66
-
67
-
68
-
69
-
70
-
71
-
72
-
73
-
74
-
75
-
76
-
77
-
78
-
79
-
80
 |
 |
