Pioneer DV-F727 Owner's Manual - Page 51
Pioneer DV-F727 - DVD Changer Manual
 |
UPC - 012562507996
View all Pioneer DV-F727 manuals
Add to My Manuals
Save this manual to your list of manuals |
Page 51 highlights
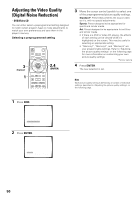
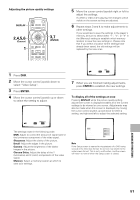
Adjusting the picture quality settings DISPLAY 2,4,5,6 (Cursor) 1 7 3 8 4¢ e 1¡ E 3,7 (ENTER) 5 Move the cursor control joystick right or left to adjust the settings. If a DVD or Video CD is playing, the changes will be visible on the screen as they are adjusted. 6 Repeat steps 3 and 4 to make adjustments to other settings. If you would like to save the settings in the player's memory, be sure to select either "1", "2", or "3" in the [Memory] setting to establish which memory location to save the new settings in. Please note that if you select a location where settings have already been saved, the old settings will be replaced by the new ones. 1 Press DNR. 2 Move the cursor control joystick down to select "Video Setup". 3 Press ENTER. 4 Move the cursor control joystick up or down to select the setting to adjust. Memory Move Off 1 2 3 ENTER Select DISPLAY Check 7 When you are finished making adjustments, press ENTER to establish the new settings. To display all of the settings at once Pressing DISPLAY while the picture quality setting adjustment screen is displayed enables all of the current settings to be viewed on one screen. Adjustments may also be made when this screen is displayed, by moving the cursor control joystick up and down to select a setting, and right and left to adjust the selected setting. DNR Move min max ENTER Select DISPLAY Check The settings rotate in the following order. DNR: Adjust to control the amount of signal noise in the luminance component of the video signal. Sharpness: Adjust the clarity of the picture. Detail: Adjust the edges in the picture. Gamma: Adjust the brightness of the darker images in the picture. Chroma Delay: Adjust the delay of the Y (luminance) and C (color) components of the video signal. Memory: Select a memory location at which to save your settings. DNR Sharpness Detail Gamma Chroma Delay Memory min - min - - Off max + max + + 123 Note If the Setup screen is opened during playback of a DVD being viewed in the letter box format, the screen may switch to the wide screen format. This is not a malfunction, and the screen will return to normal when the Setup screen is closed. ADVANCED FUNCTIONS 51
-
 1
1 -
2
-
3
-
4
-
5
-
6
-
7
-
8
-
9
-
10
-
11
-
12
-
13
-
14
-
15
-
16
-
17
-
18
-
19
-
20
-
21
-
22
-
23
-
24
-
25
-
26
-
27
-
28
-
29
-
30
-
31
-
32
-
33
-
34
-
35
-
36
-
37
-
38
-
39
-
40
-
41
-
42
-
43
-
44
-
45
-
 46
46 -
 47
47 -
 48
48 -
 49
49 -
 50
50 -
 51
51 -
 52
52 -
 53
53 -
 54
54 -
 55
55 -
 56
56 -
57
-
58
-
59
-
60
-
61
-
62
-
63
-
64
-
65
-
66
-
67
-
68
-
69
-
70
-
71
-
72
-
73
-
74
-
75
-
76
-
77
-
78
-
79
-
80
 |
 |
