Pioneer DV-F727 Owner's Manual - Page 33
Inputting characters using controls, on the front panel, Inputting characters using a PS/2,
 |
UPC - 012562507996
View all Pioneer DV-F727 manuals
Add to My Manuals
Save this manual to your list of manuals |
Page 33 highlights
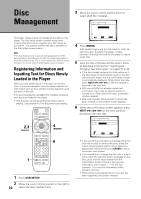
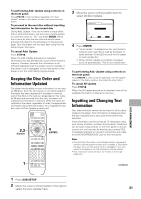
Inputting characters using controls on the front panel 1,3 41 ¡ ¢ Î 7 3 8 2,6,8 CLEAR 4 1 Turn the selection dial to select the disc you want to input a title for. 2 Press TEXT INPUT. The cursor blinks in the leftmost character position. 3 Turn the selection dial to select the characters in the display window. As the selection dial is turned, the cursor scrolls through the characters. 4 Press the enter button to advance to the next location. 5 Repeat steps 3 and 4 to input the rest of the title. 6 Press TEXT INPUT. The disc title is saved in memory. The cursor blinks in the leftmost character position for artist name input. 7 Repeat steps 3 and 4 to input the artist's name. 8 Press TEXT INPUT. The artist's name is saved in memory and the mode is exited. To clear text that has been entered 1 Set the character input mode as described in steps 1 and 2 above. 2 Use the 4 1 or ¡ ¢ to move the cursor underneath the character you want to clear 3 Press CLEAR. 4 Press TEXT INPUT. To add or insert text 1 Set the character input mode as described in steps 1 and 2 on this page. 2 Use the 4 1 or ¡ ¢ to move the cursor to where you want to add or insert new text. 3 Turn the selection dial to select a character and press the enter button. 4 Press TEXT INPUT. Note Please note that when the custom play mode is selected and TEXT INPUT is pressed, text input is applied to the name of the custom file and not to the title or artist's name of the currently selected disc. Inputting characters using a PS/2* compatible keyboard Be sure to turn off the power to the player when connecting a PS/2 compatible keyboard to the KEYBOARD/MOUSE connection jack on the front panel of this player. 41 ¡ ¢ Î 7 3 8 DISC MANAGEMENT 1 Use the keyboard's numeric keypad to select the number of the disc. 2 Press F1 on the keyboard. The character input screen appears. Input Disc Type Title 5 CD L Artist ABCDEFGHIJKLMNOPQRSTUVWXYZ +-789 abcd efgh i j klmnopqr stuvwxyz /456 DEL 0123OK 4 ¢ Cursor CLEAR Delete Return Chara ENTER Select TEXT INPUT Artist 3 Enter characters directly from the keyboard. • Use the shift or caps key to switch between lower case and upper case letters. • Only the characters that appear on the text input screen can be used for text input. 4 Press F1 or the ENTER key on the keyboard. 5 Repeat step 3 to input the artist's name. 6 Press F1 or the ENTER key on the keyboard. 33 continued
-
 1
1 -
2
-
3
-
4
-
5
-
6
-
7
-
8
-
9
-
10
-
11
-
12
-
13
-
14
-
15
-
16
-
17
-
18
-
19
-
20
-
21
-
22
-
23
-
24
-
25
-
26
-
27
-
 28
28 -
 29
29 -
 30
30 -
 31
31 -
 32
32 -
 33
33 -
 34
34 -
 35
35 -
 36
36 -
 37
37 -
 38
38 -
39
-
40
-
41
-
42
-
43
-
44
-
45
-
46
-
47
-
48
-
49
-
50
-
51
-
52
-
53
-
54
-
55
-
56
-
57
-
58
-
59
-
60
-
61
-
62
-
63
-
64
-
65
-
66
-
67
-
68
-
69
-
70
-
71
-
72
-
73
-
74
-
75
-
76
-
77
-
78
-
79
-
80
 |
 |
