Rheem RARL-JEC Installation Instructions - Page 8
For Units With Space Limitations
 |
View all Rheem RARL-JEC manuals
Add to My Manuals
Save this manual to your list of manuals |
Page 8 highlights
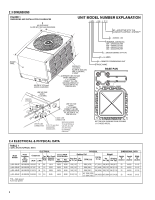
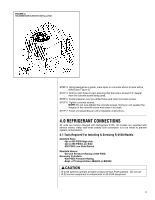
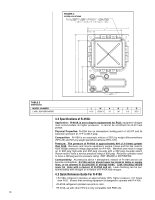
3.3 Operational Issues • IMPORTANT: Locate the unit in a manner that will not prevent, impair or compromise the performance of other equipment horizontally installed in proximity to the unit. Maintain all required minimum distances to gas and electric meters, dryer vents, exhaust and inlet openings. In the absence of National Codes, or manufacturers' recommendations, local code recommendations and requirements will take precedence. • Refrigerant piping and wiring should be properly sized and kept as short as possible to avoid capacity losses and increased operating costs. • Locate the unit where water run off will not create a problem with the equipment. Position the unit away from the drip edge of the roof whenever possible. Units are weatherized, but can be affected by the following: o Water pouring into the unit from the junction of rooflines, without protective guttering. Large volumes of water entering the heat pump while in operation can impact fan blade or motor life, and coil damage may occur to a heat pump if moisture cannot drain from the unit under freezing conditions. o Freezing moisture, or sleeting conditions, can cause the cabinet to ice-over prematurely and prevent heat pump operation, requiring backup heat, which generally results in less economical operation. • Closely follow clearance recommendations on Page 6. o 24" to the service panel access o 60" above heat pump fan discharge (unit top) to prevent recirculation o 6" to heat pump coil grille air inlets 3.4 For Units With Space Limitations FOR CONDENSERS WITH SPACE LIMITATIONS In the event that a space limitation exists, we will permit the following clearances: Single Unit Applications: Clearances below 6 inches will reduce unit capacity and efficiency. Do not reduce the 60-inch discharge, or the 24-inch service clearances. Multiple Unit Applications: When multiple condenser grille sides are aligned, a 6inch per unit clearance is recommended, for a total of 12" between two units. Two combined clearances below 12 inches will reduce capacity and efficiency. Do not reduce the 60-inch discharge, or 24-inch service, clearances. 3.5 Customer Satisfaction Issues • The condensing unit should be located away from the living, sleeping and recreational spaces of the owner and those spaces on adjoining property. • To prevent noise transmission, the mounting pad for the outdoor unit should not be connected to the structure, and should be located sufficient distance above grade to prevent ground water from entering the unit. 3.6 Unit Mounting If elevating the condensing unit, either on a flat roof or on a slab, observe the following guidelines. • The base pan provided elevates the heat pump 3/4" above the base pad. • If elevating a unit on a flat roof, use 4" x 4" (or equivalent) stringers positioned to distribute unit weight evenly and prevent noise and vibration (see Figure 2). NOTE: Do not block drain openings shown in Figure 1. 3.7 Factory-Preferred Tie-Down Method INSTRUCTIONS IMPORTANT: These instructions are intended as a guide to securing equipment for wind-load ratings of "120 MPH sustained wind load" and "3-second, 150 MPH gust." While this procedure is not mandatory, the Manufacturer does recommend that equipment be properly secured in areas where high wind damage may occur. STEP 1: Before installing, clear pad of any dirt or debris. IMPORTANT: The pad must be constructed of industry-approved materials, and must be thick enough to accommodate the concrete fastener. STEP 2: Center base pan on pad, ensuring it is level. 8
-
 1
1 -
2
-
 3
3 -
 4
4 -
 5
5 -
 6
6 -
 7
7 -
 8
8 -
 9
9 -
 10
10 -
 11
11 -
 12
12 -
 13
13 -
14
-
15
-
16
-
17
-
18
-
19
-
20
-
21
-
22
-
23
-
24
-
25
-
26
-
27
-
28
-
29
-
30
-
31
-
32
-
33
-
34
-
35
-
36
-
37
-
38
-
39
-
40
-
41
-
42
-
43
-
44
-
45
-
46
-
47
-
48
 |
 |
