Ricoh Aficio MP C2050 User Manual
Ricoh Aficio MP C2050 Manual
 |
View all Ricoh Aficio MP C2050 manuals
Add to My Manuals
Save this manual to your list of manuals |
Ricoh Aficio MP C2050 manual content summary:
- Ricoh Aficio MP C2050 | User Manual - Page 1
faxes 10 2.2.9 Choose an Installation Method 11 2.2.10 Installing Application using Ricoh Web Admin (Recommended)......... 12 2.2.11 Installing application using the Ricoh Java SD card 14 2.2.12 Set Default Application and System Timeout 16 2.2.13 Starting the Embedded Application 16 3 Post - Ricoh Aficio MP C2050 | User Manual - Page 2
PaperCut - Ricoh Embedded Manual Revision: 19 2012-10-26 4.3 Shared Account Selection 24 4.4 Customizing Text and Messages 25 5 Advanced Configuration 26 5.1 Config Editor 26 5.1 Customizing the Header Logos and Colors 27 5.1.1 Customized Logos 27 5.2 Custom Header Color 27 5.3 Configuring - Ricoh Aficio MP C2050 | User Manual - Page 3
and copier control are all managed in the one system. Users have a single account and administrators have the same level of reporting and administration for all services. The embedded solution interacts with the PaperCut server using a Service Oriented Architecture (SOA) and web services based - Ricoh Aficio MP C2050 | User Manual - Page 4
Installation' section of the PaperCut user manual for assistance. Ensure that your Ricoh device supports ESA SDK version 2 or later. Check the device lists in 2.1.1 and 2.1.3 below. Ensure you know which SDK version your device supports. Installation instructions will vary slightly for different - Ricoh Aficio MP C2050 | User Manual - Page 5
Devices supporting ESA SDK version 4.x, 5.x, 7.x Aficio MP C6000/C6501/C7500/C7501 Aficio MP C2800/C3300/C3001/C3501/C5041 Aficio MP C4000/C4501/C5000/C5501 Aficio MP C2050/C2051/C2551/C7140 Aficio MP C300/C400 Aficio MP 6001/7001/8001/9001 Aficio MP 4000/4001/5000/5001 Aficio MP - Ricoh Aficio MP C2050 | User Manual - Page 6
PaperCut - Ricoh Embedded Manual Revision: 19 2012-10-26 2.1.3 Devices supporting ESA SDK version 2.x Aficio MP C2500SP/C3000SP Aficio MP C3500/C3500SP/C4500/C4500SP Aficio MP C1500SP/C1500SPF/615C Aficio MP 5500/5500SP/6500/6500SP/7500/7500SP Aficio MP 9000/1100/1350 Aficio MP 6000/ - Ricoh Aficio MP C2050 | User Manual - Page 7
web browser 2. Enter the URL of the Ricoh device. E.g. http://ricoh-device-ip/ 3. Click the "Login" link at the top right of the page. 4. Enter the device administrator username and password (default admin/blank), and press "Login then do not follow the instruction for 4.x devices only. Copyright © - Ricoh Aficio MP C2050 | User Manual - Page 8
5113-1 (Default Optional Counter Type) is set to "0: None". If set to another setting it will conflict with the SP-5113-2 setting and the copier will not to the user. For this reason the document server should be disabled via the SP paramters by a Ricoh Technician. PaperCut plans to address this in - Ricoh Aficio MP C2050 | User Manual - Page 9
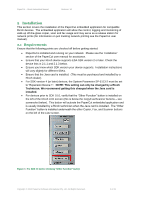
(i.e. not highlighted). 2.2.6.2 Enabling Enhanced External Charge Unit support Once the system parameter has been enabled, the Enhanced External Charge Unit on the device should be enabled as follows: 1. Go to the Ricoh admin/settings by pressing the "User Tools/Counter" hard key (on the top left - Ricoh Aficio MP C2050 | User Manual - Page 10
- Ricoh Embedded Manual Revision: 19 2012-10-26 copier functions should be disabled and the following screen should display: 2.2.7 Increase Extended Feature Settings Heap / Stack size We recommend increasing the heap-size setting to the maximum available. To do this: 1. Go to the device's Web - Ricoh Aficio MP C2050 | User Manual - Page 11
interface. This allows you to the upload the embedded application to the device remotely. To perform the web-based install follow the steps in section 2.2.10 "Installing Application using Ricoh Web Admin". An alternate installation method is to install via the Java SD card. This involves copying the - Ricoh Aficio MP C2050 | User Manual - Page 12
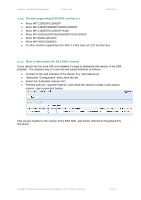
following steps: 1. On a computer, open your web browser 2. Enter the URL of the Ricoh device. E.g. http://ricoh-device-ip/ 3. Click the "Login" link at the top right of the page. 4. Enter the device administrator username and password, and press "Login". 5. Select the "Configuration" from the left - Ricoh Aficio MP C2050 | User Manual - Page 13
PaperCut - Ricoh Embedded Manual Revision: 19 2012-10-26 List" button. Note this make take up to page. Now that the application is installed, skip the "Ricoh Java card" installation method and proceed with section 2.2.12 "Set Default Application and System Timeout." on page 16. Copyright © 2012 - Ricoh Aficio MP C2050 | User Manual - Page 14
Ricoh Embedded Manual Revision: 19 2012-10-26 2.2.11 Installing application using the Ricoh Java SD card It is generally recommended to use the web name and address of the PaperCut server. It is recommended to set the "server-name" to a name that can be resolved by the Ricoh copier (e.g. the DNS - Ricoh Aficio MP C2050 | User Manual - Page 15
PaperCut - Ricoh Embedded Manual Revision: 19 2012-10-26 2. Power off the device fully using the main power switch. 3. Insert the Java card into SD card slot 3. 4. Turn on the main power switch. 5. Wait for the device to boot. 6. Go to the Ricoh admin/settings by pressing the "User Tools/Counter" - Ricoh Aficio MP C2050 | User Manual - Page 16
must be configured as the default application and a system reset timeout should be set. This gives PaperCut full control of the copier and forces the user to login before using the copier. To do this: 1. On the device go to the Ricoh admin/settings by pressing the "User Tools/Counter" hard key (on - Ricoh Aficio MP C2050 | User Manual - Page 17
the "Welcome screen" (see below). 10. The Ricoh device will appear in the PaperCut administration interface under the "Devices" tab with the name you provided in the steps above. It will be created using the cost settings of the "[Template Printer]". The embedded application is configured to "auto - Ricoh Aficio MP C2050 | User Manual - Page 18
monitoring and control with the account selection enabled (i.e. to charge copying to accounts/departments/costcenters/etc). To setup these users in PaperCut: 1. Create the 'testusersimple' and 'testuseradvanced' users in your Active Directory or LDAP directory. 2. Login to the PaperCut's admin web - Ricoh Aficio MP C2050 | User Manual - Page 19
and password and press "Login". 3. At this point the copier will be enabled for use. 4. If the release station is also enabled, then select "Copier functions" to enable the copier. 5. Follow the onscreen instructions and perform some test copying. i.e. press the "Copy" hard key on the Ricoh and - Ricoh Aficio MP C2050 | User Manual - Page 20
the 'testuseradvanced' username and password and press "Login". 3. The screen will display the account selection options. Select the account to allocate copying to. E.g. "Test Account 1". 4. At this point the copier will be enabled for usage. Follow the onscreen instructions and perform some test - Ricoh Aficio MP C2050 | User Manual - Page 21
PaperCut - Ricoh Embedded Manual Revision: 19 2012-10-26 5. Once completed copying press the "Other function" hard key to return to the PaperCut application. 6. Press the "Logout" button. Back in the PaperCut application verify that the copier activity was recorded and the user's account deducted - Ricoh Aficio MP C2050 | User Manual - Page 22
listed in the "Printers- >Jobs Pending Release" page of the PaperCut administration interface. 9. Confirm that the username is 'testusersimple'. At the photocopier device: 10. At the "Welcome" screen, press "Start". 11. Enter the 'testusersimple' username and password and press "Login". 12. Select - Ricoh Aficio MP C2050 | User Manual - Page 23
. See section 6 for more information.) 4.2 Authentication Methods PaperCut supports a number of different ways to authenticate users who walk-up to the devices to perform copying. The default authentication method is username and password authentication. The available authentication methods can be - Ricoh Aficio MP C2050 | User Manual - Page 24
PaperCut - Ricoh Embedded Manual Revision: 19 2012-10-26 Authentication methods available for a device Each authentication method is discussed in the following table. Authentication Method Description Username and password The user may use their domain/network username and password to log - Ricoh Aficio MP C2050 | User Manual - Page 25
Ricoh Embedded Manual Revision: 19 2012-10-26 The options available to each user, as well as account security access, will mirror the same options available when the user prints. "Select from list" and/or "Select using PIN/Code" are controlled at the user level via the User include instructions or - Ricoh Aficio MP C2050 | User Manual - Page 26
- Ricoh Embedded Manual Revision: ext-device-msg.copierenabled-text The text displayed on the 'copier enabled screen' (the screen where the device is ready one authentication mode is enabled this option will have no effect. Default: N ext-device.inactivity-timeout- Defines how long to allow a user - Ricoh Aficio MP C2050 | User Manual - Page 27
PaperCut - Ricoh Embedded Manual Revision: 19 2012-10-26 5.1 Customizing the Header Logos and Colors The embedded application has a header at the top of all screens. This header defaults to the PaperCut logo and green color. The header can be customized to match your organization's color scheme - Ricoh Aficio MP C2050 | User Manual - Page 28
application, use the device web admin: 1. Open your web browser 2. Enter the URL of the Ricoh device. E.g. http://ricoh-device-ip/ 3. Click the "Login" link at the top right of the page. 4. Enter the device administrator username and password, and press "Login". 5. Select the "Configuration" from - Ricoh Aficio MP C2050 | User Manual - Page 29
buttons: Login to the PaperCut admin site On the "Devices" tab, select the Ricoh device to DISABLED". 5.4 Configuring Swipe Card Readers For a list of supported card readers please see Appendix A towards the end of this document. Swipe cards contain numbers which are used to identify users - Ricoh Aficio MP C2050 | User Manual - Page 30
Ricoh Embedded Manual Revision: 19 2012-10-26 A typical case is the checksum being reported after the card number, separated by an equals sign, such as in 5235092385=8. PaperCut can handle this case by default . o Usually one regular expression will PaperCut Admin Console. Open the Admin Console - Ricoh Aficio MP C2050 | User Manual - Page 31
it's also important that administrators know how to bypass/disable the system if direct copier access is required - say to change advanced system settings. Administrations should take the following precautions: The copier's built in admin password should be changed and always kept secure. The - Ricoh Aficio MP C2050 | User Manual - Page 32
in the setup instructions. I see an error on the Ricoh LCD screen? This may indicate a configuration issue, or maybe a software bug. Re-check your settings and restart the MFD (i.e. power-off and power-on the copier). If problems continue, contact PaperCut Support. Copyright © 2012 PaperCut - Ricoh Aficio MP C2050 | User Manual - Page 33
PaperCut - Ricoh Embedded Manual Revision: 19 2012-10-26 My users have symbols in their passwords and/or it's difficult to enter their usernames. What options do I have? The Shift button will offer addition symbols. Use of this is however cumbersome. You may wish to instruct your users to change - Ricoh Aficio MP C2050 | User Manual - Page 34
- Ricoh Aficio MP C2050 | User Manual - Page 35
PaperCut - Ricoh Embedded Manual Revision: 19 2012-10-26 A. Appendix: Supported Authentication Card Readers The list of officially supported card readers from Ricoh are: Card Type Manufacturer Model HID RFIDeas, Inc. RDR-6081-AKU Indala / Motorola RFIDeas, Inc. RDR-6381-AKU Casi-Rusco - Ricoh Aficio MP C2050 | User Manual - Page 36
Ricoh Embedded Manual Revision: 19 2012-10-26 A typical case is the checksum being reported after the card number, separated by an equals sign, such as in 5235092385=8. PaperCut can handle this case by default as the first match group. o Usually one regular expression will be used for all the - Ricoh Aficio MP C2050 | User Manual - Page 37
PaperCut - Ricoh Embedded Manual Revision: 19 2012-10-26 Enter the name of the required converter (see table below) and click Update To set at the device level: Devices -> [ - Ricoh Aficio MP C2050 | User Manual - Page 38
team uses to implement these advanced converters. Please contact support to discuss development options and costs. . 7.2 Configuration of RFIdeas pcSwipe magstripe reader For the RFIdeas magstripe reader to work with the Ricoh Embedded application the card reader must be re-configured using - Ricoh Aficio MP C2050 | User Manual - Page 39
PaperCut - Ricoh Embedded Manual Revision: 19 2012-10-26 Copyright © 2012 PaperCut Software International Pty. Ltd., All Rights Reserved. 39 of 41 - Ricoh Aficio MP C2050 | User Manual - Page 40
- Ricoh Embedded Manual Revision: 19 2012-10-26 B. Appendix: Screenshots for User Information Sheets Many organizations like to provide detailed step-by-step instructions to their users to guide them through copier use. In addition to the screenshots in the previous sections of the manual - Ricoh Aficio MP C2050 | User Manual - Page 41
PaperCut - Ricoh Embedded Manual Revision: 19 2012-10-26 Copyright © 2012 PaperCut Software International Pty. Ltd., All Rights Reserved. 41 of 41
-
 1
1 -
 2
2 -
 3
3 -
 4
4 -
 5
5 -
 6
6 -
 7
7 -
8
-
9
-
10
-
11
-
12
-
13
-
14
-
15
-
16
-
17
-
18
-
19
-
20
-
21
-
22
-
23
-
24
-
25
-
26
-
27
-
28
-
29
-
30
-
31
-
32
-
33
-
34
-
35
-
36
-
37
-
38
-
39
-
40
-
41
 |
 |

PaperCut Ricoh Embedded Manual
Contents
1
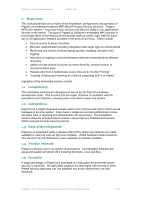
Overview
...........................................................................................................
3
1.1
Consistency:
...............................................................................................
3
1.2
Integration:
..................................................................................................
3
1.3
Rate of development:
..................................................................................
3
1.4
Vendor Neutral:
...........................................................................................
3
1.5
Security:
......................................................................................................
3
2
Installation
.........................................................................................................
4
2.1
Requirements
..............................................................................................
4
2.1.1
Devices supporting GW+ ESA SDK version 10.x (or later)
...................
5
2.1.2
Devices supporting ESA SDK version 4.x, 5.x, 7.x
...............................
5
2.1.3
Devices supporting ESA SDK version 2.x
............................................
6
2.1.4
How to determine the ESA SDK version
..............................................
6
2.2
Setup Procedure
.........................................................................................
7
2.2.1
Verify Access to the Ricoh Administrative Web Interface
.....................
7
2.2.2
Networking/Firewall Configuration
........................................................
7
2.2.3
PaperCut Settings
................................................................................
7
2.2.4
Choosing Application Version
..............................................................
7
2.2.5
Configuring the Enhanced External Charge Unit (SDK 4.x+ devices
only)
8
2.2.6
Disable the Document Server
..............................................................
8
2.2.7
Increase Extended Feature Settings Heap / Stack size
......................
10
2.2.8
Fax Configuration (Recommended when tracking faxes)
...................
10
2.2.9
Choose an Installation Method
...........................................................
11
2.2.10
Installing Application using Ricoh Web Admin (Recommended)
.........
12
2.2.11
Installing application using the Ricoh Java SD card
...........................
14
2.2.12
Set Default Application and System Timeout
......................................
16
2.2.13
Starting the Embedded Application
....................................................
16
3
Post-install testing
...........................................................................................
18
3.1
Test Preparation
.......................................................................................
18
3.2
Scenario 1: Standard copying
...................................................................
19
3.3
Scenario 2: Copying with account selection
..............................................
20
3.4
Scenario 3: Print release
...........................................................................
21
4
Configuration
...................................................................................................
23
4.1
Device Function
........................................................................................
23
4.2
Authentication Methods
.............................................................................
23