Ricoh Aficio MP C2050 User Manual - Page 16
Set Default Application and System Timeout, Starting the Embedded Application - default login
 |
View all Ricoh Aficio MP C2050 manuals
Add to My Manuals
Save this manual to your list of manuals |
Page 16 highlights
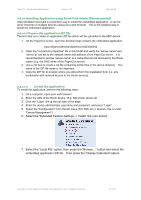
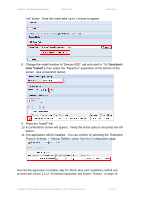
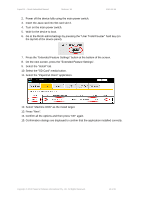
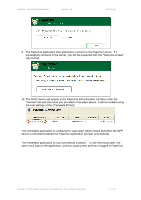
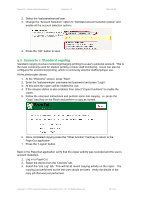
PaperCut - Ricoh Embedded Manual Revision: 19 2012-10-26 2.2.12 Set Default Application and System Timeout The PaperCut embedded application is now installed on the Ricoh MFP device. For the PaperCut embedded application to run effectively it must be configured as the default application and a system reset timeout should be set. This gives PaperCut full control of the copier and forces the user to login before using the copier. To do this: 1. On the device go to the Ricoh admin/settings by pressing the "User Tools/Counter" hard key (on the top left of the device panel). 2. Press the "System Settings" button. 3. On the "General Features" tab, select the "Function Priority" setting. 4. Select "JavaTM/X" and press "OK". For SDK 10.x+ devices, see Extended Features, then PaperCut MF. 5. Select the "Timer Settings" tab. 6. Select the "System Auto Reset Timer" option. 7. Enable the timer by pressing the "On" button and set the timeout to something reasonable. We recommend setting this to between 30 and 60 seconds. There is a trade-off setting the timeout. If it is set too short, then it will be annoying for users. If it is set too long and users forget to logout other users could charge copies to the previous user's account. 2.2.13 Starting the Embedded Application Once the application is installed and configured it can be started via the web interface. Navigate to Device Configuration->Extended Feature Settings->Startup Setting. Alternatively, the embedded application can be started at the device itself. 1. Go to the Ricoh admin/settings by pressing the "User Tools/Counter" hard key (on the left of the device panel). 2. Press the "Extended Feature Settings" button at the bottom of the screen. 3. On the "Extended Features Settings" screen, select the "Startup Setting" tab. 4. The running applications are highlighted. To start the PaperCut application, press the "PaperCut MF" application button. 5. The device will display a "Please wait ..." dialog until the application starts. 6. Once started, exit the admin screens by pressing Exit twice. 7. Press the "Other function" hard button (which is below the copy/fax buttons on the left - this can also be replaced with a custom button). The PaperCut application will then appear as shown below. On SDK 10.x+ devices, the PaperCut application can be found after pressing the 'Home' hardware button. 8. The first time the PaperCut application runs, it prompts for a friendly name to register the device in PaperCut (e.g. admin-copier). The name should uniquely identify the device on your network. Using the same name as the copier's print queue is recommended. Enter the name and press "Save". Copyright © 2012 PaperCut Software International Pty. Ltd., All Rights Reserved. 16 of 41
-
 1
1 -
2
-
3
-
4
-
5
-
6
-
7
-
8
-
9
-
10
-
 11
11 -
 12
12 -
 13
13 -
 14
14 -
 15
15 -
 16
16 -
 17
17 -
 18
18 -
 19
19 -
 20
20 -
 21
21 -
22
-
23
-
24
-
25
-
26
-
27
-
28
-
29
-
30
-
31
-
32
-
33
-
34
-
35
-
36
-
37
-
38
-
39
-
40
-
41
 |
 |