Ricoh Aficio MP C2050 User Manual - Page 29
Configuring Swipe Card Readers - admin login
 |
View all Ricoh Aficio MP C2050 manuals
Add to My Manuals
Save this manual to your list of manuals |
Page 29 highlights
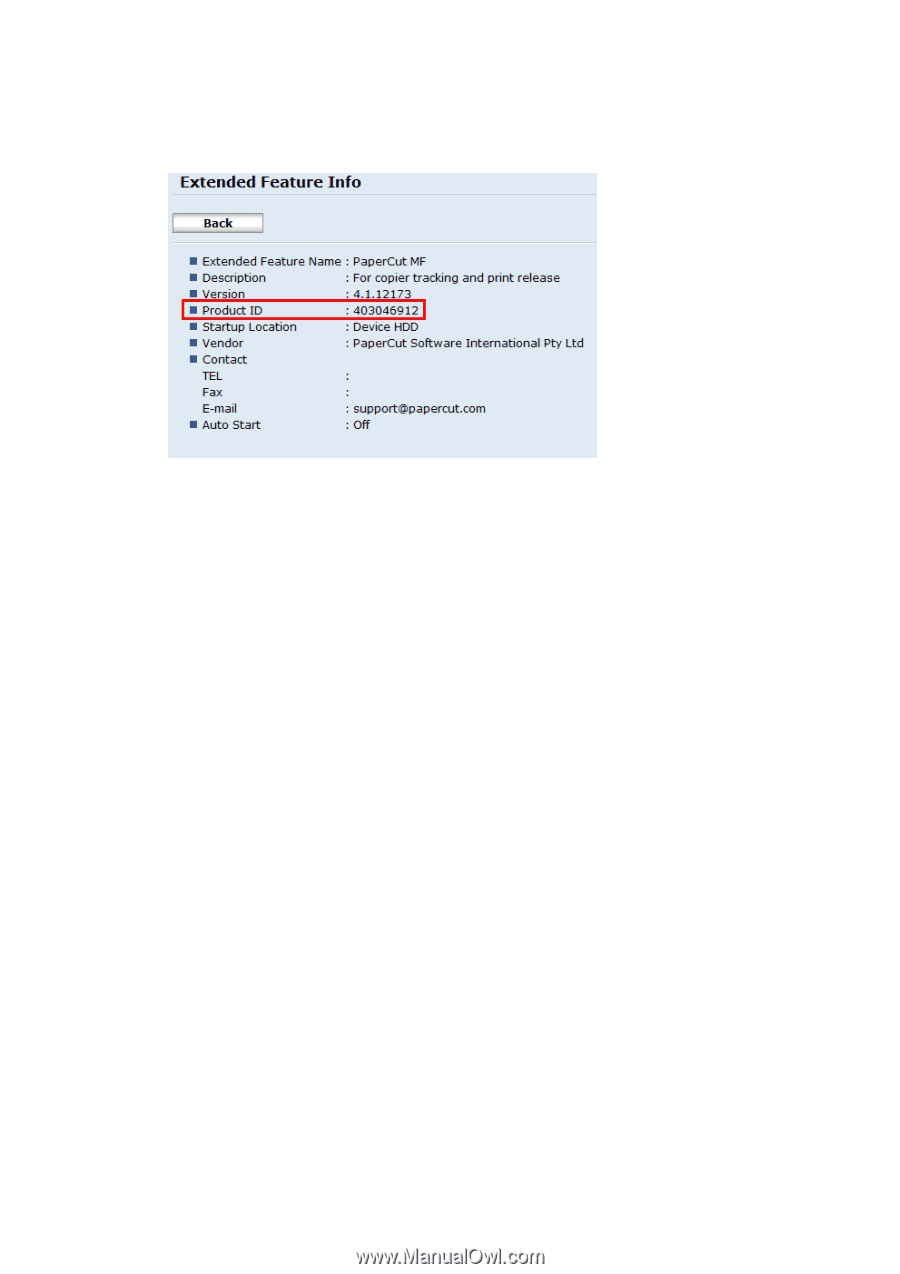
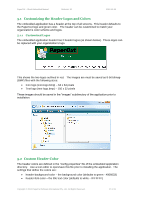
PaperCut - Ricoh Embedded Manual Revision: 19 2012-10-26 product ID. See the screenshot below showing the application information for the PaperCut embedded application. The product id is a 9 digit number and is highlighted below. Take note of the application product id. To configure the application switch buttons: Login to the PaperCut admin site On the "Devices" tab, select the Ricoh device to configure Select the "Advanced Config" tab. Locate the entry "ext-device.ricoh.app-button1.label". This is the text that appears on the application button. Change the button label to as appropriate, and press the "Update" button next to the setting. Locate the entry "ext-device.ricoh.app-button1.product-id". This will be set to "DISABLED" to indicate the button is disabled. Enter the product id of the application and press the "Update" button. Confirm that the settings were saved. The settings will take effect after a short period of time. To create a second application switch button perform the same steps setting the "extdevice.ricoh.app-button2.label" and "ext-device.ricoh.app-button2.product-id" settings. To disable the application buttons set the product id settings to "DISABLED". 5.4 Configuring Swipe Card Readers For a list of supported card readers please see Appendix A towards the end of this document. Swipe cards contain numbers which are used to identify users according to the card number configured in the User Details screen under "Card/Identity" number. Some readers report information in addition to the number encoded on the card, such as checksums. PaperCut can treat these cases in two ways: Copyright © 2012 PaperCut Software International Pty. Ltd., All Rights Reserved. 29 of 41
-
 1
1 -
2
-
3
-
4
-
5
-
6
-
7
-
8
-
9
-
10
-
11
-
12
-
13
-
14
-
15
-
16
-
17
-
18
-
19
-
20
-
21
-
22
-
23
-
 24
24 -
 25
25 -
 26
26 -
 27
27 -
 28
28 -
 29
29 -
 30
30 -
 31
31 -
 32
32 -
 33
33 -
 34
34 -
35
-
36
-
37
-
38
-
39
-
40
-
41
 |
 |