Ricoh Aficio MP C2050 User Manual - Page 9
Enabling Enhanced External Charge Unit support - fax
 |
View all Ricoh Aficio MP C2050 manuals
Add to My Manuals
Save this manual to your list of manuals |
Page 9 highlights
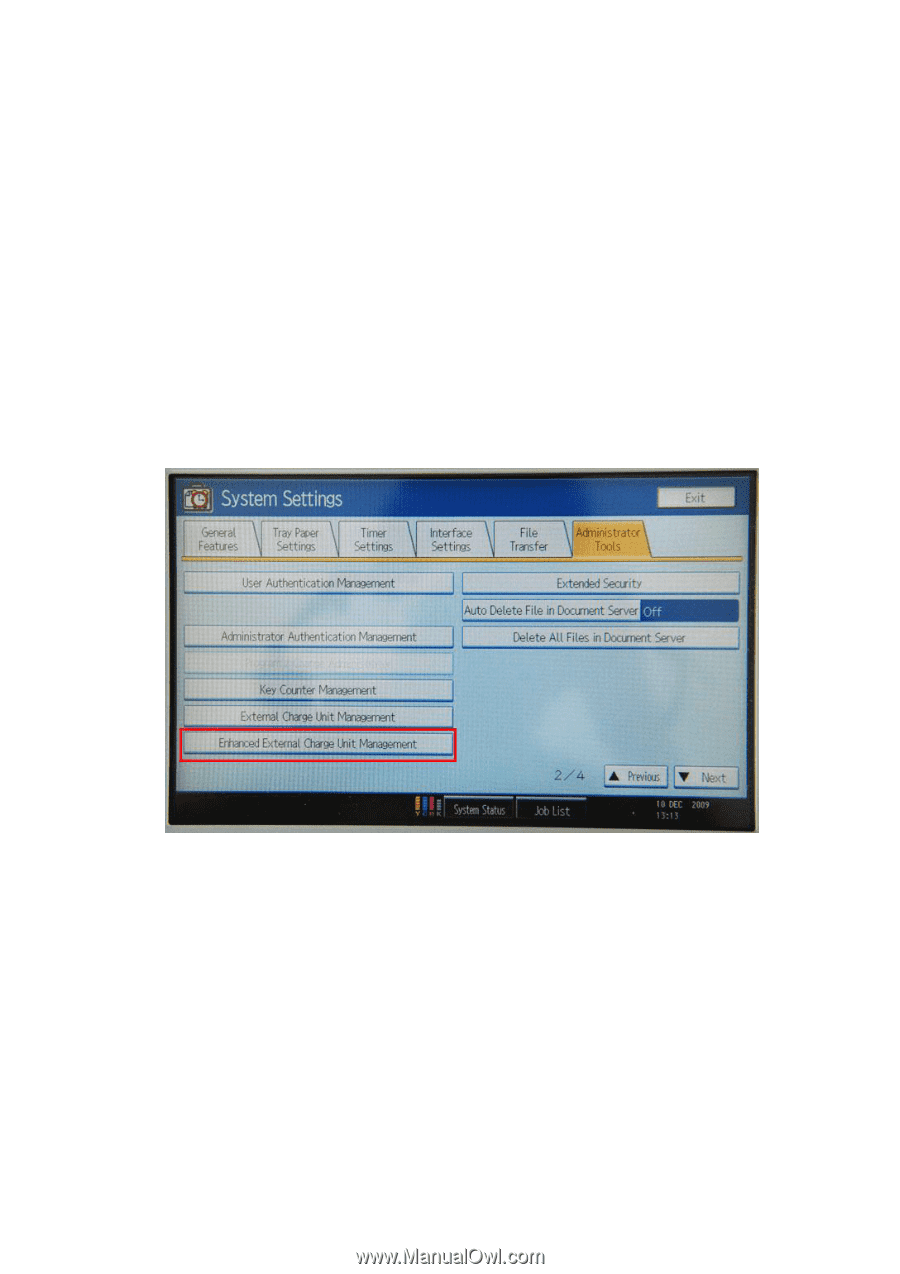
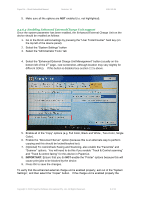
PaperCut - Ricoh Embedded Manual Revision: 19 2012-10-26 5. Make sure all the options are NOT enabled (i.e. not highlighted). 2.2.6.2 Enabling Enhanced External Charge Unit support Once the system parameter has been enabled, the Enhanced External Charge Unit on the device should be enabled as follows: 1. Go to the Ricoh admin/settings by pressing the "User Tools/Counter" hard key (on the top left of the device panel). 2. Select the "System Settings" button 3. Select the "Administrator Tools" tab 4. Select the "Enhanced External Charge Unit Management" button (usually on the bottom left of the 2nd page, -see screenshot, although location may vary slightly for different SDKs). If this button is disabled see section 2.2.5 above. 5. Enable all of the "Copy" options (e.g. Full Color, Black and White , Two-Color, Single Color). 6. Enable the "Document Server" option (because this is an alternate way to perform copying and this should be locked/tracked too). 7. (Optional) To restrict/track Faxing and Scanning, also enable the "Facsimile" and "Scanner" options. You will need to do this if you enable "Track & Control scanning" and "Track & control faxing" for this device in PaperCut. 8. IMPORTANT: Ensure that you do NOT enable the "Printer" options because this will cause print jobs to be blocked by the device. 9. Press OK to save the changes. To verify that the enhanced external charge unit is enabled properly, exit out of the "System Settings", and then select the "Copier" button. If the charge unit is enabled properly the Copyright © 2012 PaperCut Software International Pty. Ltd., All Rights Reserved. 9 of 41
-
 1
1 -
2
-
3
-
 4
4 -
 5
5 -
 6
6 -
 7
7 -
 8
8 -
 9
9 -
 10
10 -
 11
11 -
 12
12 -
 13
13 -
 14
14 -
15
-
16
-
17
-
18
-
19
-
20
-
21
-
22
-
23
-
24
-
25
-
26
-
27
-
28
-
29
-
30
-
31
-
32
-
33
-
34
-
35
-
36
-
37
-
38
-
39
-
40
-
41
 |
 |