Ryobi RMX001 Operation Manual - Page 12
Attaching The Handles
 |
View all Ryobi RMX001 manuals
Add to My Manuals
Save this manual to your list of manuals |
Page 12 highlights
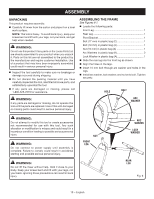
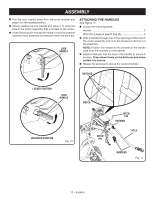
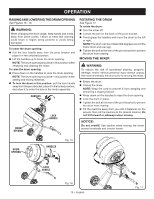
ASSEMBLY Pull the lock handle away from the pivot bracket and place it in the locked position. Slowly release the lock handle and allow it to enter the hole in the motor assembly that is closest to the motor. Insert the pivot pin through the holes in the pivot bracket and the motor assembly and secure it with the hitch pin. LOCK HANDLE ATTACHING THE HANDLES See Figure 11. Locate the following parts: Handle 2 Hitch Pin (Large) in plastic bag (E 2 Slide a handle through one of the openings at the rear of the motor assembly and onto the bracket at the front of the assembly. NOTE: Position the handle so the notches in the handle slide onto the notches on the bracket. Install a hitch pin into the hole in the handle to secure it in place. Press down firmly on the hitch pin and make certain it is secure. Repeat the process to secure the second handle. NOTCHES LOCKED POSITION LOCK HANDLE NOTCH UNLOCKED POSITION Fig. 10 HITCH PIN HITCH PIN OPENING HOLE HANDLES Fig. 11 12 − English
-
 1
1 -
2
-
3
-
4
-
5
-
6
-
 7
7 -
 8
8 -
 9
9 -
 10
10 -
 11
11 -
 12
12 -
 13
13 -
 14
14 -
 15
15 -
 16
16 -
 17
17 -
18
-
19
-
20
-
21
-
22
-
23
-
24
-
25
-
26
-
27
-
28
-
29
-
30
-
31
-
32
-
33
-
34
-
35
-
36
-
37
-
38
-
39
-
40
-
41
-
42
-
43
-
44
-
45
-
46
-
47
-
48
-
49
-
50
-
51
-
52
-
53
-
54
-
55
-
56
 |
 |
