Samsung ML-2251N User Manual (ENGLISH) - Page 145
Installing PS Drivers, Appendix D, Installing Printer Options. - network setup
 |
UPC - 635753622713
View all Samsung ML-2251N manuals
Add to My Manuals
Save this manual to your list of manuals |
Page 145 highlights
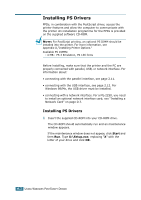
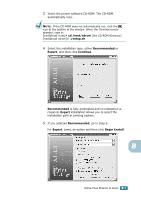
Installing PS Drivers PPDs, in combination with the PostScript driver, access the printer features and allow the computer to communicate with the printer. An installation programme for the PPDs is provided on the supplied software CD-ROM. NOTE: For PostScript printing, an optional PS DIMM should be installed into the printer. For more information, see Appendix D,"Installing Printer Options." Avaliable PS DIMMs: - 4 MB : PS 3 Emulation, PS 136 fonts Before installing, make sure that the printer and the PC are properly connected with parallel, USB, or network interface. For information about: • connecting with the parallel interface, see page 2.11. • connecting with the USB interface, see page 2.12. For Windows 98/Me, the USB driver must be installed. • connecting with a network interface. For a ML-2250, you need to install an optional network interface card; see "Installing a Network Card" on page D.7. Installing PS Drivers 1 Insert the supplied CD-ROM into your CD-ROM drive. The CD-ROM should automatically run and an maintenance window appears. If the maintenance window does not appear, click Start and then Run. Type X:\Setup.exe, replacing "X" with the letter of your drive and click OK. A.2 USING WINDOWS POSTSCRIPT DRIVER
-
 1
1 -
2
-
3
-
4
-
5
-
6
-
7
-
8
-
9
-
10
-
11
-
12
-
13
-
14
-
15
-
16
-
17
-
18
-
19
-
20
-
21
-
22
-
23
-
24
-
25
-
26
-
27
-
28
-
29
-
30
-
31
-
32
-
33
-
34
-
35
-
36
-
37
-
38
-
39
-
40
-
41
-
42
-
43
-
44
-
45
-
46
-
47
-
48
-
49
-
50
-
51
-
52
-
53
-
54
-
55
-
56
-
57
-
58
-
59
-
60
-
61
-
62
-
63
-
64
-
65
-
66
-
67
-
68
-
69
-
70
-
71
-
72
-
73
-
74
-
75
-
76
-
77
-
78
-
79
-
80
-
81
-
82
-
83
-
84
-
85
-
86
-
87
-
88
-
89
-
90
-
91
-
92
-
93
-
94
-
95
-
96
-
97
-
98
-
99
-
100
-
101
-
102
-
103
-
104
-
105
-
106
-
107
-
108
-
109
-
110
-
111
-
112
-
113
-
114
-
115
-
116
-
117
-
118
-
119
-
120
-
121
-
122
-
123
-
124
-
125
-
126
-
127
-
128
-
129
-
130
-
131
-
132
-
133
-
134
-
135
-
136
-
137
-
138
-
139
-
 140
140 -
 141
141 -
 142
142 -
 143
143 -
 144
144 -
 145
145 -
 146
146 -
 147
147 -
 148
148 -
 149
149 -
 150
150 -
151
-
152
-
153
-
154
-
155
-
156
-
157
-
158
-
159
-
160
-
161
-
162
-
163
-
164
-
165
-
166
-
167
-
168
-
169
-
170
-
171
-
172
-
173
-
174
-
175
-
176
-
177
-
178
-
179
-
180
-
181
-
182
-
183
-
184
-
185
-
186
-
187
-
188
-
189
-
190
-
191
-
192
-
193
-
194
-
195
-
196
-
197
 |
 |