Samsung ML-2251N User Manual (ENGLISH) - Page 161
About the Remote Control Panel, Installing the Remote Control Panel
 |
UPC - 635753622713
View all Samsung ML-2251N manuals
Add to My Manuals
Save this manual to your list of manuals |
Page 161 highlights
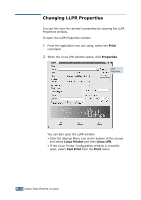
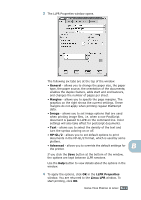
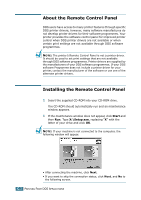
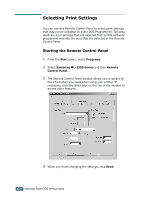
About the Remote Control Panel DOS users have access to many printer features through specific DOS printer drivers; however, many software manufactures do not develop printer drivers for their software programmes. Your printer provides the software control panel for improved printer control when DOS printer drivers are not available or when certain print settings are not available through DOS software programmes. NOTE: The printer's Remote Control Panel is not a printer driver. It should be used to set print settings that are not available through DOS software programmes. Printer drivers are supplied by the manufacturers of your DOS software programmes. If your DOS software Programme does not include a printer driver for your printer, contact the manufacturer of the software or use one of the alternate printer drivers. Installing the Remote Control Panel 1 Insert the supplied CD-ROM into your CD-ROM drive. The CD-ROM should automatically run and an maintenance window appears. 1 If the maintenance window does not appear, click Start and then Run. Type X:\Setup.exe, replacing "X" with the letter of your drive and click OK. NOTE: If your machine is not connected to the computer, the following window will appear. • After connecting the machine, click Next. • If you want to skip the connection status, click Next, and No to the following screen. C.2 PRINTING FROM DOS APPLICATIONS
-
 1
1 -
2
-
3
-
4
-
5
-
6
-
7
-
8
-
9
-
10
-
11
-
12
-
13
-
14
-
15
-
16
-
17
-
18
-
19
-
20
-
21
-
22
-
23
-
24
-
25
-
26
-
27
-
28
-
29
-
30
-
31
-
32
-
33
-
34
-
35
-
36
-
37
-
38
-
39
-
40
-
41
-
42
-
43
-
44
-
45
-
46
-
47
-
48
-
49
-
50
-
51
-
52
-
53
-
54
-
55
-
56
-
57
-
58
-
59
-
60
-
61
-
62
-
63
-
64
-
65
-
66
-
67
-
68
-
69
-
70
-
71
-
72
-
73
-
74
-
75
-
76
-
77
-
78
-
79
-
80
-
81
-
82
-
83
-
84
-
85
-
86
-
87
-
88
-
89
-
90
-
91
-
92
-
93
-
94
-
95
-
96
-
97
-
98
-
99
-
100
-
101
-
102
-
103
-
104
-
105
-
106
-
107
-
108
-
109
-
110
-
111
-
112
-
113
-
114
-
115
-
116
-
117
-
118
-
119
-
120
-
121
-
122
-
123
-
124
-
125
-
126
-
127
-
128
-
129
-
130
-
131
-
132
-
133
-
134
-
135
-
136
-
137
-
138
-
139
-
140
-
141
-
142
-
143
-
144
-
145
-
146
-
147
-
148
-
149
-
150
-
151
-
152
-
153
-
154
-
155
-
 156
156 -
 157
157 -
 158
158 -
 159
159 -
 160
160 -
 161
161 -
 162
162 -
 163
163 -
 164
164 -
 165
165 -
 166
166 -
167
-
168
-
169
-
170
-
171
-
172
-
173
-
174
-
175
-
176
-
177
-
178
-
179
-
180
-
181
-
182
-
183
-
184
-
185
-
186
-
187
-
188
-
189
-
190
-
191
-
192
-
193
-
194
-
195
-
196
-
197
 |
 |