Samsung ML-2251N User Manual (ENGLISH) - Page 91
Creating a Watermark, Extras, Watermark, Message, First Only
 |
UPC - 635753622713
View all Samsung ML-2251N manuals
Add to My Manuals
Save this manual to your list of manuals |
Page 91 highlights
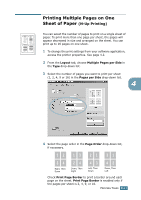
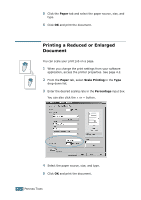
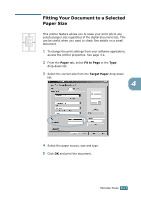
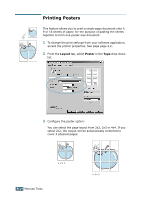
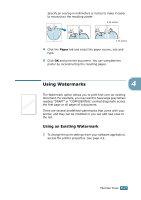
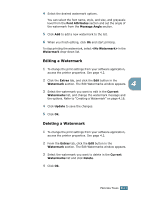
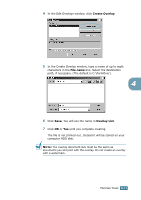
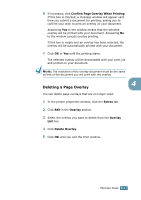
2 Click the Extras tab, and select the desired watermark in the Watermark drop-down list. You will see the selected watermark in the preview image. Preview imagPereview image 3 Click OK and start printing. Creating a Watermark 1 To change the print settings from your software application, access the printer properties. See page 4.2. 2 Click the Extras tab, and click the Edit button in the Watermark section. The Edit Watermarks window appears. Preview image 3 Enter the desired text message in the Watermark Message box. This will be displayed in the preview window. The preview image is provided so that you can see how the watermark will appear on the printed page. If the First Page Only box is checked, the watermark will be printed on the first page only. 4.16 PRINTING TASKS
-
 1
1 -
2
-
3
-
4
-
5
-
6
-
7
-
8
-
9
-
10
-
11
-
12
-
13
-
14
-
15
-
16
-
17
-
18
-
19
-
20
-
21
-
22
-
23
-
24
-
25
-
26
-
27
-
28
-
29
-
30
-
31
-
32
-
33
-
34
-
35
-
36
-
37
-
38
-
39
-
40
-
41
-
42
-
43
-
44
-
45
-
46
-
47
-
48
-
49
-
50
-
51
-
52
-
53
-
54
-
55
-
56
-
57
-
58
-
59
-
60
-
61
-
62
-
63
-
64
-
65
-
66
-
67
-
68
-
69
-
70
-
71
-
72
-
73
-
74
-
75
-
76
-
77
-
78
-
79
-
80
-
81
-
82
-
83
-
84
-
85
-
 86
86 -
 87
87 -
 88
88 -
 89
89 -
 90
90 -
 91
91 -
 92
92 -
 93
93 -
 94
94 -
 95
95 -
 96
96 -
97
-
98
-
99
-
100
-
101
-
102
-
103
-
104
-
105
-
106
-
107
-
108
-
109
-
110
-
111
-
112
-
113
-
114
-
115
-
116
-
117
-
118
-
119
-
120
-
121
-
122
-
123
-
124
-
125
-
126
-
127
-
128
-
129
-
130
-
131
-
132
-
133
-
134
-
135
-
136
-
137
-
138
-
139
-
140
-
141
-
142
-
143
-
144
-
145
-
146
-
147
-
148
-
149
-
150
-
151
-
152
-
153
-
154
-
155
-
156
-
157
-
158
-
159
-
160
-
161
-
162
-
163
-
164
-
165
-
166
-
167
-
168
-
169
-
170
-
171
-
172
-
173
-
174
-
175
-
176
-
177
-
178
-
179
-
180
-
181
-
182
-
183
-
184
-
185
-
186
-
187
-
188
-
189
-
190
-
191
-
192
-
193
-
194
-
195
-
196
-
197
 |
 |
