Samsung ML 3051N User Manual (ENGLISH) - Page 17
Paper menu, Graphic menu, Paper, Explanation, Copies, Paper Size, Source, MP Tray, Manual Tray, Tray 2 - paper tray
 |
UPC - 635753624243
View all Samsung ML 3051N manuals
Add to My Manuals
Save this manual to your list of manuals |
Page 17 highlights
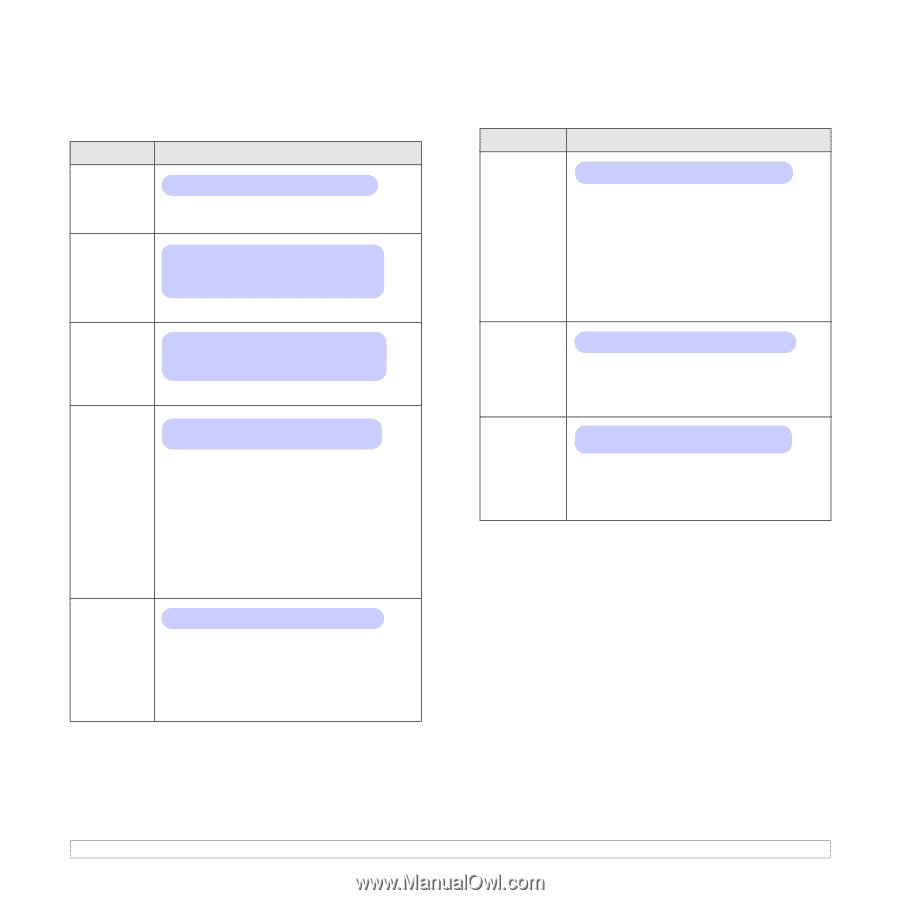
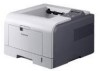
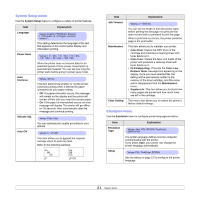
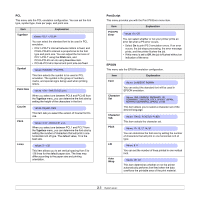
Paper menu Use the Paper menu to define all settings relating to print material input and output, as well as the specific print material you are using with your printer. Item Copies Paper Size Explanation Values: 1 ~ 999 Set the default number of copies by selecting any number from 1 to 999. Values: A4, A5, A6, JIS B5, ISO B5, Letter, Legal, Executive, No.10 Env., Monarch Env., DL Env., C5 Env., C6 Env., US Folio, Oficio, Custom Paper Paper Type Paper Source Tray Chaining Select the paper size currently loaded in the tray. Values: Plain Paper, Bond, Transparency, Envelope, Labels, CardStock, Preprinted, Color Paper, Cotton Paper, Recycled, Archive, Thick, Thin Select the paper type currently loaded in the tray. Values: Tray 1, Tray 2, MP Tray, Manual Tray, Auto Using this item, you can set which tray you want to use. • If you select Auto, the printer can automatically determine the source. • Select MP Tray or Manual Tray to use the multi- purpose tray. If you select Manual Tray, you need to press Stop (ML-3050) or OK (ML-3051N, ML-3051ND) each time you print a page. • Tray 2 is available only when an optional tray 2 is installed. Values: Off, On When you select any other value except Auto from Paper Source and the selected tray is empty, the printer automatically prints from other trays. If this menu item is set to Off, the Status LED lights red and the printer doesn't work until you insert paper into the specified tray. Graphic menu Use the Graphic menu to change settings affecting the quality of the printed characters and images. Item Resolution Explanation Values: 600dpi-Normal, 1200dpi-Best Darkness Image Enhance Specify the number of dots printed per inch (dpi). The higher the setting, the sharper printed characters and graphics. • If your print jobs are mostly text, select 600dpi- Normal for the highest quality printing. • Select 1200dpi-Best when your job contains bitmapped images, such as scanned photos or some graphics, that will benefit from enhanced line screening. Values: Normal, Light, Dark You can lighten or darken the print on the page by changing the toner density setting. The Normal setting usually produces the best result. Use the Light toner density setting to save toner. Values: Normal, Text Enhance This item enhances the print quality. • Normal: Doesn't enhance the quality. • Text Enhance: Enhances letters and simple figures. 2.3
-
 1
1 -
2
-
3
-
4
-
5
-
6
-
7
-
8
-
9
-
10
-
11
-
 12
12 -
 13
13 -
 14
14 -
 15
15 -
 16
16 -
 17
17 -
 18
18 -
 19
19 -
 20
20 -
 21
21 -
 22
22 -
23
-
24
-
25
-
26
-
27
-
28
-
29
-
30
-
31
-
32
-
33
-
34
-
35
-
36
-
37
-
38
-
39
-
40
-
41
-
42
-
43
-
44
-
45
-
46
-
47
-
48
-
49
-
50
-
51
-
52
-
53
-
54
-
55
-
56
-
57
-
58
-
59
-
60
-
61
-
62
-
63
-
64
-
65
-
66
-
67
-
68
-
69
-
70
-
71
-
72
-
73
-
74
-
75
-
76
-
77
-
78
-
79
-
80
-
81
-
82
-
83
-
84
-
85
-
86
-
87
-
88
-
89
-
90
-
91
-
92
-
93
-
94
-
95
-
96
-
97
-
98
-
99
-
100
-
101
-
102
 |
 |