Samsung NP-Q320E User Manual Vista Ver.1.0 (English) - Page 111
Reinstalling when Windows does not, start, Step 7 of Installing in Windows.
 |
View all Samsung NP-Q320E manuals
Add to My Manuals
Save this manual to your list of manuals |
Page 111 highlights
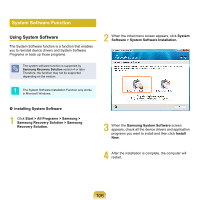
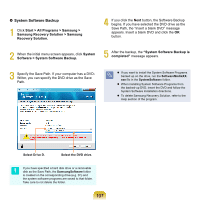
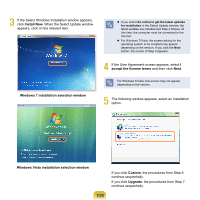
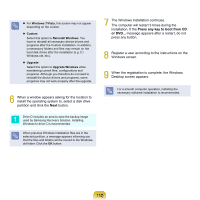
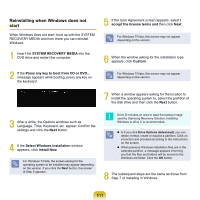
Reinstalling when Windows does not start When Windows does not start, boot up with the SYSTEM RECOVERY MEDIA and from there you can reinstall Windows. 1 Insert the SYSTEM RECOVERY MEDIA into the DVD drive and restart the computer. 5 If the User Agreement screen appears, select I accept the license terms and then click Next. For Windows 7/Vista, this screen may not appear depending on the version. 6 When the window asking for the installation type appears, click Custom. 2 If the Press any key to boot from CD or DVD... message appears while booting, press any key on the keyboard. For Windows 7/Vista, this screen may not appear depending on the version. 7 When a window appears asking for the location to install the operating system to, select the partition of the disk drive and then click the Next button. 3 After a while, the Options windows such as Language, Time, Keyboard, etc. appear. Confirm the settings and click the Next button. 4 If the Select Windows Installation window appears, click Install Now. For Windows 7/Vista, the screen asking for the operating system to be installed may appear depending on the version. If you click the Next button, the screen of Step 5 appears. Drive D includes an area to save the backup image used by Samsung Recovery Solution. Installing Windows to drive C is recommended. A If you click Drive Options (Advanced), you can delete, format, create or expand a partition. Click on a function and proceed according to the instructions on the screen. When previous Windows installation files are in the selected partition, a message appears informing you that the files and folders will be moved to the Windows.old folder. Click the OK button. 8 The subsequent steps are the same as those from Step 7 of Installing in Windows.� 111
-
 1
1 -
2
-
3
-
4
-
5
-
6
-
7
-
8
-
9
-
10
-
11
-
12
-
13
-
14
-
15
-
16
-
17
-
18
-
19
-
20
-
21
-
22
-
23
-
24
-
25
-
26
-
27
-
28
-
29
-
30
-
31
-
32
-
33
-
34
-
35
-
36
-
37
-
38
-
39
-
40
-
41
-
42
-
43
-
44
-
45
-
46
-
47
-
48
-
49
-
50
-
51
-
52
-
53
-
54
-
55
-
56
-
57
-
58
-
59
-
60
-
61
-
62
-
63
-
64
-
65
-
66
-
67
-
68
-
69
-
70
-
71
-
72
-
73
-
74
-
75
-
76
-
77
-
78
-
79
-
80
-
81
-
82
-
83
-
84
-
85
-
86
-
87
-
88
-
89
-
90
-
91
-
92
-
93
-
94
-
95
-
96
-
97
-
98
-
99
-
100
-
101
-
102
-
103
-
104
-
105
-
 106
106 -
 107
107 -
 108
108 -
 109
109 -
 110
110 -
 111
111 -
 112
112 -
 113
113 -
 114
114 -
 115
115 -
 116
116 -
117
-
118
-
119
-
120
-
121
-
122
-
123
-
124
-
125
-
126
-
127
-
128
-
129
-
130
-
131
 |
 |