Samsung PS63A756T1M User Manual (user Manual) (ver.1.0) (English, French, Gree - Page 17
DNIe™ Digital Natural Image engine DNIe™
 |
View all Samsung PS63A756T1M manuals
Add to My Manuals
Save this manual to your list of manuals |
Page 17 highlights
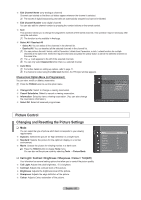
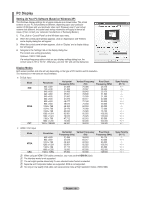
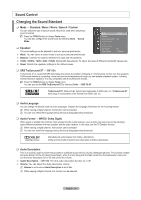
Size You can select the picture size which best corresponds to your viewing requirements. T Press the TOOLS button to display Tools menu. You can also set the size by selecting Tools → Picture Size. • Auto Wide: Automatically adjusts the picture size to the 16:9 aspect ratio. • 16:9: Adjusts the picture size to 16:9 appropriate for DVDs or wide broadcasting. • Wide Zoom: Magnify the size of the picture more than 4:3. • Zoom: Magnifies the 16:9 wide picture (in the vertical direction) to fit the screen size. • 4:3: This is the default setting for a video movie or normal broadcasting. • Just Scan: Use the function to see the full image without any cutoff when HDMI (720p / 1080i / 1080p) or Component (1080i / 1080p) signals are input. N Depending on the input source, the picture size options may vary. N The items available may differ depending on the selected mode. N In PC Mode, only 16:9 and 4:3 mode can be adjusted. N Settings can be adjusted and stored for each external device you have connected to an input of the TV. N Temporary image retention may occur when viewing a static image on the set for more than two hours. N Wide Zoom: Press the ► button to select Position, then press the ENTERE button. Press the ▲ or ▼ button to move the screen up / down. Then press the ENTERE button. N Zoom: Press the ► button to select Position, then press the ENTERE button. Press the ▲ or ▼ button to move the picture up and down. Then press the ENTERE button. Press the ► button to select Size, then press the ENTERE button. Press the ▲ or ▼ button to magnify or reduce the picture size in the vertical direction. Then press the ENTERE button. N After selecting Just Scan in HDMI (1080i / 1080p) or Component (1080i / 1080p) mode: Select Position by pressing the ◄ or ►button. Use the or ► button to move the picture. N Reset: Press the ◄ or ► button to select Reset, then press the ENTERE button. You can initialize the setting. N If you use the Just Scan function with HDMI 720p input, 1 line will be cut at the top, bottom, left and right as in the overscan function. N When Double ( , ) mode has been set in PIP, the Picture Size cannot be set. Screen Mode → 16:9 / Wide Zoom / Zoom / 4:3 When setting the picture size to Auto Wide in a 16:9 wide TV, you can determine the picture size you want to see the 4:3 WSS (Wide Screen Service) image or nothing. Each individual European country requires different picture size so this function is intended for users to select it. • 16:9: Sets the picture to 16:9 wide mode. • Wide Zoom: Magnify the size of the picture more than 4:3. • Zoom: Magnify the size of the picture vertically on screen. • 4:3: Sets the picture to 4:3 normal mode. N This function is available in Auto Wide mode. N This function is not available in PC, Component or HDMI mode. Digital NR → Off / Low / Medium / High / Auto If the broadcast signal received by your TV is weak, you can activate the Digital Noise Reduction feature to help reduce any static and ghosting that may appear on the screen. N When the signal is weak, select one of the other options until the best picture is displayed. DNIe → Off / Demo / On This TV includes the DNIe function so as to provide a high visual quality. If you set DNIe to on, you can view the screen with the DNIe feature activated. If you set the DNIe to Demo, you can view the applied DNIe and normal pictures on the screen, for demonstration purposes. Using this function, you can view the difference in the visual quality. N DNIe™ (Digital Natural Image engine) DNIe™ This feature brings you more detailed image with 3D noise reduction, detail enhancement, contrast enhancement and white enhancement. New image compensation Algorithm gives brighter, clearer, more detailed image to you. DNIe™ technology will fit every signal into your eyes. N This function is not available in Movie and Standard mode. HDMI Black Level → Normal / Low You can directly select the black level on the screen to adjust the screen depth. N This function is active only when the external input connects to HDMI (RGB signals). English - 17
-
 1
1 -
2
-
3
-
4
-
5
-
6
-
7
-
8
-
9
-
10
-
11
-
 12
12 -
 13
13 -
 14
14 -
 15
15 -
 16
16 -
 17
17 -
 18
18 -
 19
19 -
 20
20 -
 21
21 -
 22
22 -
23
-
24
-
25
-
26
-
27
-
28
-
29
-
30
-
31
-
32
-
33
-
34
-
35
-
36
-
37
-
38
-
39
-
40
-
41
-
42
-
43
-
44
-
45
-
46
-
47
-
48
-
49
-
50
-
51
-
52
-
53
-
54
-
55
-
56
-
57
-
58
-
59
-
60
-
61
-
62
-
63
-
64
-
65
-
66
-
67
-
68
-
69
-
70
-
71
-
72
-
73
-
74
-
75
-
76
-
77
-
78
-
79
-
80
-
81
-
82
-
83
-
84
-
85
-
86
-
87
-
88
-
89
-
90
-
91
-
92
-
93
-
94
-
95
-
96
-
97
-
98
-
99
-
100
-
101
-
102
-
103
-
104
-
105
-
106
-
107
-
108
-
109
-
110
-
111
-
112
-
113
-
114
-
115
-
116
-
117
-
118
-
119
-
120
-
121
-
122
-
123
-
124
-
125
-
126
-
127
-
128
-
129
-
130
-
131
-
132
-
133
-
134
-
135
-
136
-
137
-
138
-
139
-
140
-
141
-
142
-
143
-
144
-
145
-
146
-
147
-
148
-
149
-
150
-
151
-
152
-
153
-
154
-
155
-
156
-
157
-
158
-
159
-
160
-
161
-
162
-
163
-
164
-
165
-
166
-
167
-
168
-
169
-
170
-
171
-
172
-
173
-
174
-
175
-
176
-
177
-
178
-
179
-
180
-
181
-
182
-
183
-
184
-
185
-
186
-
187
-
188
-
189
-
190
-
191
-
192
-
193
-
194
-
195
-
196
-
197
-
198
-
199
-
200
-
201
-
202
-
203
-
204
-
205
-
206
-
207
-
208
-
209
-
210
-
211
-
212
-
213
-
214
-
215
-
216
-
217
-
218
-
219
-
220
-
221
-
222
-
223
-
224
-
225
-
226
-
227
-
228
-
229
-
230
-
231
-
232
-
233
-
234
-
235
-
236
-
237
-
238
-
239
-
240
-
241
-
242
-
243
-
244
-
245
-
246
-
247
-
248
-
249
-
250
-
251
-
252
-
253
-
254
-
255
-
256
-
257
-
258
-
259
-
260
-
261
-
262
-
263
-
264
-
265
-
266
-
267
-
268
-
269
-
270
-
271
-
272
-
273
-
274
-
275
-
276
-
277
-
278
-
279
-
280
-
281
-
282
-
283
-
284
-
285
-
286
-
287
-
288
-
289
-
290
-
291
-
292
-
293
-
294
-
295
-
296
-
297
-
298
-
299
-
300
-
301
-
302
-
303
-
304
-
305
-
306
-
307
-
308
-
309
-
310
-
311
-
312
-
313
-
314
-
315
-
316
-
317
-
318
-
319
-
320
-
321
-
322
-
323
-
324
-
325
-
326
-
327
-
328
-
329
-
330
-
331
-
332
-
333
-
334
-
335
-
336
-
337
 |
 |
