Samsung SC-DC564 User Manual (user Manual) (ver.1.0) (English, French) - Page 53
Auto Focus/Manual Focus, Auto Focus, Manual Focus, Mise au point automatique, Mise au point manuelle
 |
UPC - 036725301542
View all Samsung SC-DC564 manuals
Add to My Manuals
Save this manual to your list of manuals |
Page 53 highlights
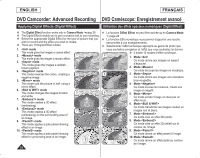
ENGLISH FRANÇAIS DVD Camcorder: Advanced Recording DVD Caméscope: Enregistrement avancé Auto Focus / Manual Focus Fonction Mise au point auto. / mise au point man. The Auto Focus/Manual Focus function works in both Camera Mode and a M.Cam Mode. page 28 In most situations, it is better to use the automatic focus feature, as it enables you to concentrate on the creative side of your recording. Manual focusing may be necessary under certain conditions that make automatic focusing difficult or unreliable. c Auto Focus If you are inexperienced in the use of DVD Camcorders, we recommend that you use Auto Focus. Manual Focus In the following situations, you may obtain better results by adjusting the focus manually. a. A picture containing several objects, some close to the DVD Camcorder, others further away. b. A person enveloped in fog or surrounded by snow. c. Very shiny or glossy surfaces like a car. d. People or objects moving constantly or quickly like an athlete or a crowd. 1. Set the [Mode] switch to [DISC] or [CARD]. 2. Set the [Power] switch to [ (Camera)]. 3. Press the [MF/AF] button. The manual focus icon ( ) will blink. 4. Focus with the [VOL-] and [VOL+] buttons. Pressing the [VOL-] button will focus on the foreground image while pressing the [VOL+] button will focus on the background image. 5. To exit, press the [MF/AF] button. Note Manual Focus is not available in the EASY.Q mode. b d 34 STBY SP 0:00:00 -RW 30 min VR Near Far Mise au point auto./Mise au point man. fonctionne en Camera Mode et M.Cam Mode. page 28 Il est préférable, dans la plupart des cas, d'utiliser la mise au point automatique car elle vous permet de vous concentrer sur la partie créative de votre enregistrement. La mise au point manuelle peut s'avérer nécessaire dans certains cas où la mise au point automatique est difficile ou peu fiable. Mise au point automatique Si vous n'êtes pas familiarisé(e) avec les DVD caméscopes, nous vous conseillons d'utiliser la mise au point automatique. Mise au point manuelle Dans les situations suivantes, il est possible que vous obteniez de meilleurs résultats en faisant la mise au point manuellement. a. Image comportant plusieurs objets, certains proches du DVD caméscope, d'autres plus éloignés. b. sujet enveloppé par le brouillard ou se détachant sur un fond enneigé. c. surfaces brillantes ou luisantes comme une carrosserie de voiture. d. sujet ou objet se déplaçant de manière constante et rapide, tel un sportif ou une foule. 1. Placez l'interrupteur [Mode] sur [DISC] ou [CARD]. 2. Placez l'interrupteur [Power] sur [ (Camera)]. 3. Appuyez sur la touche [MF/AF]. L'icône de mise au point manuelle ( ) clignote. 4. Effectuez votre mise au point à l'aide des boutons [VOL-] et [VOL+]. Appuyez sur la touche [VOL-] bpour effectuer la mise au point sur l'image en avant plant tandis que la touche [VOL+] permet la mise au point sur l'arrière plan. 5. Appuyez sur la touche [MF/AF] pour quitter. Remarque La mise au point manuelle n'est pas accessible en mode EASY.Q. 53
-
 1
1 -
2
-
3
-
4
-
5
-
6
-
7
-
8
-
9
-
10
-
11
-
12
-
13
-
14
-
15
-
16
-
17
-
18
-
19
-
20
-
21
-
22
-
23
-
24
-
25
-
26
-
27
-
28
-
29
-
30
-
31
-
32
-
33
-
34
-
35
-
36
-
37
-
38
-
39
-
40
-
41
-
42
-
43
-
44
-
45
-
46
-
47
-
 48
48 -
 49
49 -
 50
50 -
 51
51 -
 52
52 -
 53
53 -
 54
54 -
 55
55 -
 56
56 -
 57
57 -
 58
58 -
59
-
60
-
61
-
62
-
63
-
64
-
65
-
66
-
67
-
68
-
69
-
70
-
71
-
72
-
73
-
74
-
75
-
76
-
77
-
78
-
79
-
80
-
81
-
82
-
83
-
84
-
85
-
86
-
87
-
88
-
89
-
90
-
91
-
92
-
93
-
94
-
95
-
96
-
97
-
98
-
99
-
100
-
101
-
102
-
103
-
104
-
105
-
106
-
107
-
108
-
109
-
110
-
111
-
112
-
113
-
114
-
115
-
116
-
117
-
118
-
119
-
120
-
121
-
122
-
123
-
124
-
125
-
126
-
127
-
128
-
129
-
130
-
131
-
132
 |
 |
