Samsung SCH A870 User Manual (ENGLISH) - Page 133
Take PIX, GET IT NOW, Get PIX, Options, Self Timer, White Balance, Shutter Sound, Color Effects, Erase
 |
View all Samsung SCH A870 manuals
Add to My Manuals
Save this manual to your list of manuals |
Page 133 highlights
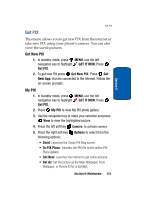
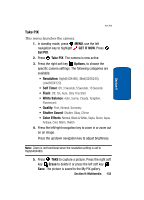
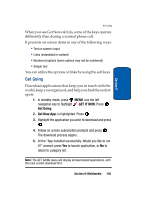
Section 9 Get PIX Take PIX This menu launches the camera. 1. In standby mode, press MENU, use the left navigation key to highlight GET IT NOW. Press Get PIX. 2. Press Take PIX. The camera is now active. 3. Press the right soft key Options, to choose the specific camera settings. The following categories are available: • Resolution: High(640X480), Med(320X240), Low(160X120) • Self Timer: Off, 3 Seconds, 5 Seconds, 10 Seconds • Flash: Off, On, Auto, Only This Shot • White Balance: Auto, Sunny, Cloudy, Tungsten, Fluorescent • Quality: Fine, Normal, Economy • Shutter Sound: Shutter, Okay, Chime • Color Effects: Normal, Black & White, Sepia, Green, Aqua, Antique, Cool, Warm, Sketch 4. Press the left/right navigation key to zoom in or zoom out on an image. Press the up/down navigation key to adjust brightness. Note: Zoom is not functional when the resolution setting is set to High(640X480). 5. Press TAKE to capture a picture. Press the right soft key Erase to delete it or press the left soft key Save. The picture is saved to the My PIX gallery. Section 9: Multimedia 133
-
 1
1 -
2
-
3
-
4
-
5
-
6
-
7
-
8
-
9
-
10
-
11
-
12
-
13
-
14
-
15
-
16
-
17
-
18
-
19
-
20
-
21
-
22
-
23
-
24
-
25
-
26
-
27
-
28
-
29
-
30
-
31
-
32
-
33
-
34
-
35
-
36
-
37
-
38
-
39
-
40
-
41
-
42
-
43
-
44
-
45
-
46
-
47
-
48
-
49
-
50
-
51
-
52
-
53
-
54
-
55
-
56
-
57
-
58
-
59
-
60
-
61
-
62
-
63
-
64
-
65
-
66
-
67
-
68
-
69
-
70
-
71
-
72
-
73
-
74
-
75
-
76
-
77
-
78
-
79
-
80
-
81
-
82
-
83
-
84
-
85
-
86
-
87
-
88
-
89
-
90
-
91
-
92
-
93
-
94
-
95
-
96
-
97
-
98
-
99
-
100
-
101
-
102
-
103
-
104
-
105
-
106
-
107
-
108
-
109
-
110
-
111
-
112
-
113
-
114
-
115
-
116
-
117
-
118
-
119
-
120
-
121
-
122
-
123
-
124
-
125
-
126
-
127
-
 128
128 -
 129
129 -
 130
130 -
 131
131 -
 132
132 -
 133
133 -
 134
134 -
 135
135 -
 136
136 -
 137
137 -
 138
138 -
139
-
140
-
141
-
142
-
143
-
144
-
145
-
146
-
147
-
148
-
149
-
150
-
151
-
152
-
153
-
154
-
155
-
156
-
157
-
158
-
159
-
160
-
161
-
162
-
163
-
164
-
165
-
166
-
167
-
168
-
169
-
170
-
171
-
172
-
173
-
174
-
175
-
176
-
177
-
178
-
179
-
180
-
181
-
182
-
183
-
184
-
185
-
186
-
187
-
188
-
189
-
190
-
191
-
192
-
193
-
194
-
195
-
196
 |
 |
