Samsung SGH-T439 User Manual - Page 51
New recipient
 |
View all Samsung SGH-T439 manuals
Add to My Manuals
Save this manual to your list of manuals |
Page 51 highlights
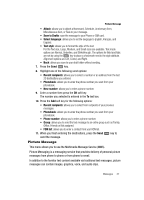
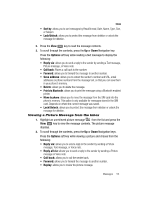
Voice Note 4. Record a memo by speaking into the phone's microphone. The display simultaneously shows the elapsed time and the remaining time. 5. Press the Stop soft key when you are finished recording. Or, when the recording time is expired, the display advances to the next screen. Note: Your voice note automatically saves a temporary voice note file in the Voice list. To create a permanent voice note file, save it (as a Voice Note) in the Voice List folder. 6. Press the Options soft key for the following options: • Send to: allows you to send the Voice note. • Play: plays back your Voice note. • Re-record: discards the previous Voice note and enables you to record a new voice note. • Set default destination: allows you to remove or edit the default destination. • Set as: allows you to save the voice note as a Default ringtone, Individual ringtone, or Alarm tone. • Save: saves this recorded voice note to the voice list. 7. Press the Send soft key or select the Send to option in the Options menu to send the Voice note. 8. Highlight one of the following send options: • Recent recipients: allows you to select either a number or an address from the last 20 destinations you entered. • Phonebook: allows you to enter the phone number you want from your phonebook. • New recipient: allows you to manually enter a phone number or email address. • My Album: allows you to send the message to My Album. • My Journal: allows you to send the message to My Journal. 9. Highlight the selection and press the key to mark the selection. 10. Press the Add soft key. The number you selected is entered in the To text box. 11. If you selected more than two recipients, press the Options soft key for the following options: • Add recipients: allows you to add additional recipients to this Voice note. • Change recipient: allows you to select To, Cc or Bcc additional numbers. 12. Press the Send key to send this voice note. Your phone sends the message. The message saves to the Outbox after it successfully sends. Messages 51
-
 1
1 -
2
-
3
-
4
-
5
-
6
-
7
-
8
-
9
-
10
-
11
-
12
-
13
-
14
-
15
-
16
-
17
-
18
-
19
-
20
-
21
-
22
-
23
-
24
-
25
-
26
-
27
-
28
-
29
-
30
-
31
-
32
-
33
-
34
-
35
-
36
-
37
-
38
-
39
-
40
-
41
-
42
-
43
-
44
-
45
-
 46
46 -
 47
47 -
 48
48 -
 49
49 -
 50
50 -
 51
51 -
 52
52 -
 53
53 -
 54
54 -
 55
55 -
 56
56 -
57
-
58
-
59
-
60
-
61
-
62
-
63
-
64
-
65
-
66
-
67
-
68
-
69
-
70
-
71
-
72
-
73
-
74
-
75
-
76
-
77
-
78
-
79
-
80
-
81
-
82
-
83
-
84
-
85
-
86
-
87
-
88
-
89
-
90
-
91
-
92
-
93
-
94
-
95
-
96
-
97
-
98
-
99
-
100
-
101
-
102
-
103
-
104
-
105
-
106
-
107
-
108
-
109
-
110
-
111
-
112
-
113
-
114
-
115
-
116
-
117
-
118
-
119
-
120
-
121
-
122
-
123
-
124
-
125
-
126
-
127
-
128
-
129
-
130
-
131
-
132
-
133
-
134
-
135
-
136
-
137
-
138
-
139
-
140
-
141
-
142
-
143
-
144
-
145
-
146
-
147
-
148
-
149
-
150
-
151
-
152
-
153
-
154
-
155
-
156
-
157
-
158
-
159
-
160
-
161
-
162
-
163
-
164
-
165
-
166
-
167
-
168
-
169
-
170
-
171
 |
 |
